We’ve all been there: it’s 3:00 PM (or, let’s be real, 11:00 PM), and that familiar little voice starts whispering for something sweet. Not just a piece of fruit—I’m talking about that soul-satisfying, sugar-dusted, chocolate-drizzled kind of magic. Whether you’re looking for a quick “desk snack” to get you through the workday or a decadent treat to cap off a cozy movie night, you deserve more than just a stale granola bar. Today, I’m diving into my personal vault of must-try sweet snacks that are as easy to whip up as they are to devour. Get ready to satisfy those cravings with treats that strike the perfect balance between “I can’t believe I made this” and “I need another bite immediately.”
Lemon Meringue Tartlets
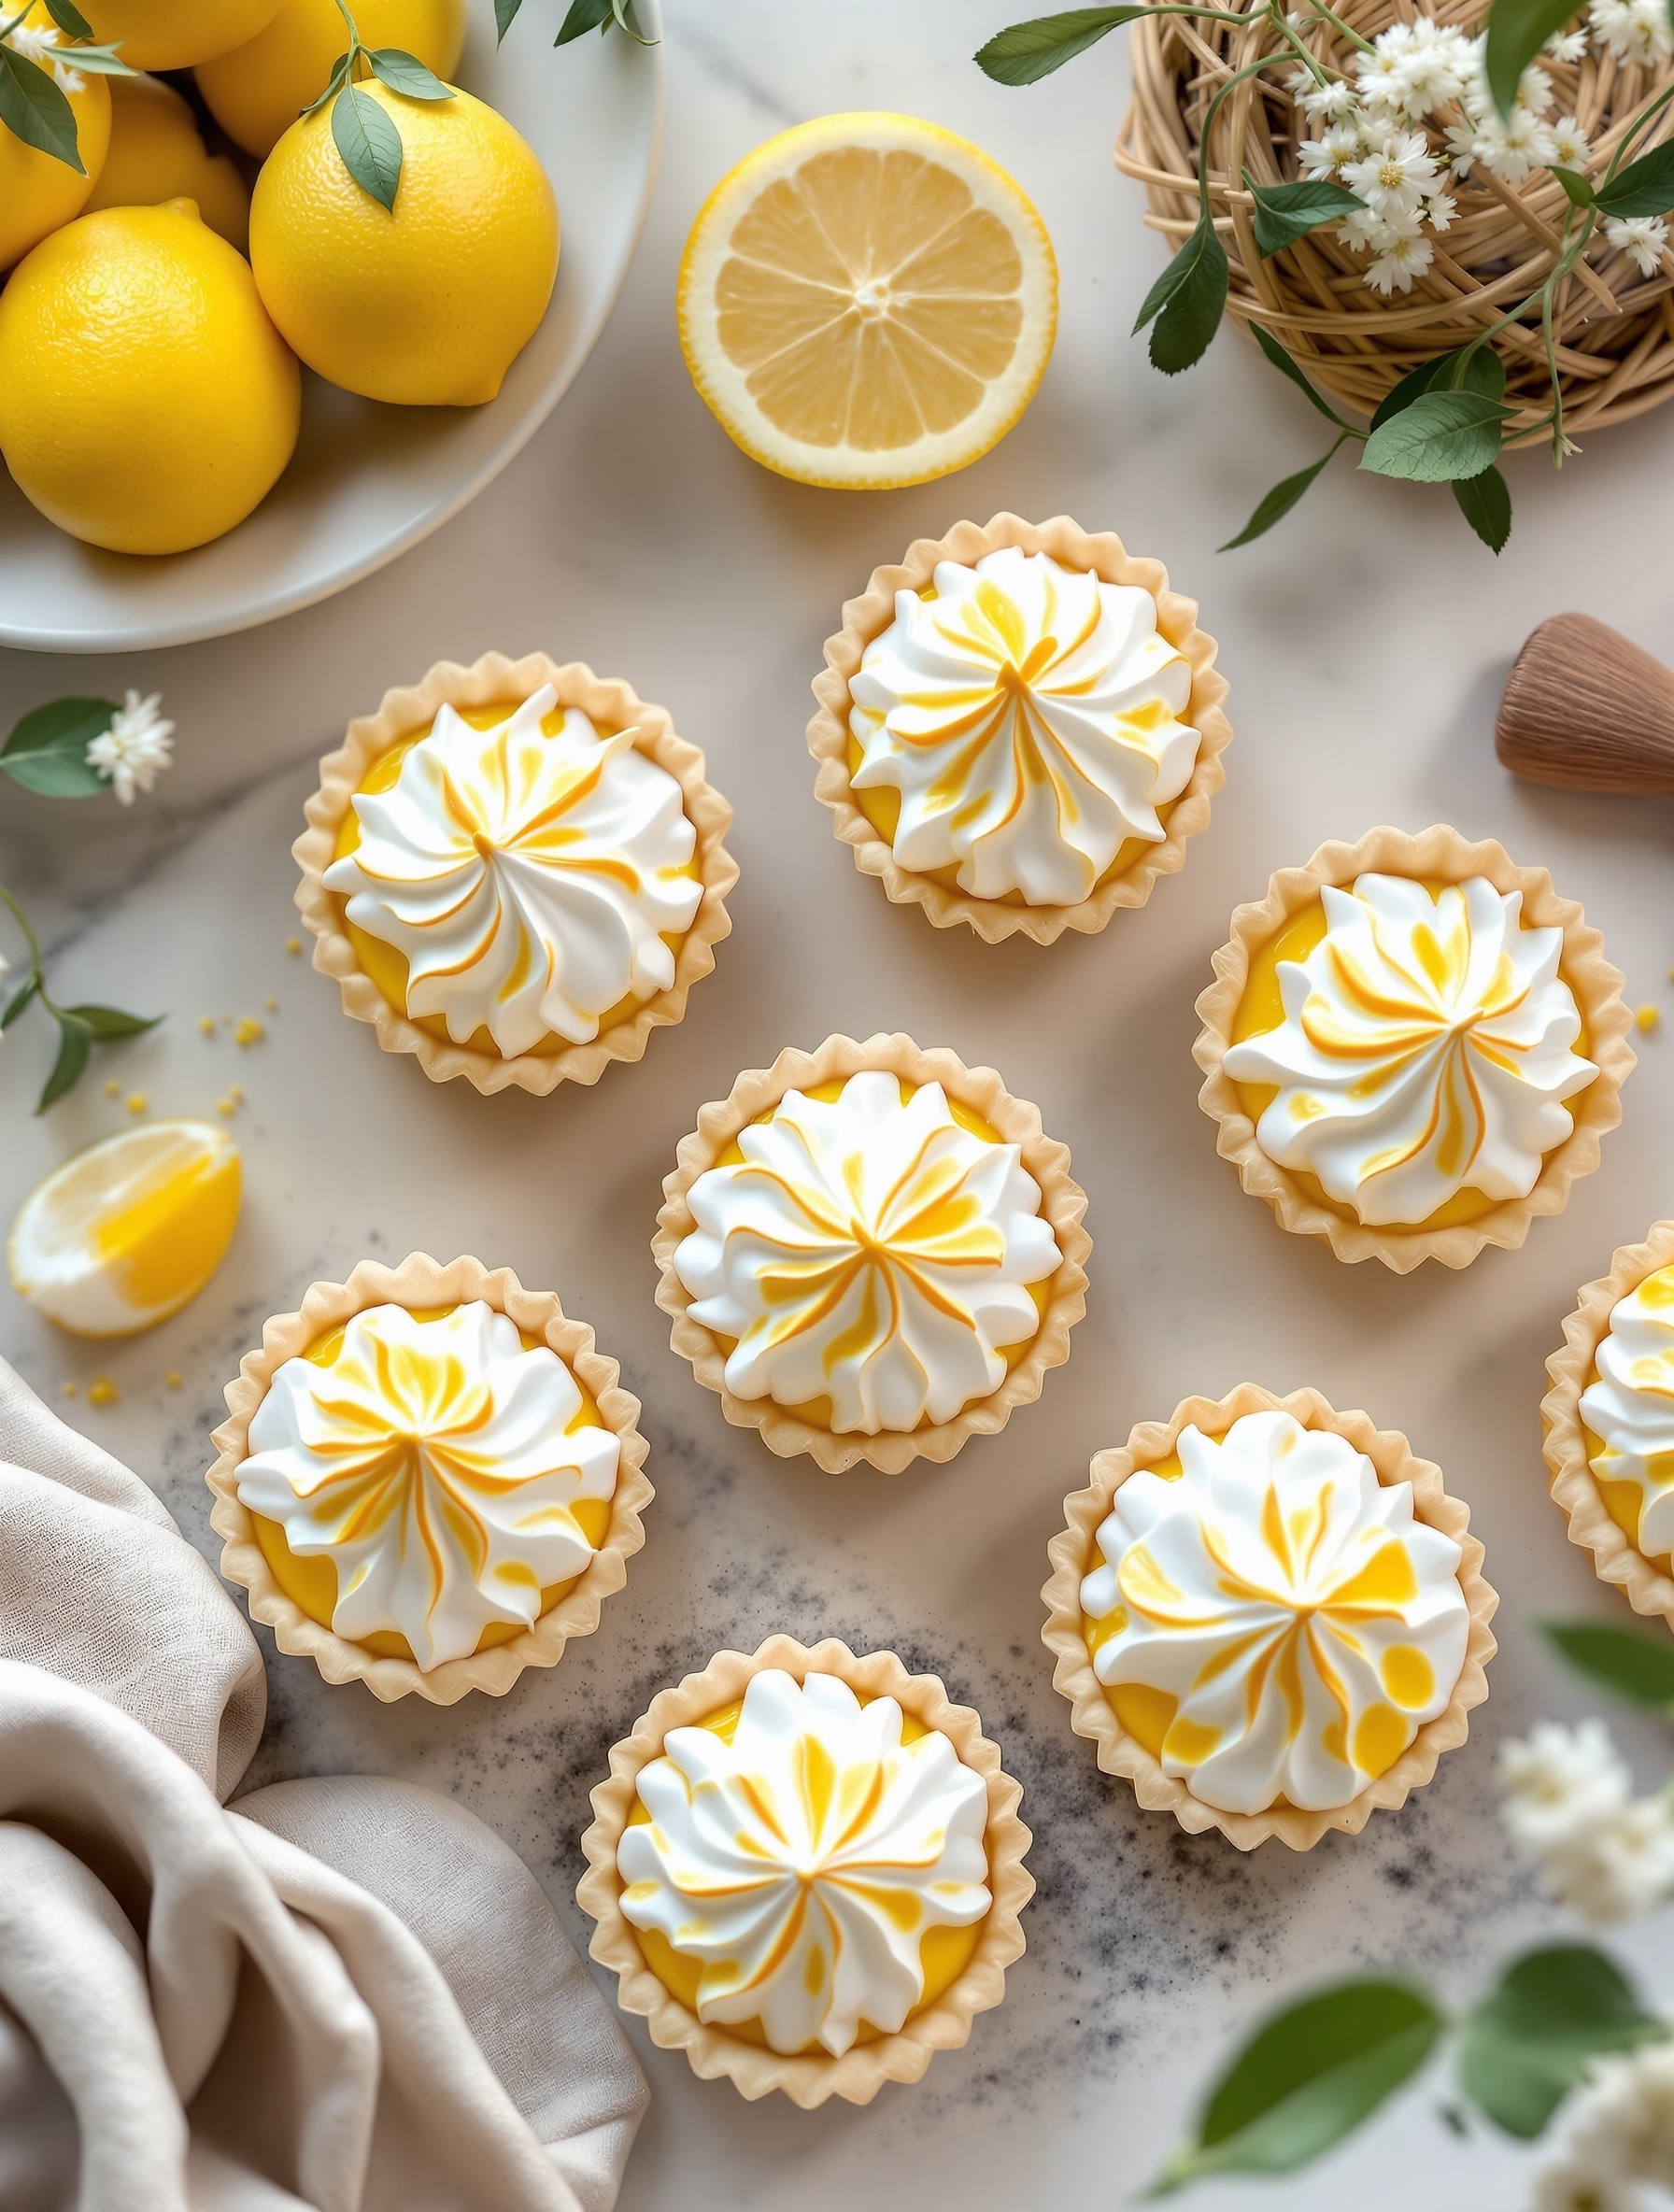
Lemon meringue tartlets are a delightful treat that brings a burst of sunshine to any dessert table. These mini tarts feature a crisp, buttery crust filled with tangy lemon curd, topped with fluffy meringue. The combination of sweet and tart flavors makes them irresistible!
In the image, you can see these charming tartlets, beautifully arranged and topped with swirls of meringue. The vibrant yellow of the lemon curd contrasts perfectly with the white meringue, creating an eye-catching dessert. Fresh lemons and greenery in the background add a refreshing touch, making it clear that these tartlets are perfect for spring and summer gatherings.
Making lemon meringue tartlets is easier than you might think. With a few simple ingredients and steps, you can whip up these tasty treats that will impress your friends and family. Let’s get into the recipe!
Peanut Butter Banana Bites
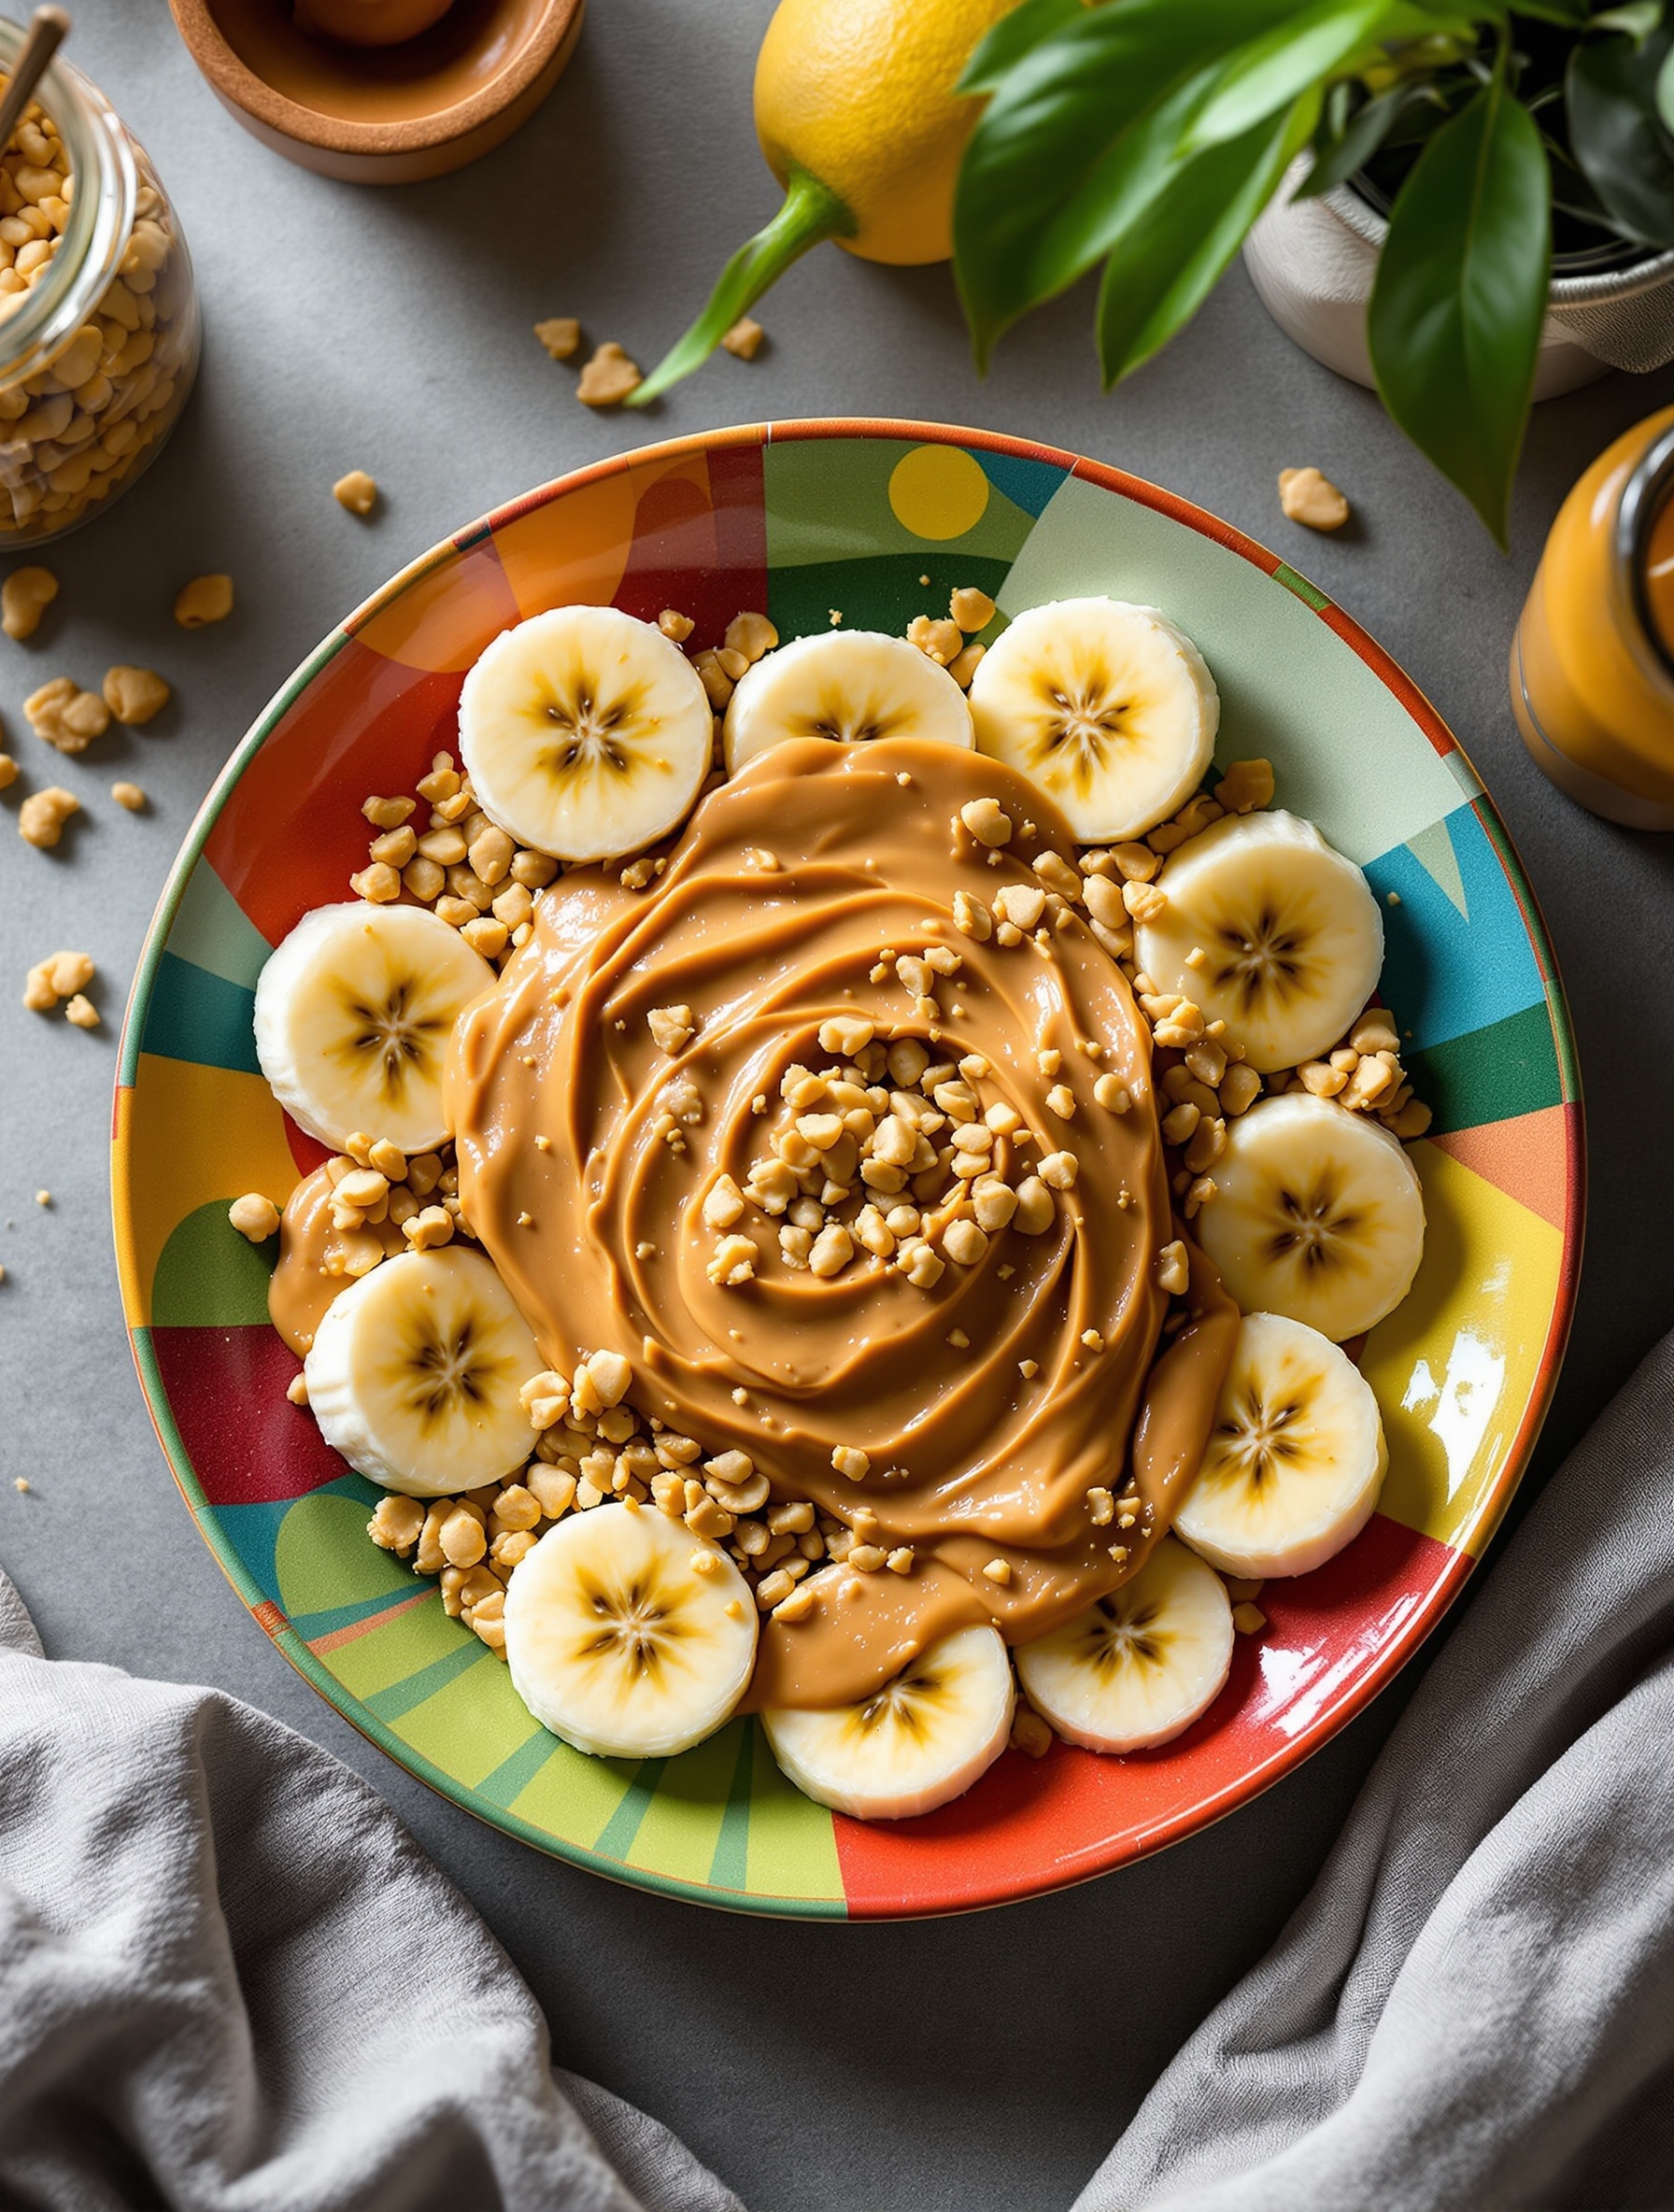
Peanut butter banana bites are a simple and tasty treat that everyone loves. This delightful snack combines the creaminess of peanut butter with the sweetness of bananas. The colorful plate adds a fun touch, making it perfect for kids and adults alike.
To make these bites, slice fresh bananas and spread a generous layer of peanut butter on top. You can sprinkle some chopped nuts or granola for added crunch. This snack is not only delicious but also packed with nutrients, making it a great choice for a quick energy boost.
These bites are versatile too! You can enjoy them as a post-workout snack or a sweet dessert after dinner. They’re easy to prepare and can be made in just a few minutes. Plus, they look great on a plate, making them perfect for sharing.
Ingredients
- 2 ripe bananas
- 1/2 cup peanut butter
- 1/4 cup chopped nuts or granola (optional)
- Honey or maple syrup (optional, for drizzling)
Instructions
- Slice the bananas into thick rounds.
- Spread a layer of peanut butter on each banana slice.
- If desired, sprinkle chopped nuts or granola on top of the peanut butter.
- Drizzle with honey or maple syrup for extra sweetness, if you like.
- Serve immediately and enjoy your delicious peanut butter banana bites!
Chocolate-Covered Strawberry Bites
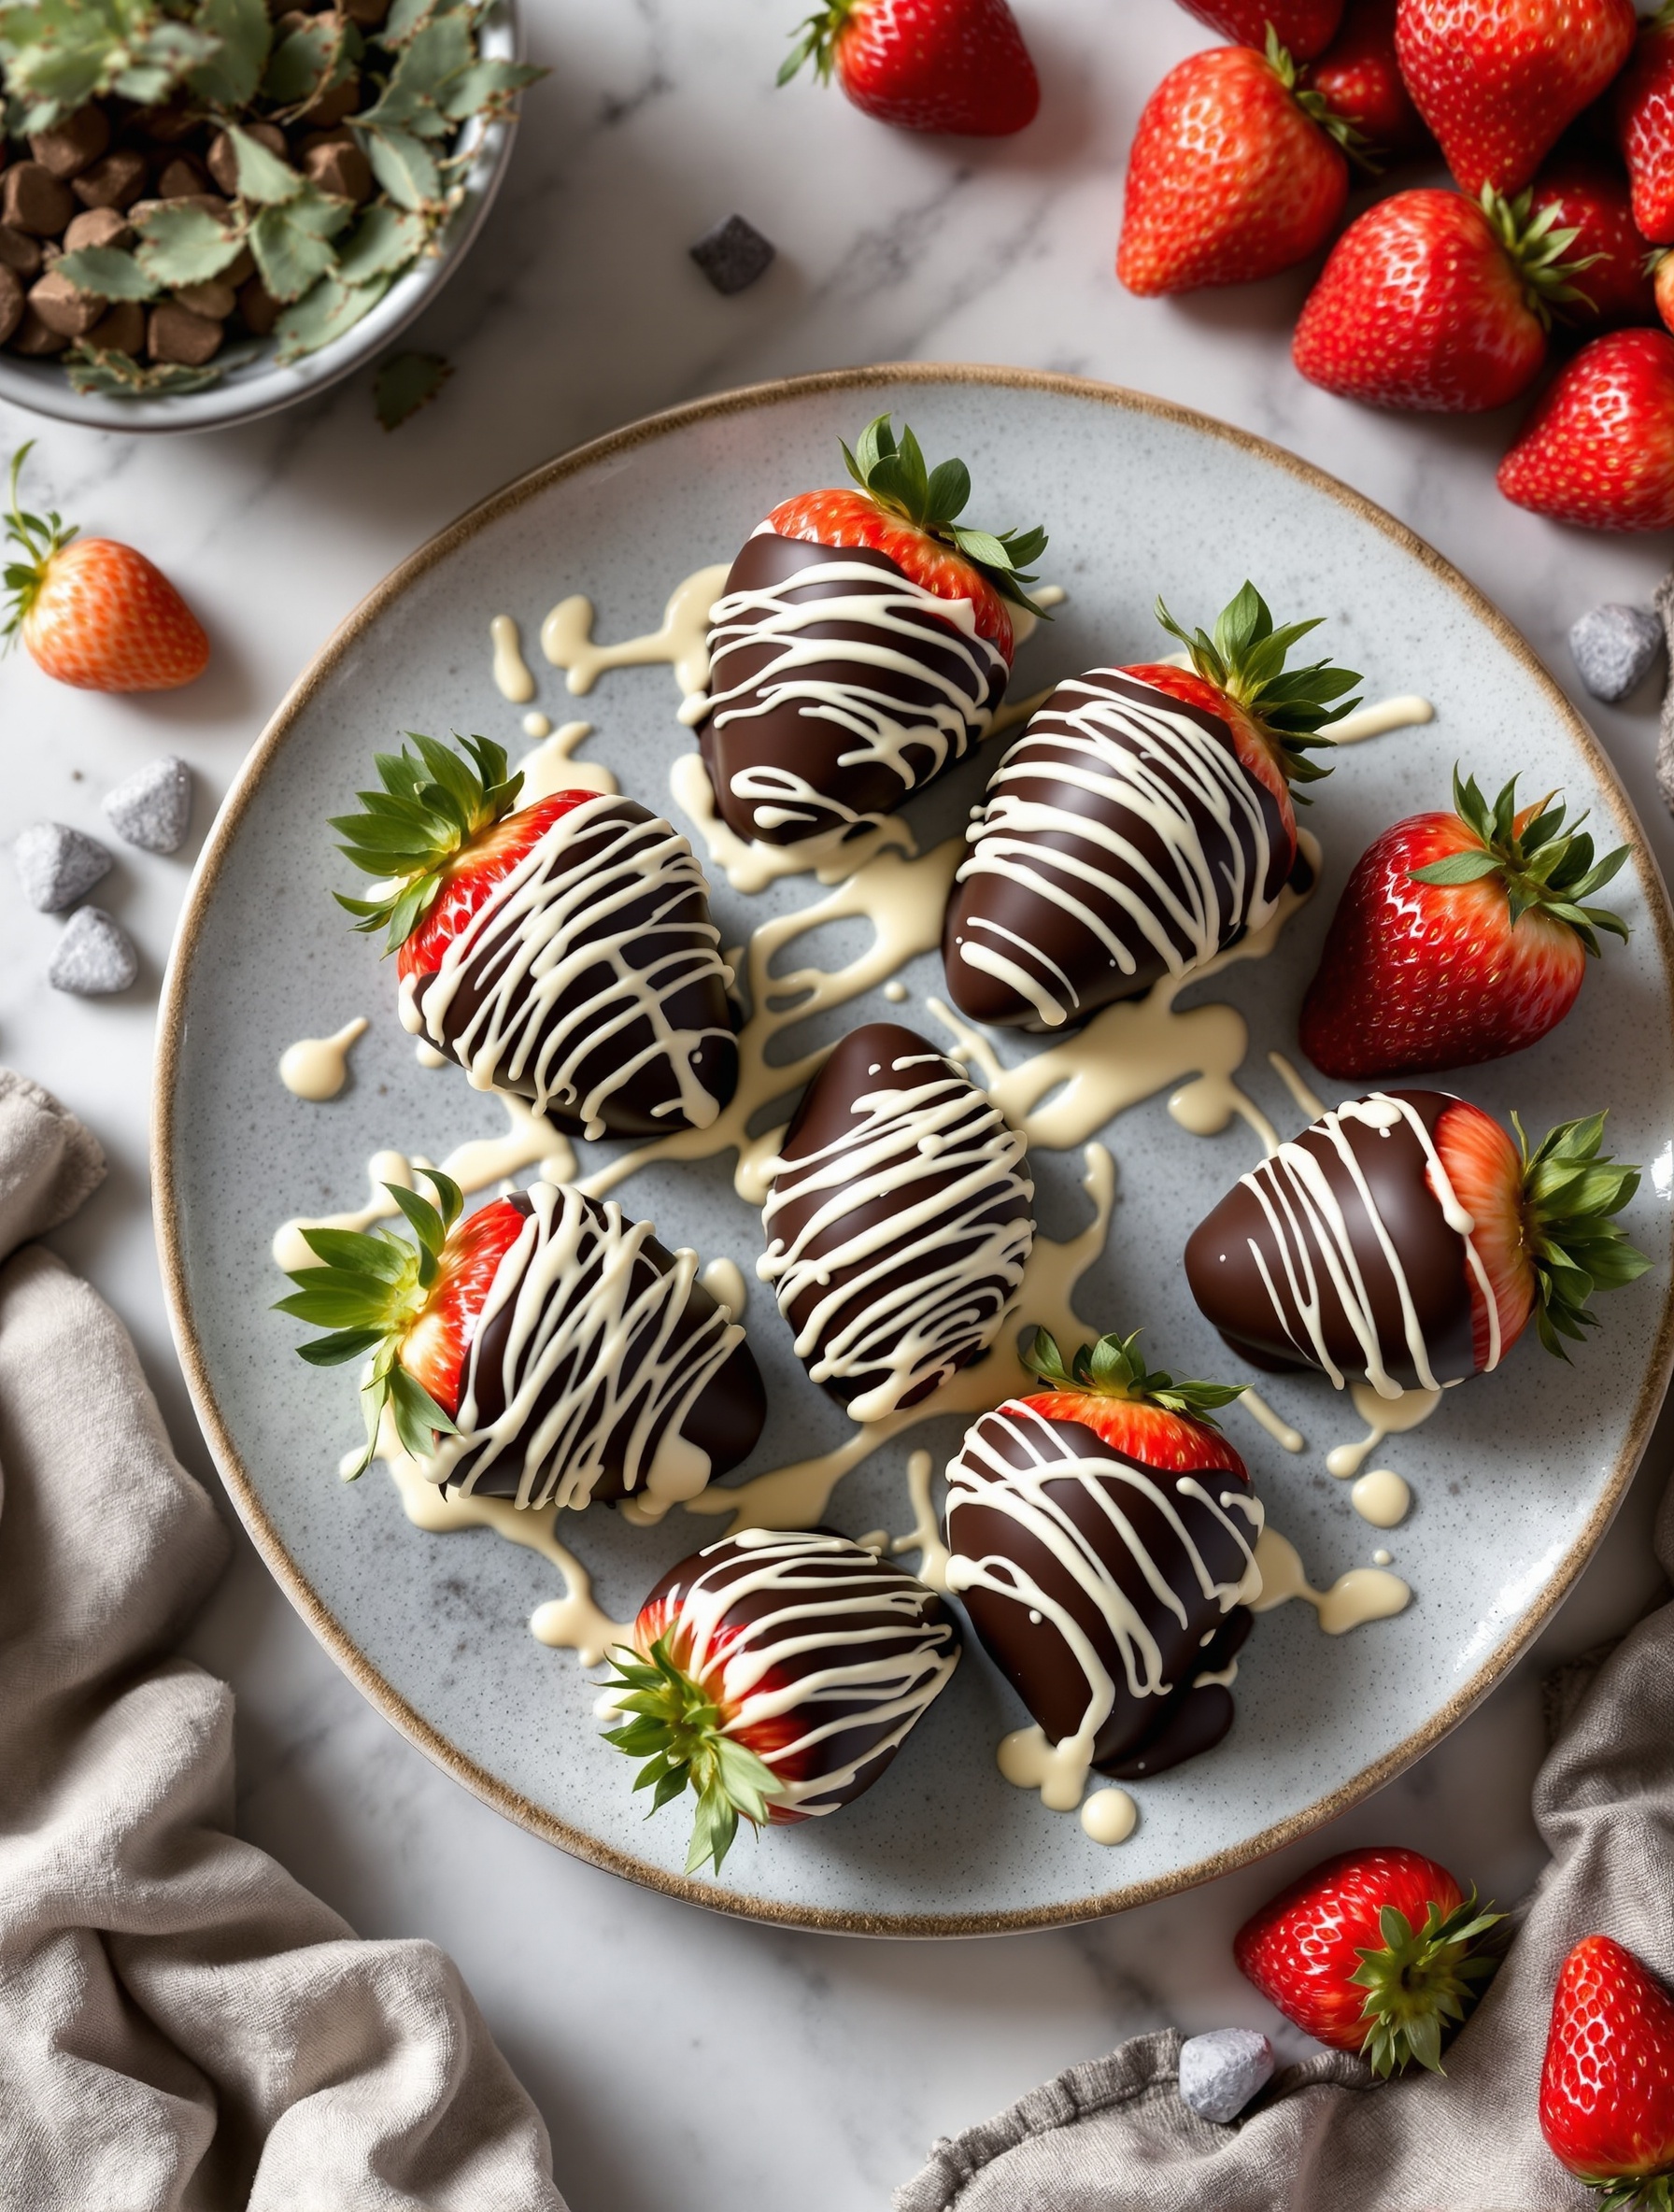
Chocolate-covered strawberries are a classic treat that never fails to impress. They combine the sweetness of ripe strawberries with the rich flavor of chocolate, creating a delightful snack. The image shows beautifully dipped strawberries, drizzled with white chocolate for an extra touch of elegance. These bites are perfect for any occasion, whether it’s a romantic dinner or a fun gathering with friends.
Making chocolate-covered strawberries is simple and fun. You can customize them with different types of chocolate and toppings. They’re not just tasty; they also look stunning on any dessert table!
Ingredients
- 1 pound fresh strawberries
- 8 ounces dark chocolate, chopped
- 4 ounces white chocolate, chopped
- 1 tablespoon coconut oil (optional, for smooth melting)
Instructions
- Wash and dry the strawberries thoroughly. Make sure they are completely dry to help the chocolate stick.
- In a microwave-safe bowl, melt the dark chocolate. Heat in 30-second intervals, stirring in between, until smooth. If using coconut oil, add it to the chocolate to achieve a smoother consistency.
- Dip each strawberry into the melted dark chocolate, allowing the excess to drip off. Place them on a parchment-lined baking sheet.
- Next, melt the white chocolate using the same method. Drizzle the white chocolate over the dark chocolate-covered strawberries for a decorative touch.
- Let the strawberries sit at room temperature or refrigerate until the chocolate hardens. Enjoy your delicious chocolate-covered strawberry bites!
Salted Caramel Brownies
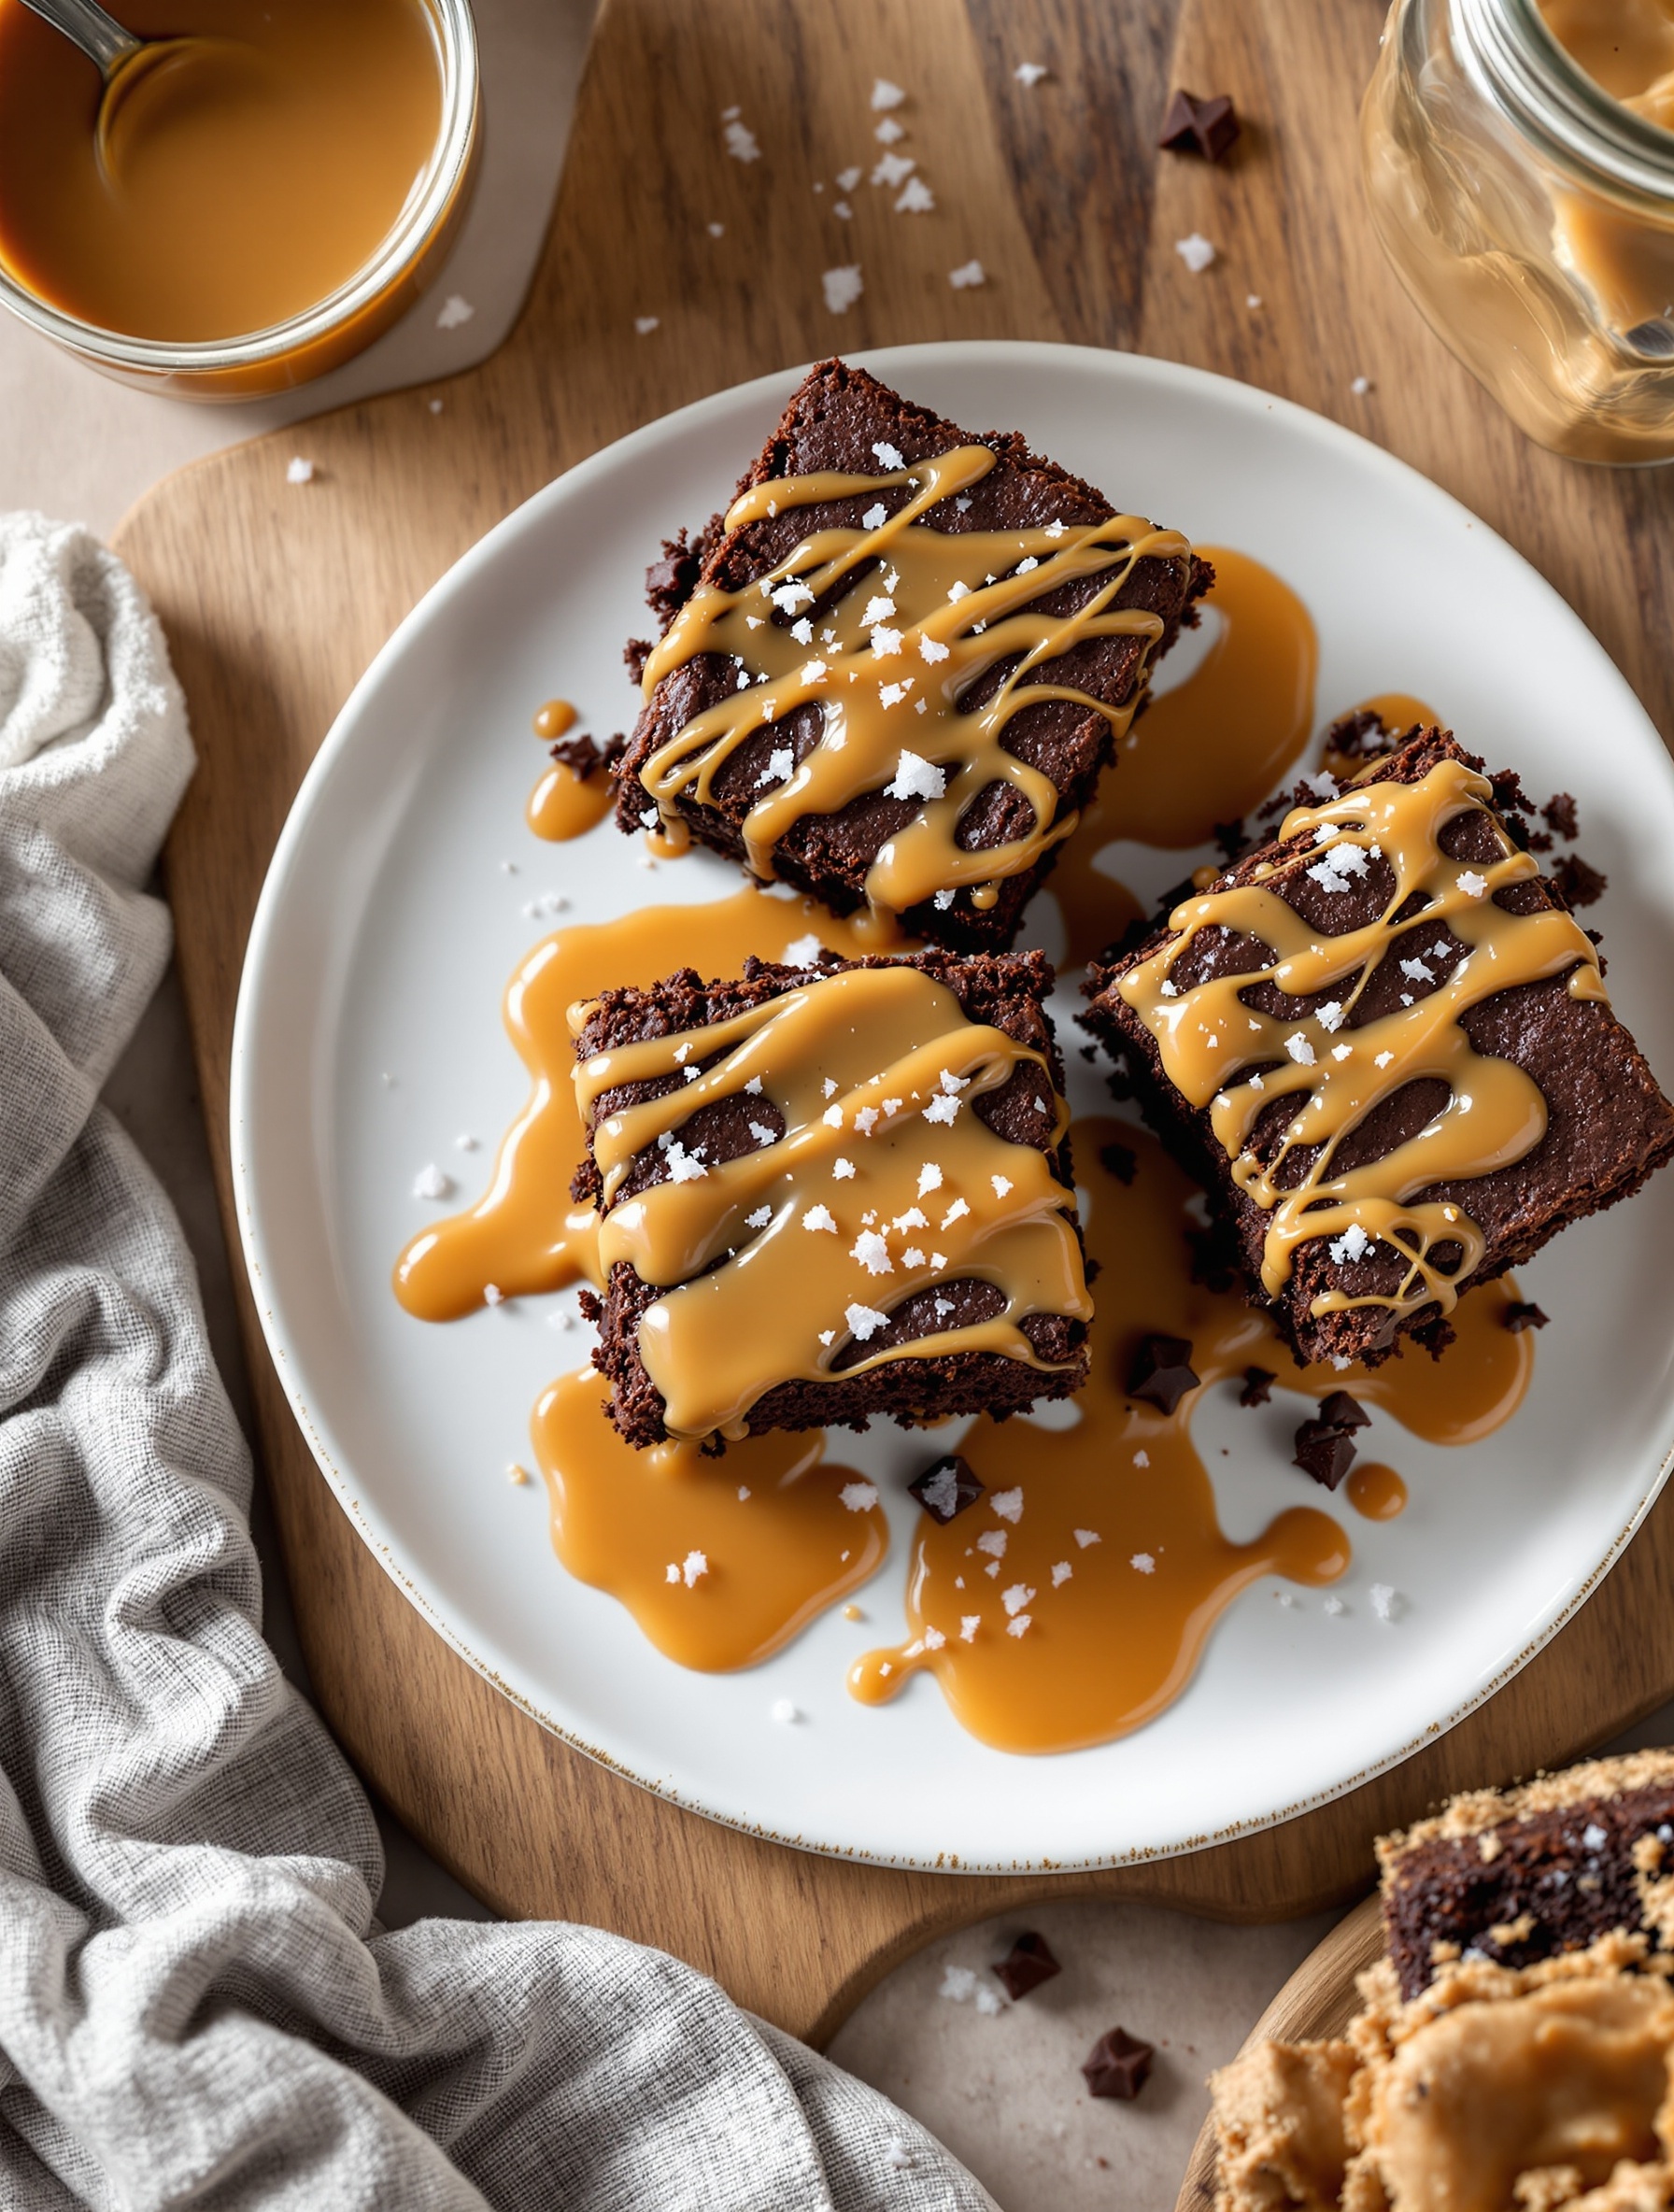
Salted caramel brownies are a delightful treat that combines rich chocolate with the sweet and salty goodness of caramel. The image shows a plate of these brownies, drizzled with a luscious caramel sauce and sprinkled with a touch of sea salt. They look so tempting and are perfect for any dessert lover!
To make these brownies, you’ll need a few simple ingredients. The combination of chocolate and caramel creates a wonderful balance of flavors. The brownies are fudgy and moist, making them a favorite for gatherings or a cozy night in.
Let’s get to the recipe so you can whip up a batch of these delicious salted caramel brownies!
Ingredients
- 1 cup unsalted butter
- 2 cups granulated sugar
- 4 large eggs
- 1 teaspoon vanilla extract
- 1 cup all-purpose flour
- 1 cup cocoa powder
- 1/2 teaspoon salt
- 1 cup caramel sauce
- 1 teaspoon sea salt for topping
Instructions
- Preheat your oven to 350°F (175°C). Grease a 9×13 inch baking pan.
- In a saucepan, melt the butter over medium heat. Once melted, remove from heat and stir in the sugar until well combined.
- Add the eggs, one at a time, mixing well after each addition. Stir in the vanilla extract.
- In a separate bowl, whisk together the flour, cocoa powder, and salt. Gradually add this dry mixture to the wet ingredients, stirring until just combined.
- Pour half of the brownie batter into the prepared pan. Drizzle half of the caramel sauce over the batter. Pour the remaining brownie batter on top, and then drizzle the rest of the caramel sauce.
- Use a knife to swirl the caramel into the brownie batter lightly.
- Bake for 25-30 minutes or until a toothpick inserted comes out with a few moist crumbs.
- Once cooled, sprinkle sea salt on top. Cut into squares and enjoy!
Mini Cheesecake Jars
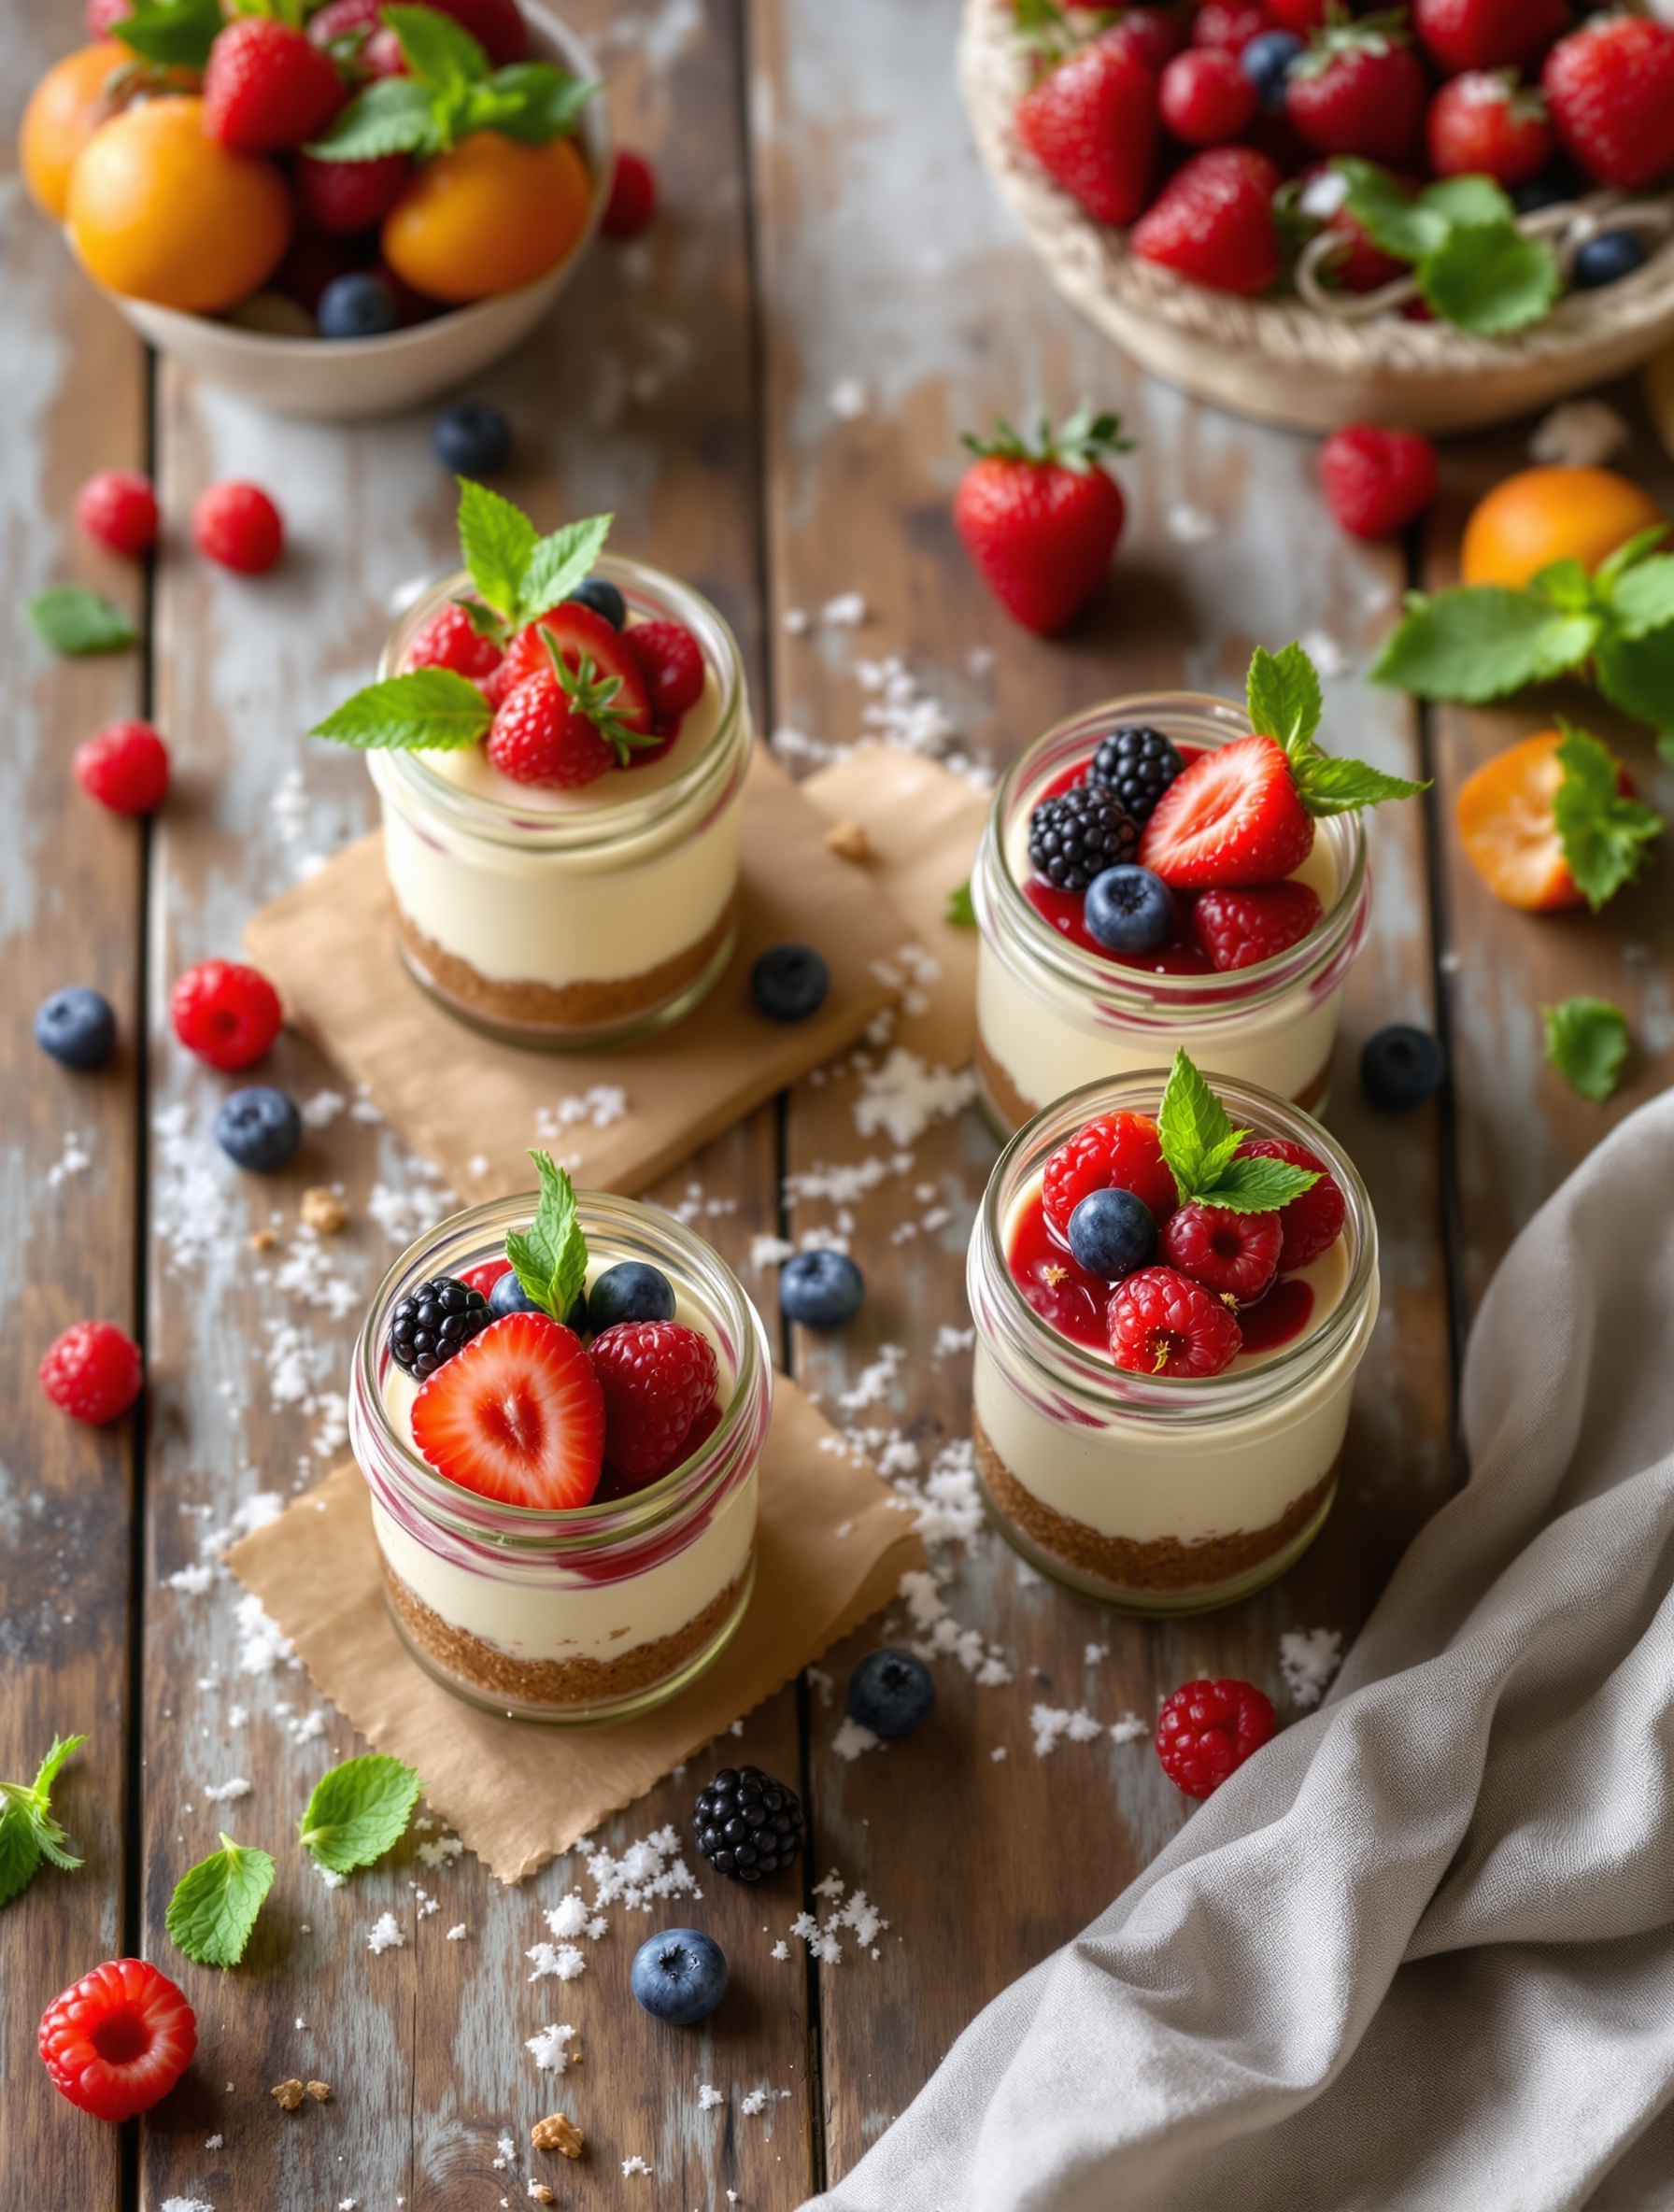
Mini cheesecake jars are a delightful treat that combines creamy cheesecake with a crunchy crust, all served in adorable little jars. These desserts are perfect for parties or a cozy night in. The jars not only make for easy serving but also add a fun twist to traditional cheesecake.
In the image, you can see several mini cheesecake jars topped with fresh berries and mint leaves. The vibrant colors of the strawberries, blueberries, and raspberries pop against the creamy cheesecake, making them visually appealing. Surrounding the jars are more berries and some citrus fruits, adding to the fresh and fruity vibe.
These mini cheesecakes are not just pretty; they are also simple to make. You can customize them with different toppings or flavors to suit your taste. Let’s get into how to whip up these tasty treats!
Ingredients
- 1 cup graham cracker crumbs
- 1/4 cup unsalted butter, melted
- 2 cups cream cheese, softened
- 1/2 cup granulated sugar
- 1 teaspoon vanilla extract
- 1 cup heavy cream
- Fresh berries for topping
- Mint leaves for garnish
Instructions
- Prepare the Crust: In a bowl, mix graham cracker crumbs with melted butter until combined. Spoon the mixture into the bottom of each jar, pressing it down firmly.
- Make the Cheesecake Filling: In another bowl, beat the softened cream cheese with sugar and vanilla until smooth. In a separate bowl, whip the heavy cream until stiff peaks form. Gently fold the whipped cream into the cream cheese mixture.
- Layer the Cheesecake: Spoon the cheesecake filling over the crust in each jar, filling them about three-quarters full.
- Chill: Cover the jars and refrigerate for at least 4 hours, or overnight for best results.
- Serve: Before serving, top each jar with fresh berries and a sprig of mint. Enjoy your mini cheesecakes!
Fruit and Yogurt Parfaits
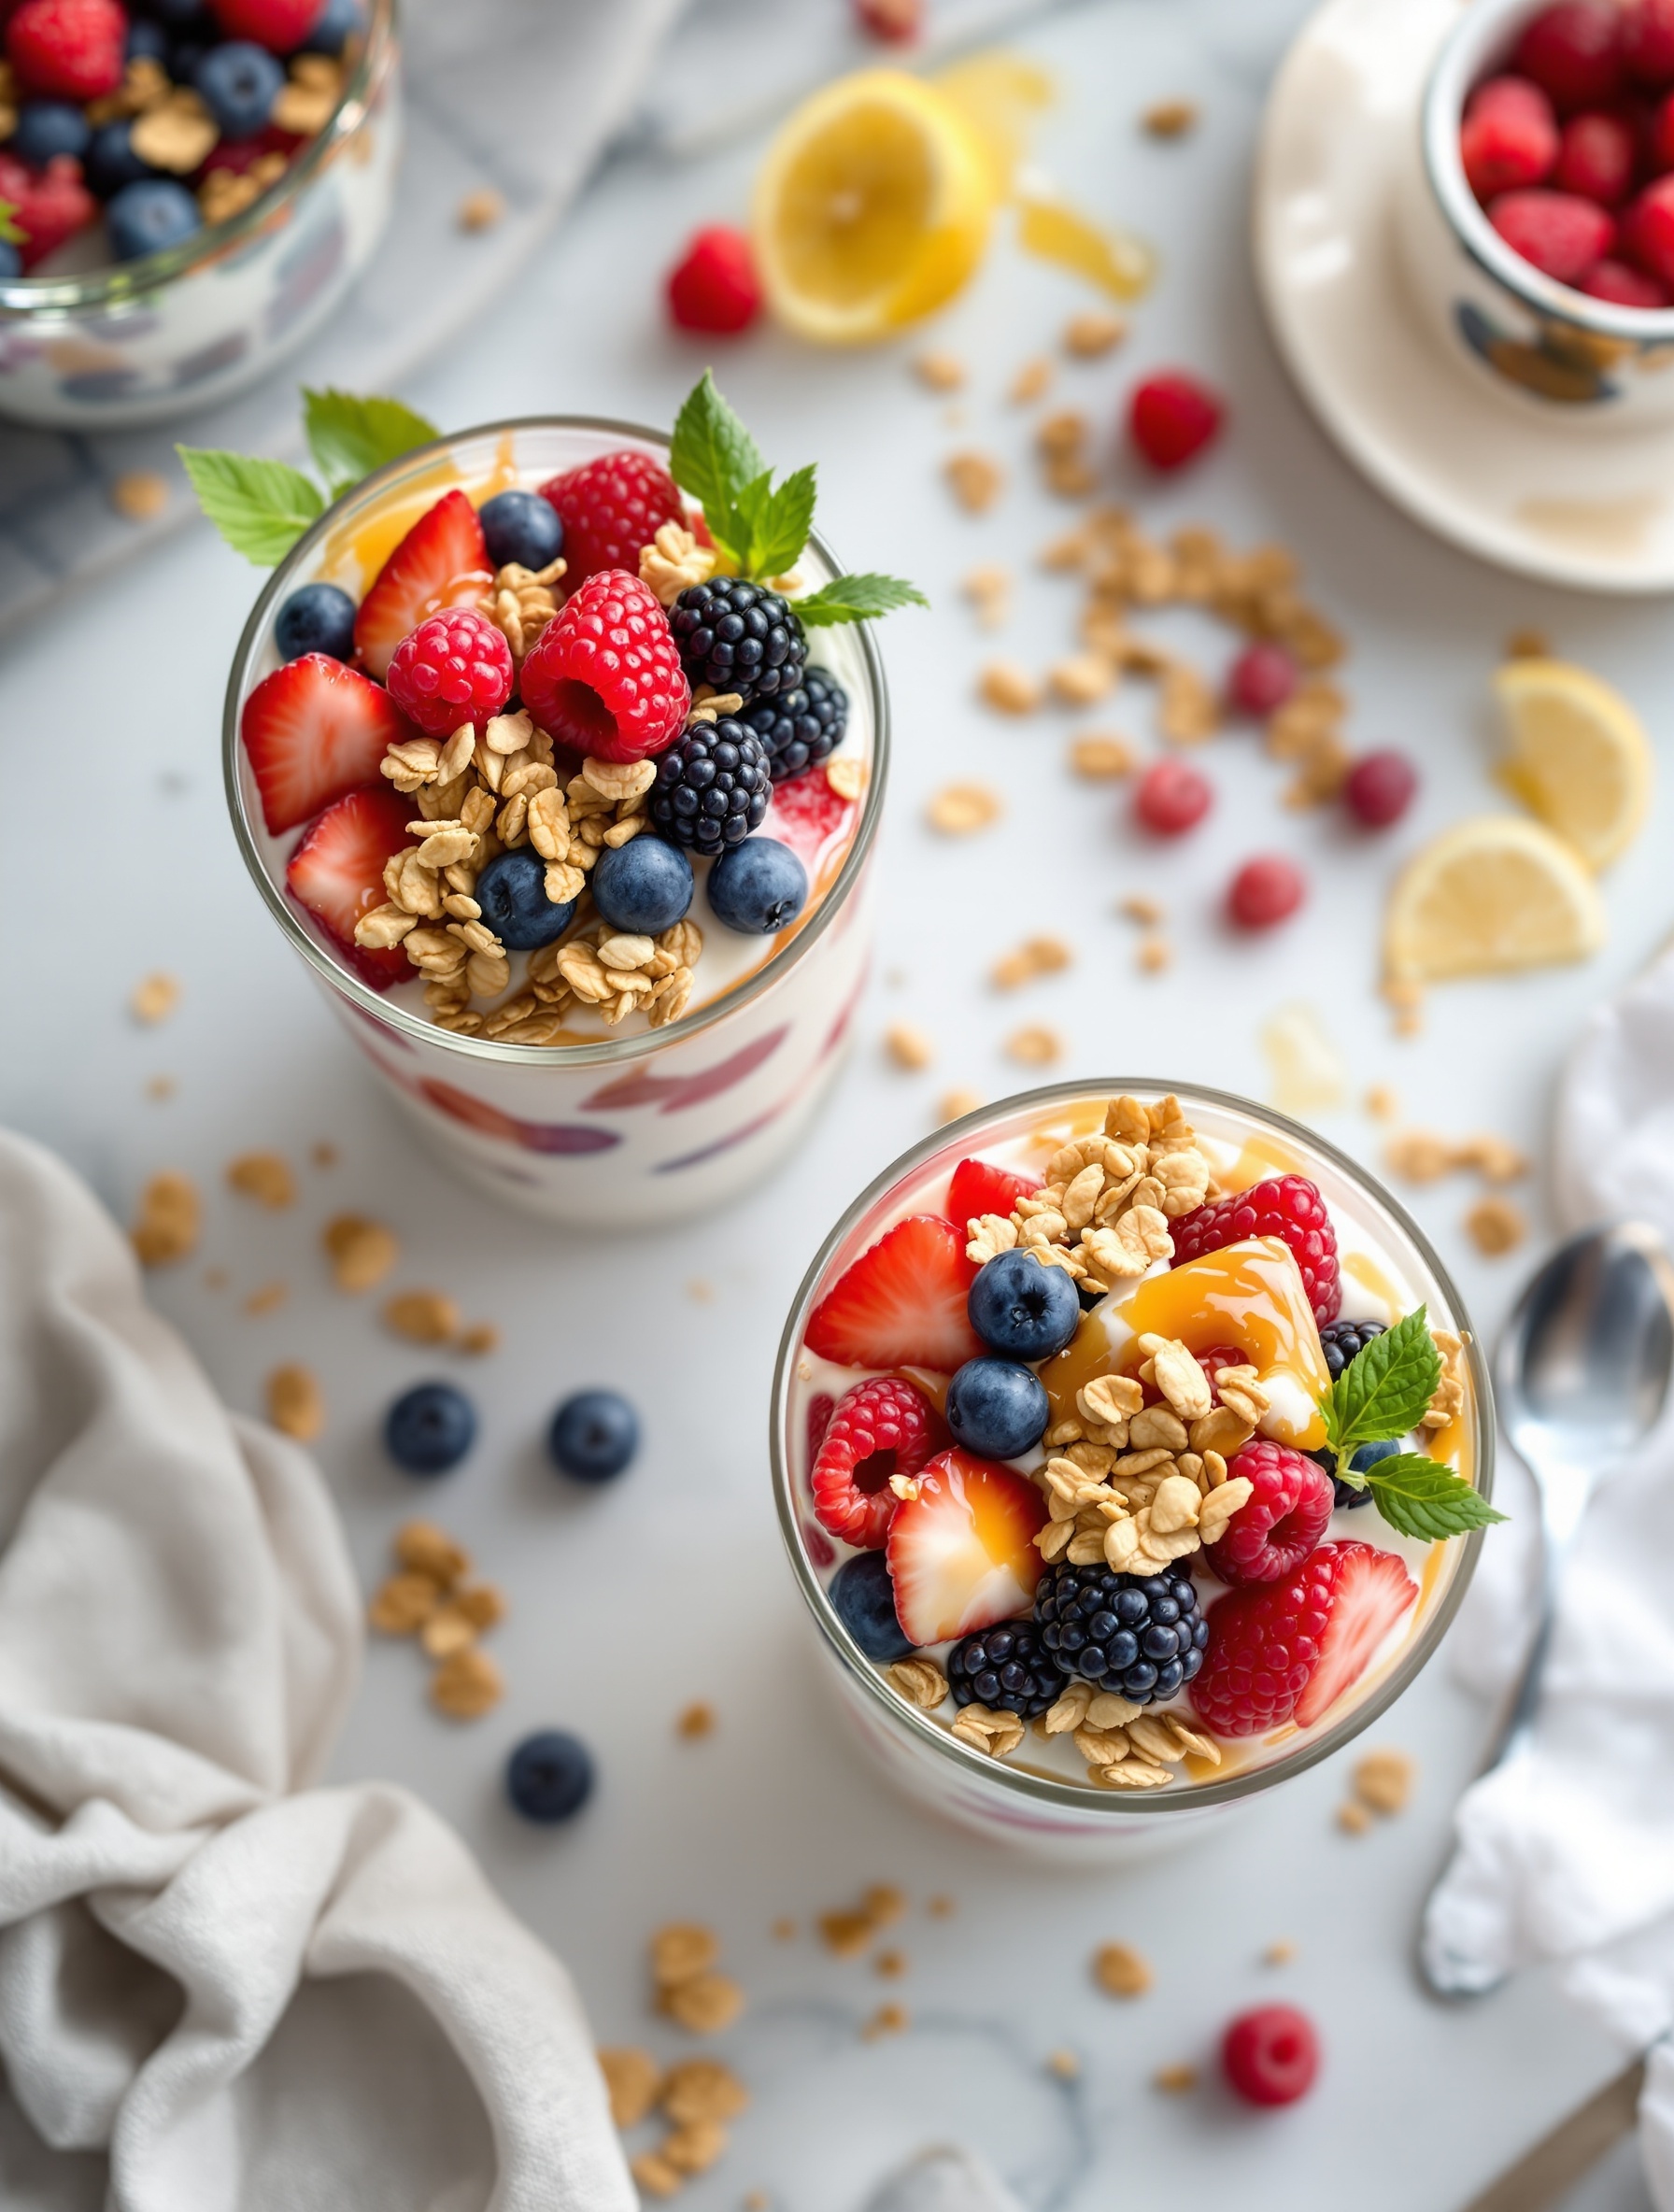
Fruit and yogurt parfaits are a delightful way to enjoy a sweet snack. They are colorful, tasty, and packed with nutrients. The layers of creamy yogurt, fresh fruits, and crunchy granola create a perfect balance of flavors and textures. You can customize them with your favorite fruits and toppings, making them a versatile treat for any occasion.
To make a fruit and yogurt parfait, start with a glass or bowl. Layer your choice of yogurt at the bottom. Then, add a layer of mixed berries like strawberries, blueberries, and raspberries. Sprinkle some granola on top for crunch. Repeat the layers until the glass is full. Finish with a sprig of mint for a pop of color.
This snack is not only delicious but also healthy. It’s a great way to satisfy your sweet tooth without the guilt. Perfect for breakfast, a snack, or even dessert!
Ingredients
- 2 cups Greek yogurt
- 1 cup mixed berries (strawberries, blueberries, raspberries)
- 1 cup granola
- Honey or maple syrup (optional)
- Fresh mint leaves for garnish
Instructions
- In a glass or bowl, add a layer of Greek yogurt at the bottom.
- Add a layer of mixed berries over the yogurt.
- Sprinkle a layer of granola on top of the berries.
- Repeat the layers until the glass is full, finishing with berries and granola on top.
- Drizzle with honey or maple syrup if desired, and garnish with fresh mint leaves.
- Serve immediately and enjoy your delicious fruit and yogurt parfait!
Chocolate Chip Cookie Dough Truffles
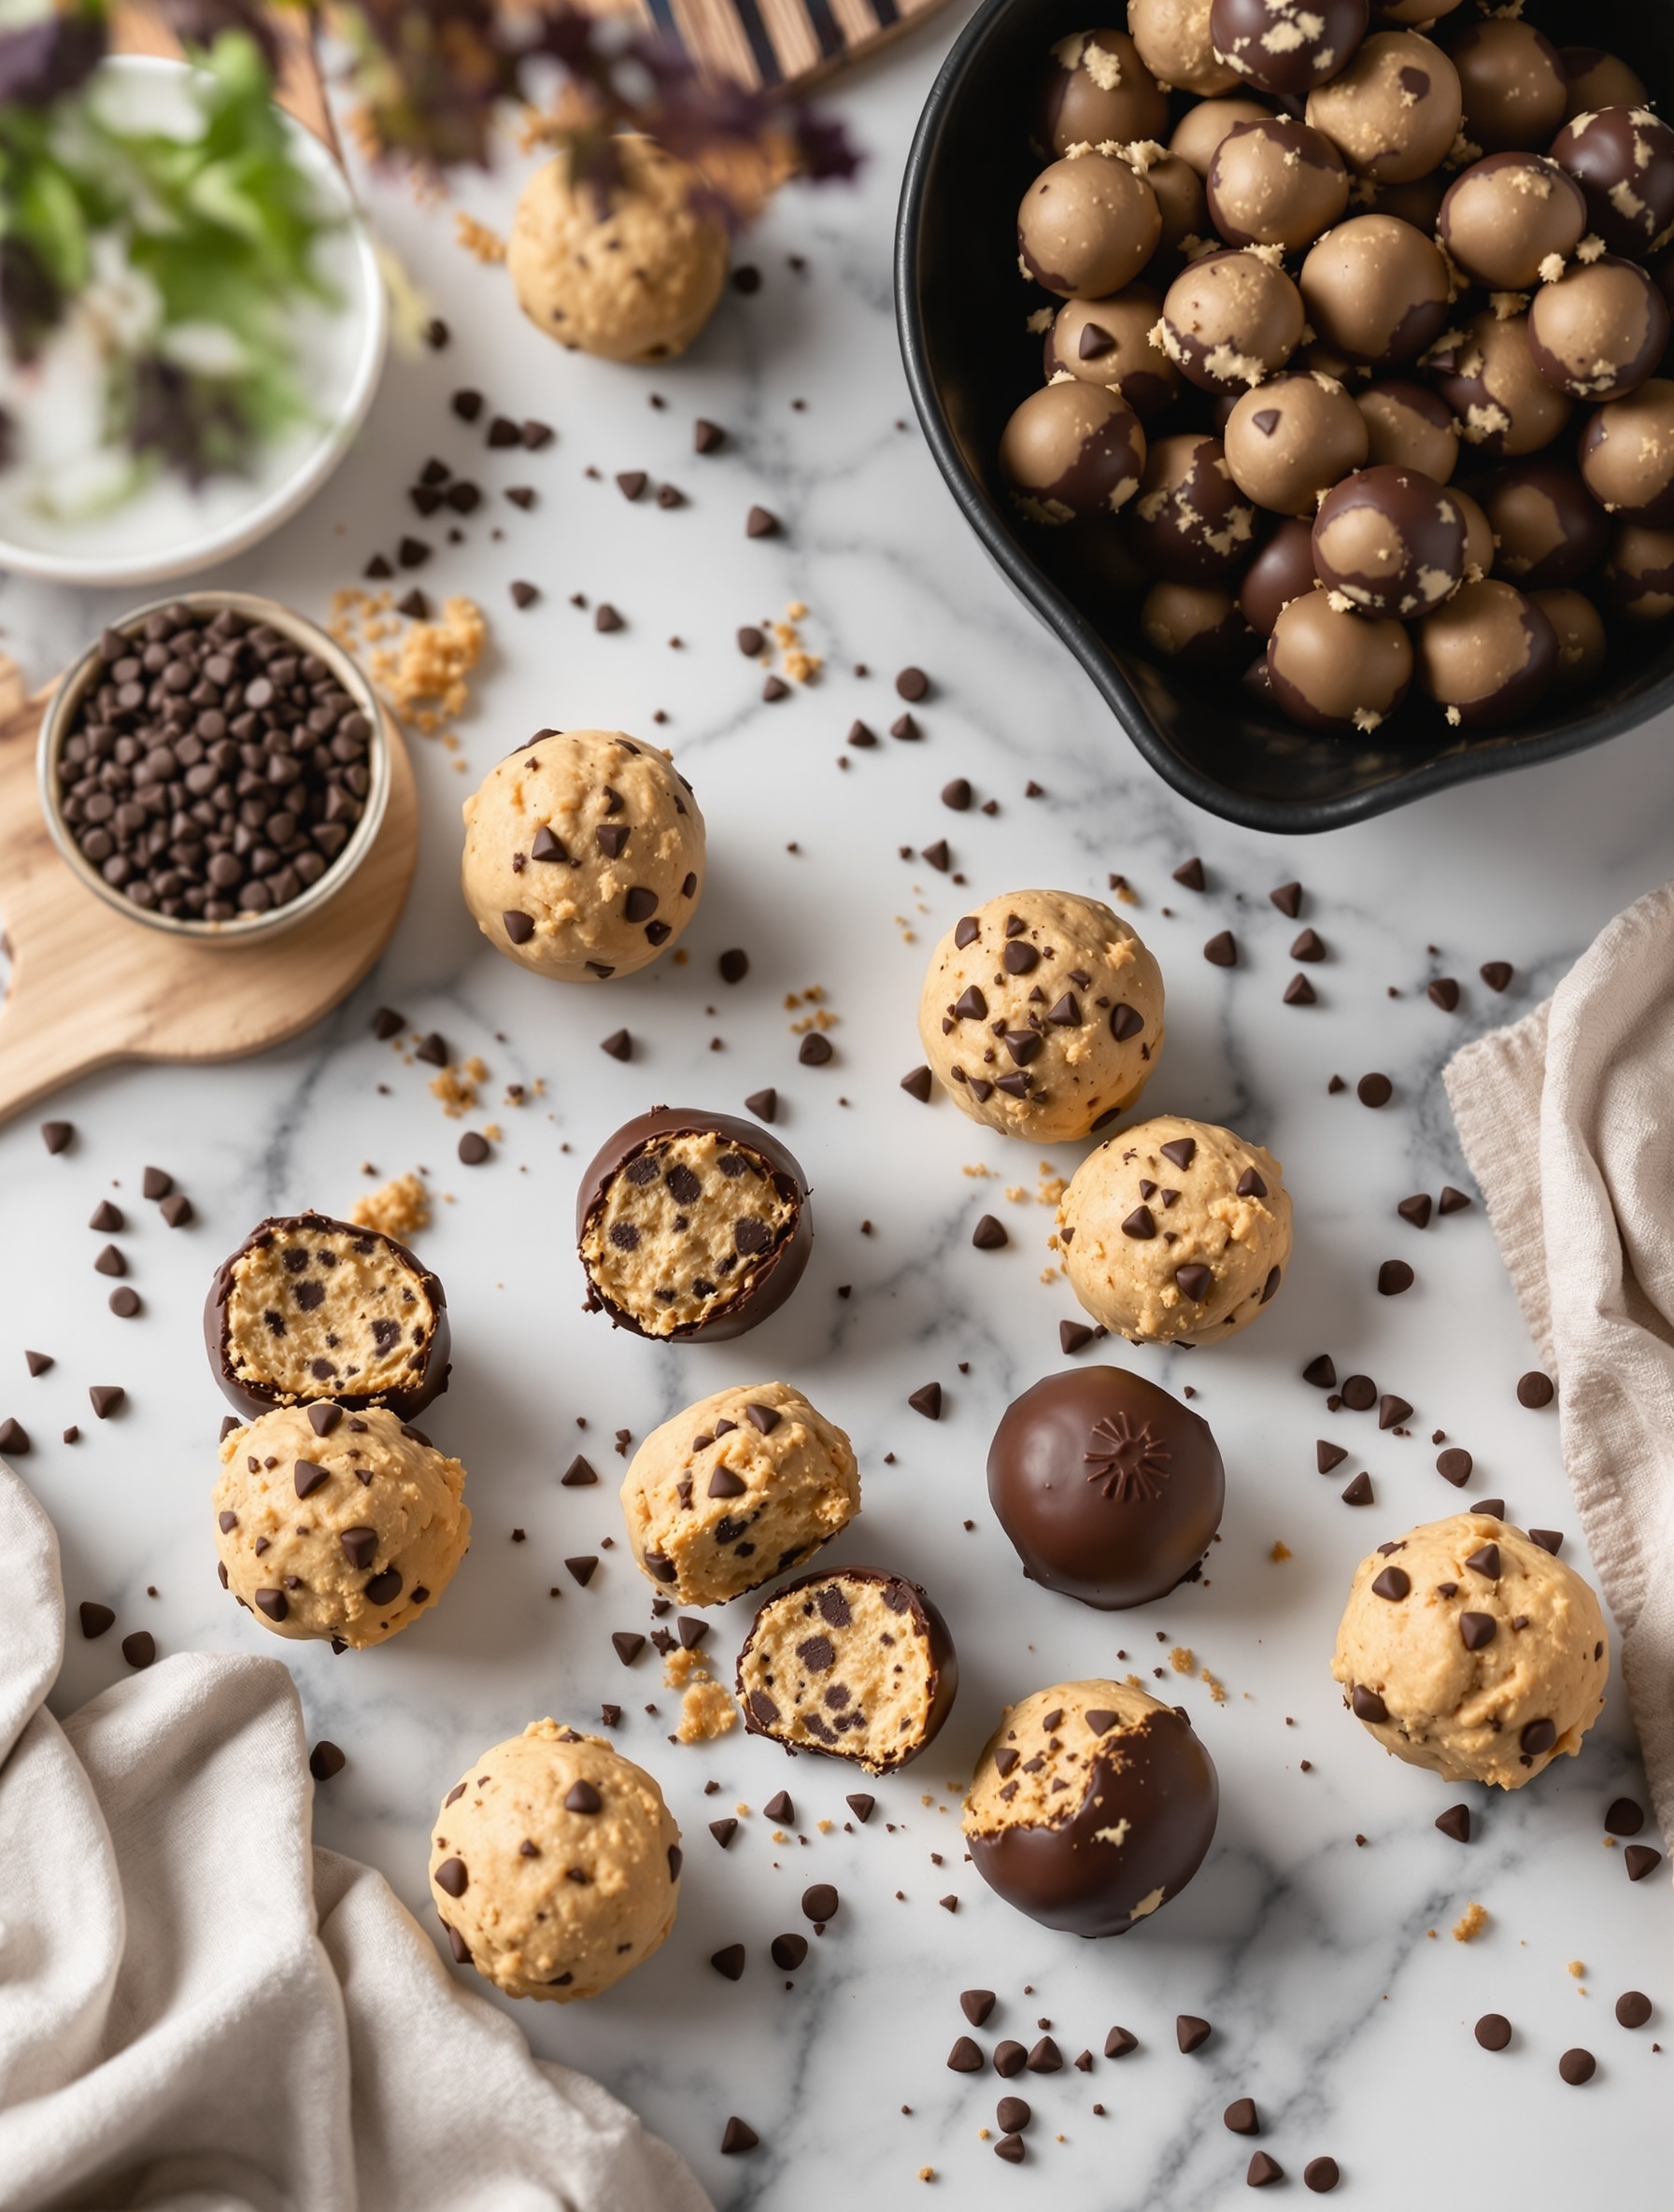
Chocolate chip cookie dough truffles are a delightful treat that combines the classic flavors of cookie dough and chocolate. These little bites are perfect for satisfying your sweet tooth. The image showcases a variety of truffles, some coated in rich chocolate and others sprinkled with mini chocolate chips. The soft, creamy texture of the cookie dough filling is simply irresistible!
Making these truffles is easy and fun. You can enjoy them as a snack or serve them at parties. They’re sure to impress your friends and family. Plus, they’re no-bake, which makes them even more appealing!
Ingredients
- 1 cup all-purpose flour
- 1/2 cup unsalted butter, softened
- 1/2 cup brown sugar, packed
- 1/4 cup granulated sugar
- 1 teaspoon vanilla extract
- 1/4 teaspoon salt
- 1/2 cup mini chocolate chips
- 1 cup semi-sweet chocolate chips (for coating)
Instructions
- Prepare the Dough: In a bowl, mix softened butter, brown sugar, and granulated sugar until creamy. Add vanilla extract and salt, then mix well.
- Add Flour: Gradually mix in the flour until fully combined. Stir in the mini chocolate chips.
- Form the Truffles: Scoop out small portions of the dough and roll them into balls. Place them on a baking sheet lined with parchment paper.
- Chill: Refrigerate the dough balls for about 30 minutes to firm up.
- Melt Chocolate: In a microwave-safe bowl, melt the semi-sweet chocolate chips in 30-second intervals, stirring in between until smooth.
- Coat the Truffles: Dip each chilled dough ball into the melted chocolate, letting any excess drip off. Place them back on the parchment paper.
- Set: Allow the chocolate to harden at room temperature or refrigerate for quicker results.
- Enjoy: Once set, these truffles are ready to eat! Store any leftovers in an airtight container in the fridge.
Cinnamon Sugar Churros
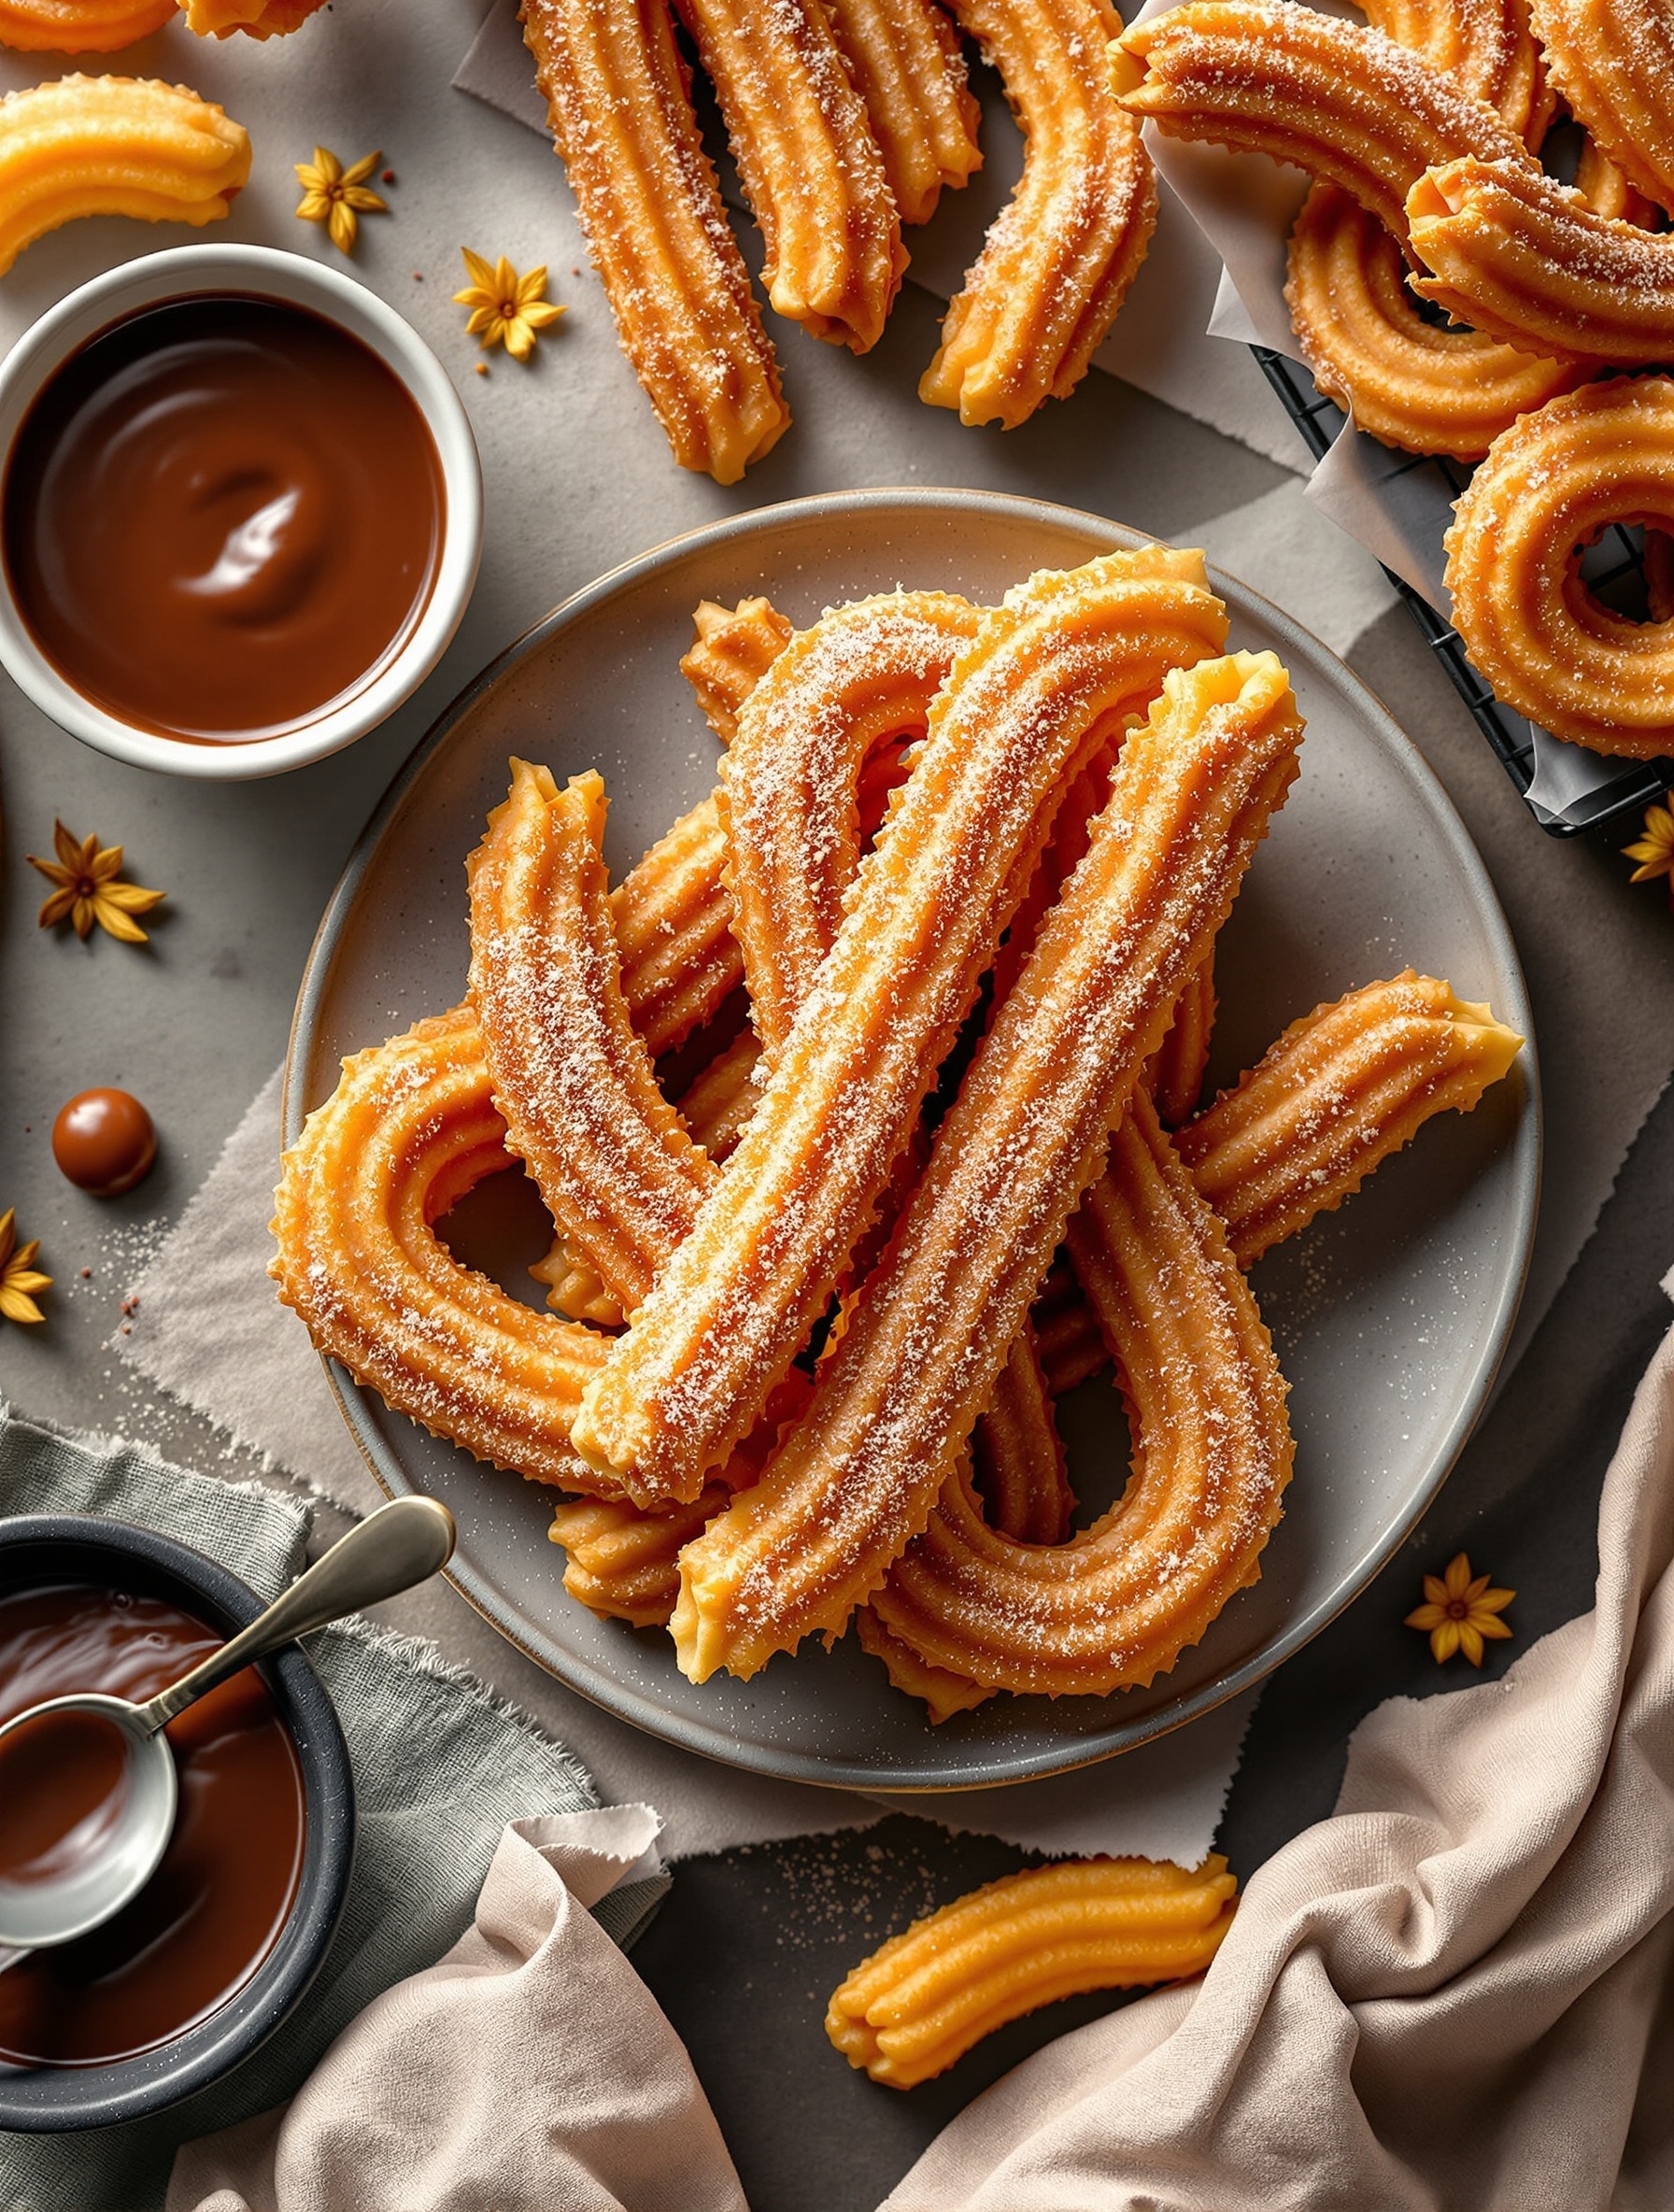
Cinnamon sugar churros are a delightful treat that brings a touch of sweetness to any occasion. These crispy, golden-brown pastries are coated in a generous layer of cinnamon sugar, making them irresistible. The churros are often served with a rich chocolate sauce for dipping, adding an extra layer of flavor.
Making churros at home is easier than you might think. With just a few simple ingredients, you can whip up a batch that will impress your family and friends. The combination of the crunchy exterior and soft, doughy interior creates a perfect snack that pairs wonderfully with coffee or hot chocolate.
To make these tasty treats, you’ll need flour, sugar, butter, eggs, and a few other pantry staples. The process involves mixing the dough, piping it into hot oil, and frying until golden. Once they’re done, a quick roll in cinnamon sugar makes them even more delicious!
Ingredients
- 1 cup water
- 1/2 cup unsalted butter
- 1 tablespoon granulated sugar
- 1/4 teaspoon salt
- 1 cup all-purpose flour
- 2 large eggs
- 1 teaspoon vanilla extract
- 1/2 cup granulated sugar (for coating)
- 1 tablespoon ground cinnamon
- Oil for frying
Instructions
- Prepare the Dough: In a medium saucepan, combine water, butter, sugar, and salt. Bring to a boil over medium heat. Once boiling, remove from heat and stir in the flour until a dough forms.
- Add Eggs: Let the dough cool slightly, then beat in the eggs one at a time, mixing well after each addition. Stir in the vanilla extract until smooth.
- Heat Oil: In a deep skillet or pot, heat oil to 375°F (190°C). You’ll need enough oil to submerge the churros.
- Pipe the Churros: Transfer the dough to a piping bag fitted with a star tip. Carefully pipe strips of dough into the hot oil, cutting them to your desired length.
- Fry Until Golden: Fry the churros for about 2-3 minutes on each side, or until golden brown. Remove them with a slotted spoon and drain on paper towels.
- Coat in Cinnamon Sugar: In a shallow dish, mix together the granulated sugar and cinnamon. Roll the warm churros in the mixture until fully coated.
- Serve: Enjoy your churros warm, with chocolate sauce on the side for dipping!
Raspberry Coconut Macaroons
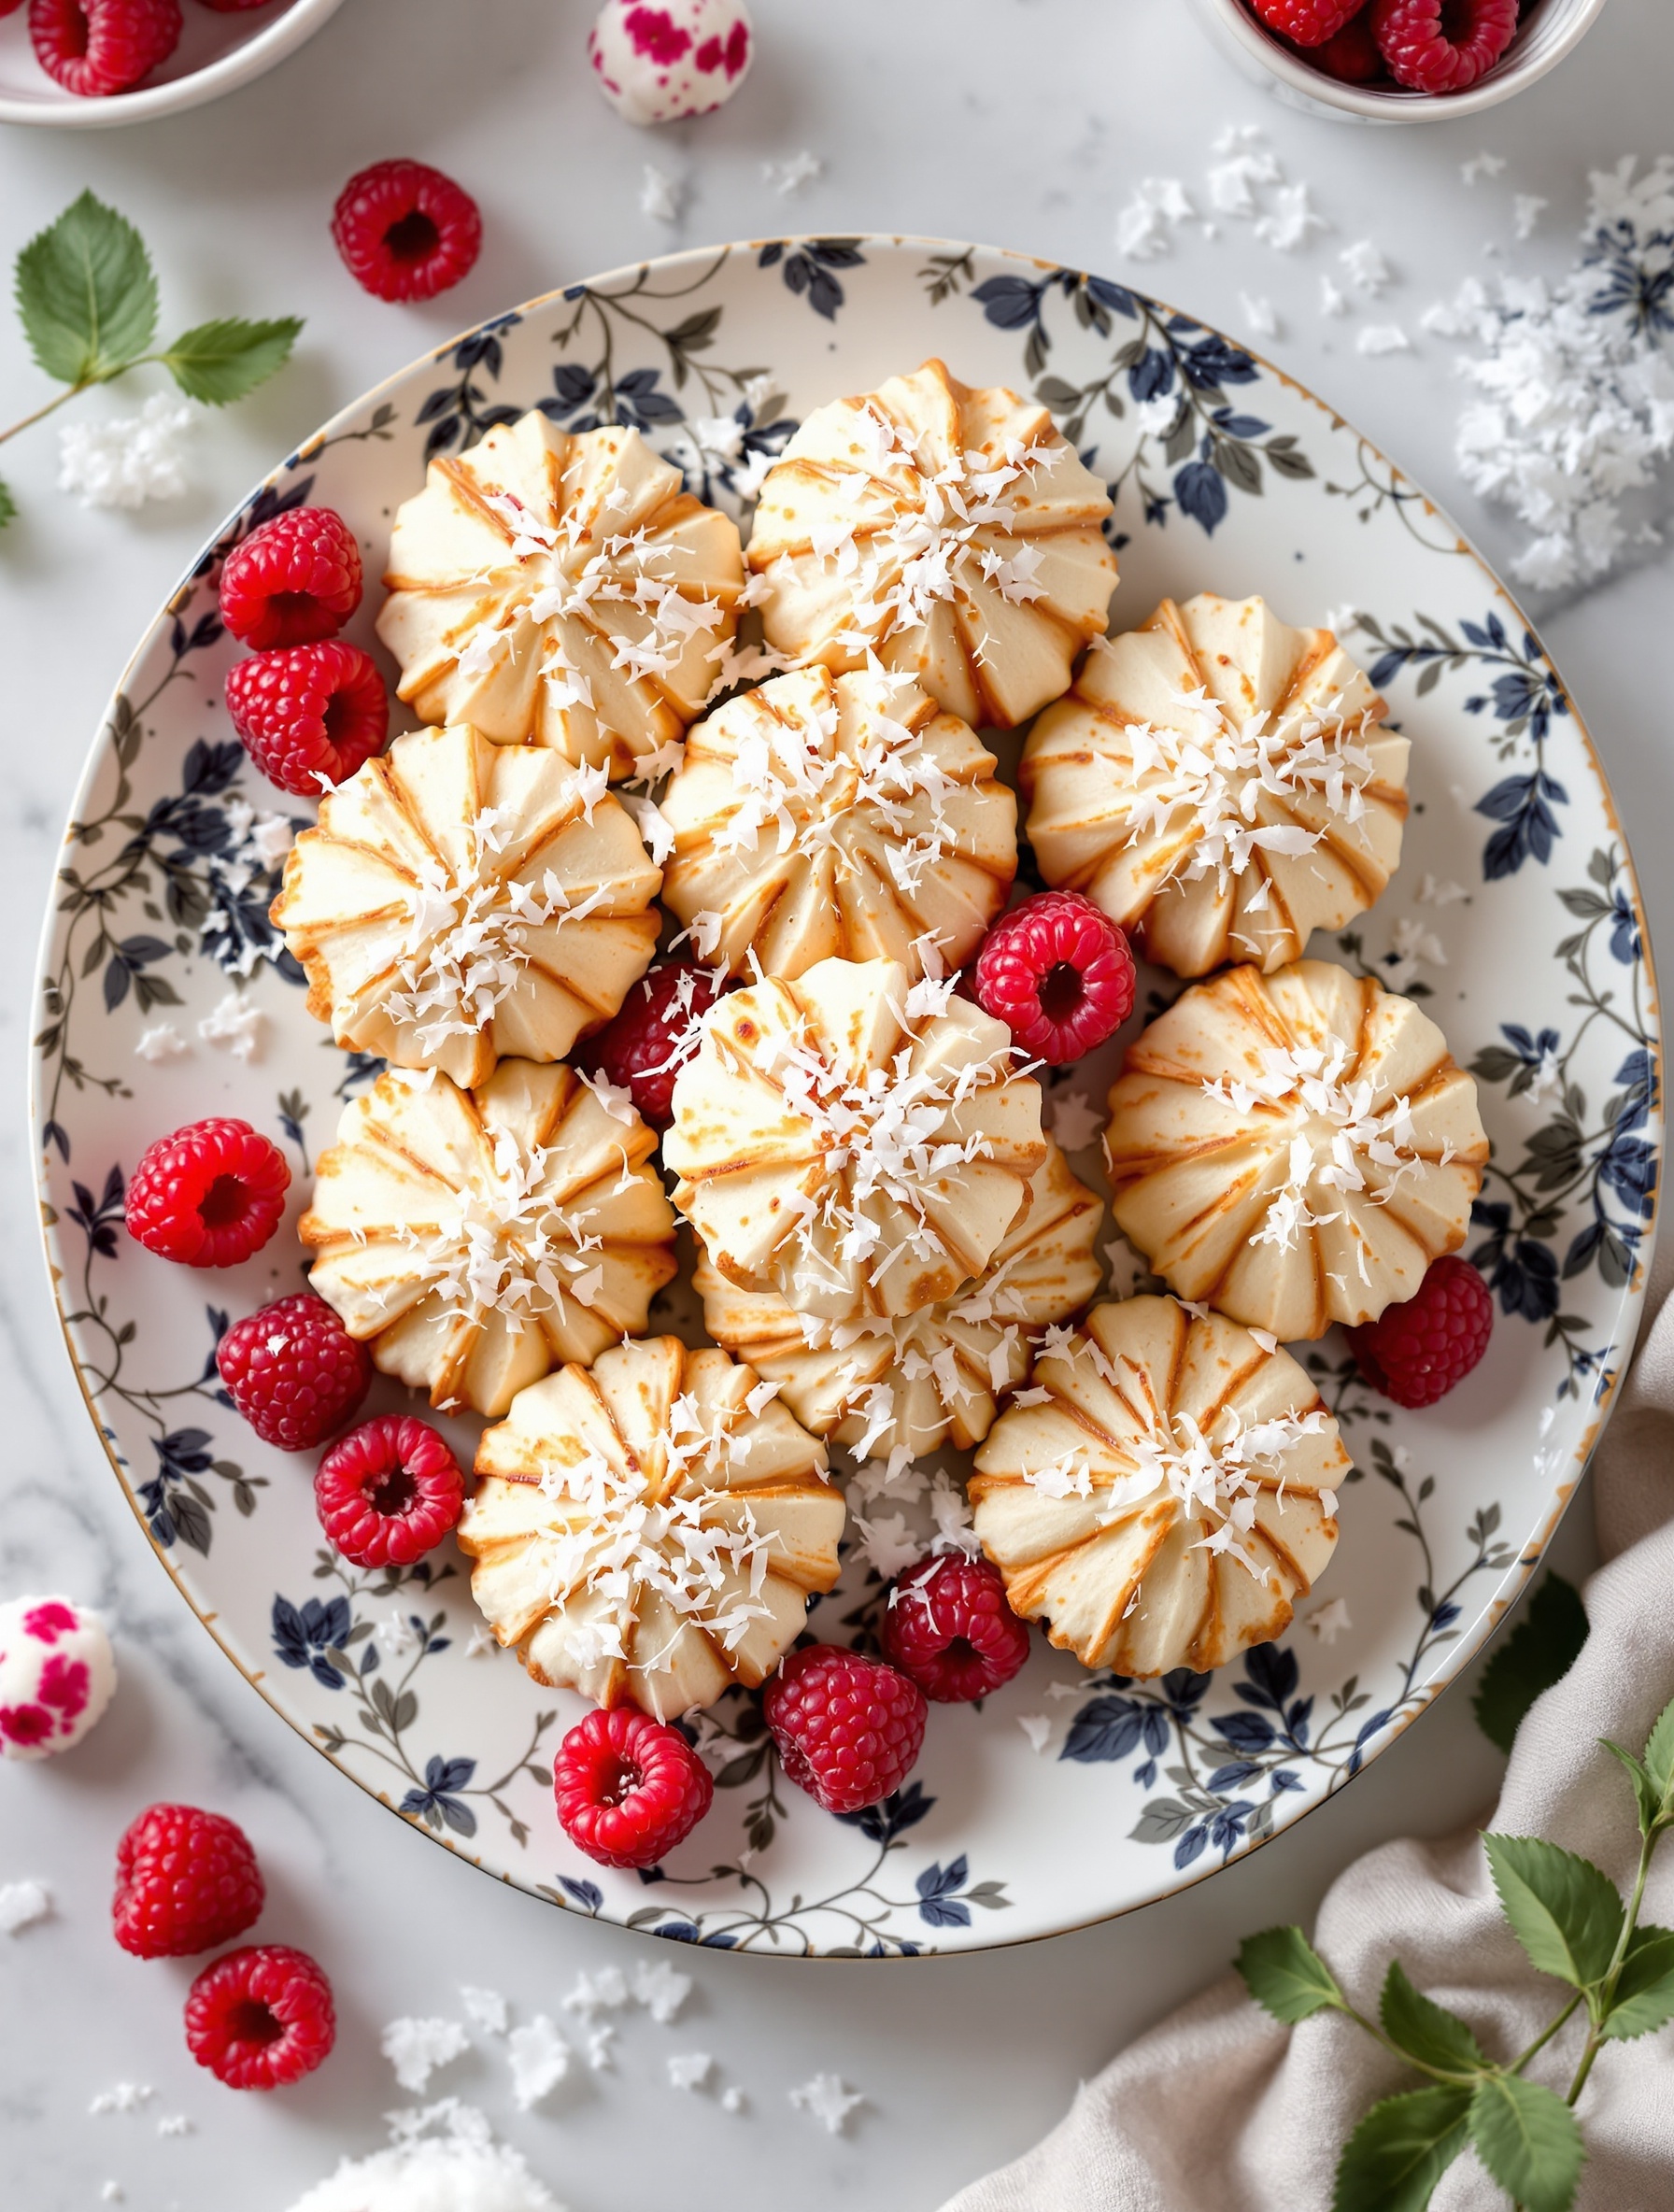
Raspberry Coconut Macaroons are a delightful treat that combines the tropical flavor of coconut with the tartness of fresh raspberries. These little bites are perfect for satisfying your sweet tooth without being overly indulgent. The macaroons are beautifully arranged on a floral plate, surrounded by vibrant raspberries and sprinkled with shredded coconut, making them not just tasty but visually appealing too.
These treats are easy to make and are great for any occasion. Whether you’re hosting a gathering or just want a sweet snack, these macaroons will impress everyone. The combination of chewy coconut and juicy raspberries creates a lovely contrast that is hard to resist.
Ingredients
- 2 1/2 cups shredded coconut
- 1/2 cup sweetened condensed milk
- 1 teaspoon vanilla extract
- 1/4 teaspoon salt
- 1 cup fresh raspberries
- 1/4 cup white chocolate chips (optional)
- Extra shredded coconut for topping
Instructions
- Preheat your oven to 325°F (160°C) and line a baking sheet with parchment paper.
- In a large bowl, mix together the shredded coconut, sweetened condensed milk, vanilla extract, and salt until well combined.
- Gently fold in the fresh raspberries, being careful not to crush them.
- Using a tablespoon, scoop the mixture onto the prepared baking sheet, forming small mounds.
- If using, sprinkle white chocolate chips on top of each mound and add extra shredded coconut.
- Bake for 15-20 minutes, or until the edges are golden brown.
- Let them cool on the baking sheet for a few minutes before transferring to a wire rack to cool completely.
Chocolate-Dipped Fruit Skewers

Chocolate-dipped fruit skewers are a fun and tasty treat that everyone loves. They combine the sweetness of fresh fruit with the rich flavor of chocolate. These colorful skewers are perfect for parties, picnics, or just a sweet snack at home.
To make these skewers, you can use a variety of fruits. Strawberries, bananas, and pineapple are popular choices. The vibrant colors make them visually appealing, and the chocolate adds a delightful twist. You can even drizzle some extra chocolate on top for a fancy touch!
Here’s how to whip up these delicious treats:
Ingredients
- 1 cup strawberries, hulled
- 1 cup pineapple, cut into chunks
- 1 cup banana, sliced
- 1 cup chocolate chips (milk or dark)
- 1 tablespoon coconut oil (optional)
- Wooden skewers
Instructions
- Prepare the Fruit: Wash and cut the fruit into bite-sized pieces. Thread the fruit onto the wooden skewers, alternating between different fruits for a colorful look.
- Melt the Chocolate: In a microwave-safe bowl, combine chocolate chips and coconut oil (if using). Microwave in 30-second intervals, stirring in between, until melted and smooth.
- Dip the Skewers: Hold each skewer by the end and dip the fruit into the melted chocolate. Allow any excess chocolate to drip off.
- Set to Cool: Place the dipped skewers on a parchment-lined tray. You can sprinkle some crushed nuts or sprinkles on top if you like.
- Chill: Refrigerate the skewers for about 30 minutes to let the chocolate set.
Enjoy your chocolate-dipped fruit skewers as a delightful snack or dessert!
Caramelized Apple Crisp
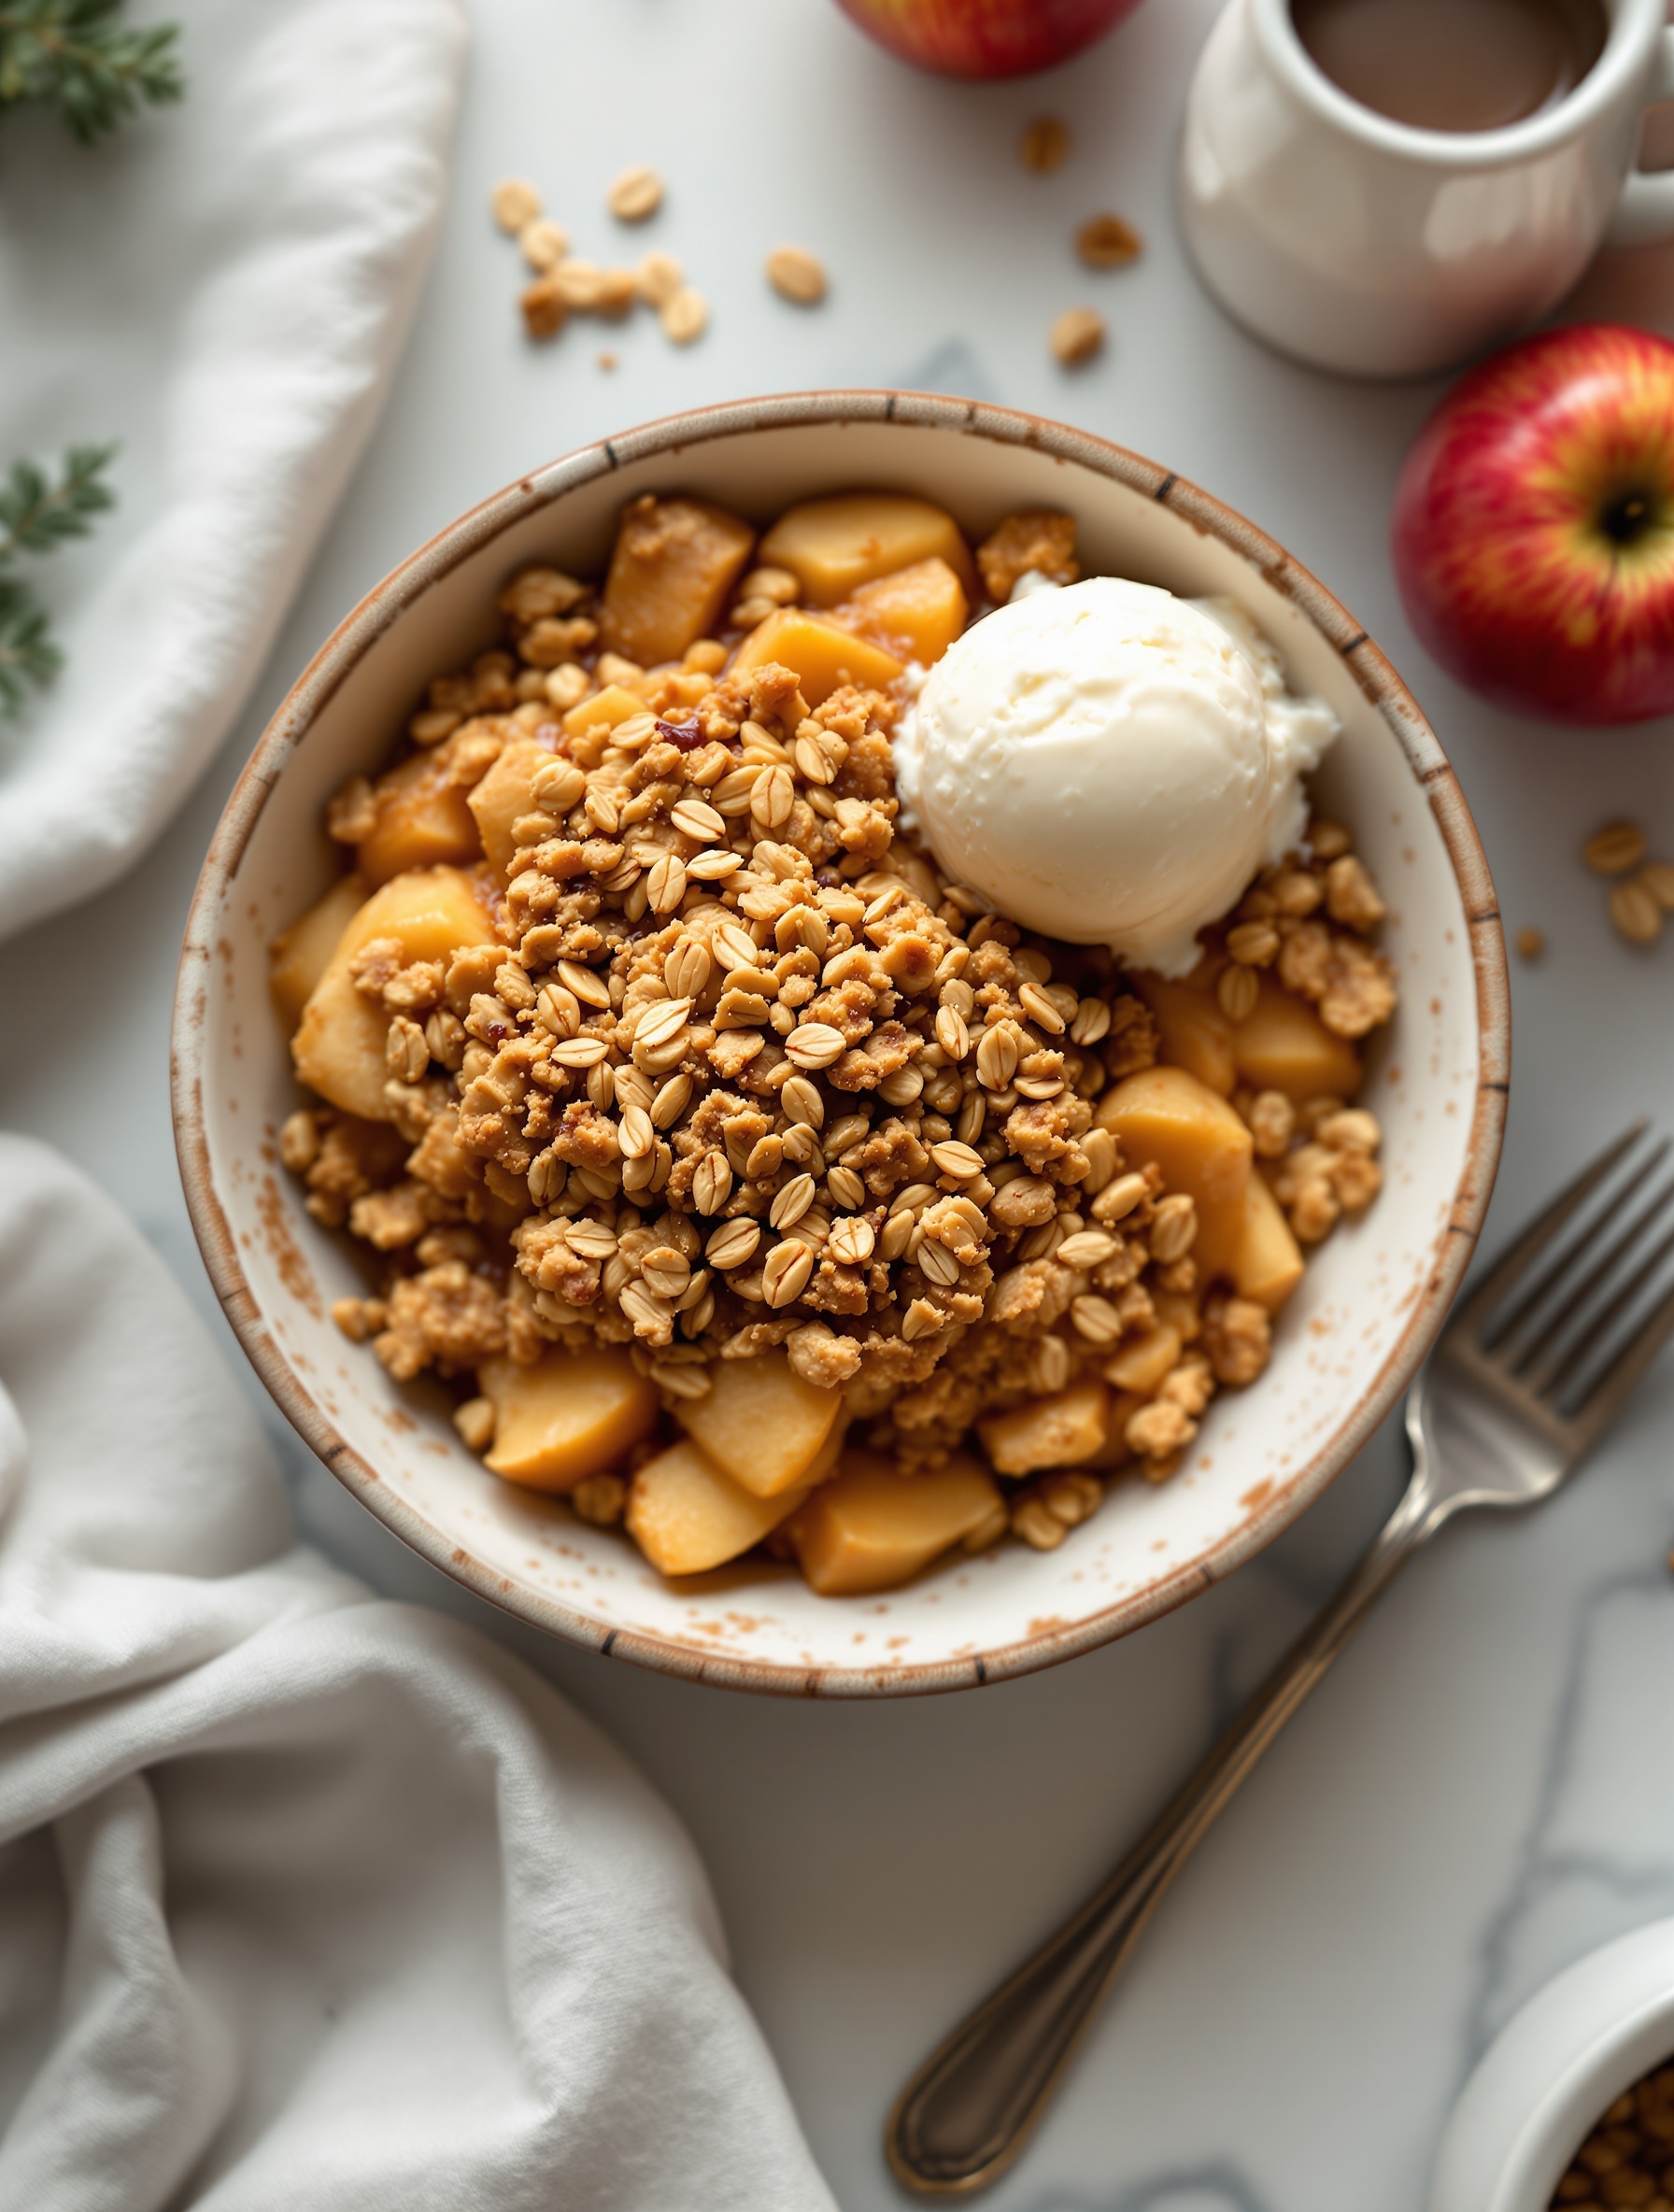
Caramelized apple crisp is a delightful dessert that brings warmth and comfort to any table. Imagine a bowl filled with tender, sweet apples, perfectly caramelized and topped with a crunchy oat mixture. This dish is not just a treat for the taste buds; it’s a feast for the eyes too. The golden-brown topping contrasts beautifully with the soft, juicy apples underneath.
To make this dessert even more special, a scoop of vanilla ice cream on top adds a creamy finish. The combination of hot and cold is simply irresistible. Whether you’re serving it at a family gathering or enjoying it on a cozy night in, caramelized apple crisp is sure to impress.
Let’s get into the ingredients and steps to whip up this delicious dessert!
Ingredients
- 4 cups peeled and sliced apples (like Granny Smith or Honeycrisp)
- 1/2 cup granulated sugar
- 1 tablespoon lemon juice
- 1 teaspoon ground cinnamon
- 1 cup rolled oats
- 1/2 cup all-purpose flour
- 1/2 cup packed brown sugar
- 1/2 cup unsalted butter, melted
- 1/4 teaspoon salt
Instructions
- Preheat your oven to 350°F (175°C).
- In a large bowl, toss the sliced apples with granulated sugar, lemon juice, and cinnamon. Spread this mixture evenly in a greased baking dish.
- In another bowl, combine the oats, flour, brown sugar, melted butter, and salt. Mix until crumbly.
- Sprinkle the oat mixture over the apples, covering them evenly.
- Bake for 30-35 minutes, or until the topping is golden and the apples are bubbly.
- Let it cool slightly before serving. Top with a scoop of vanilla ice cream if desired.
Chocolate Mousse Cups
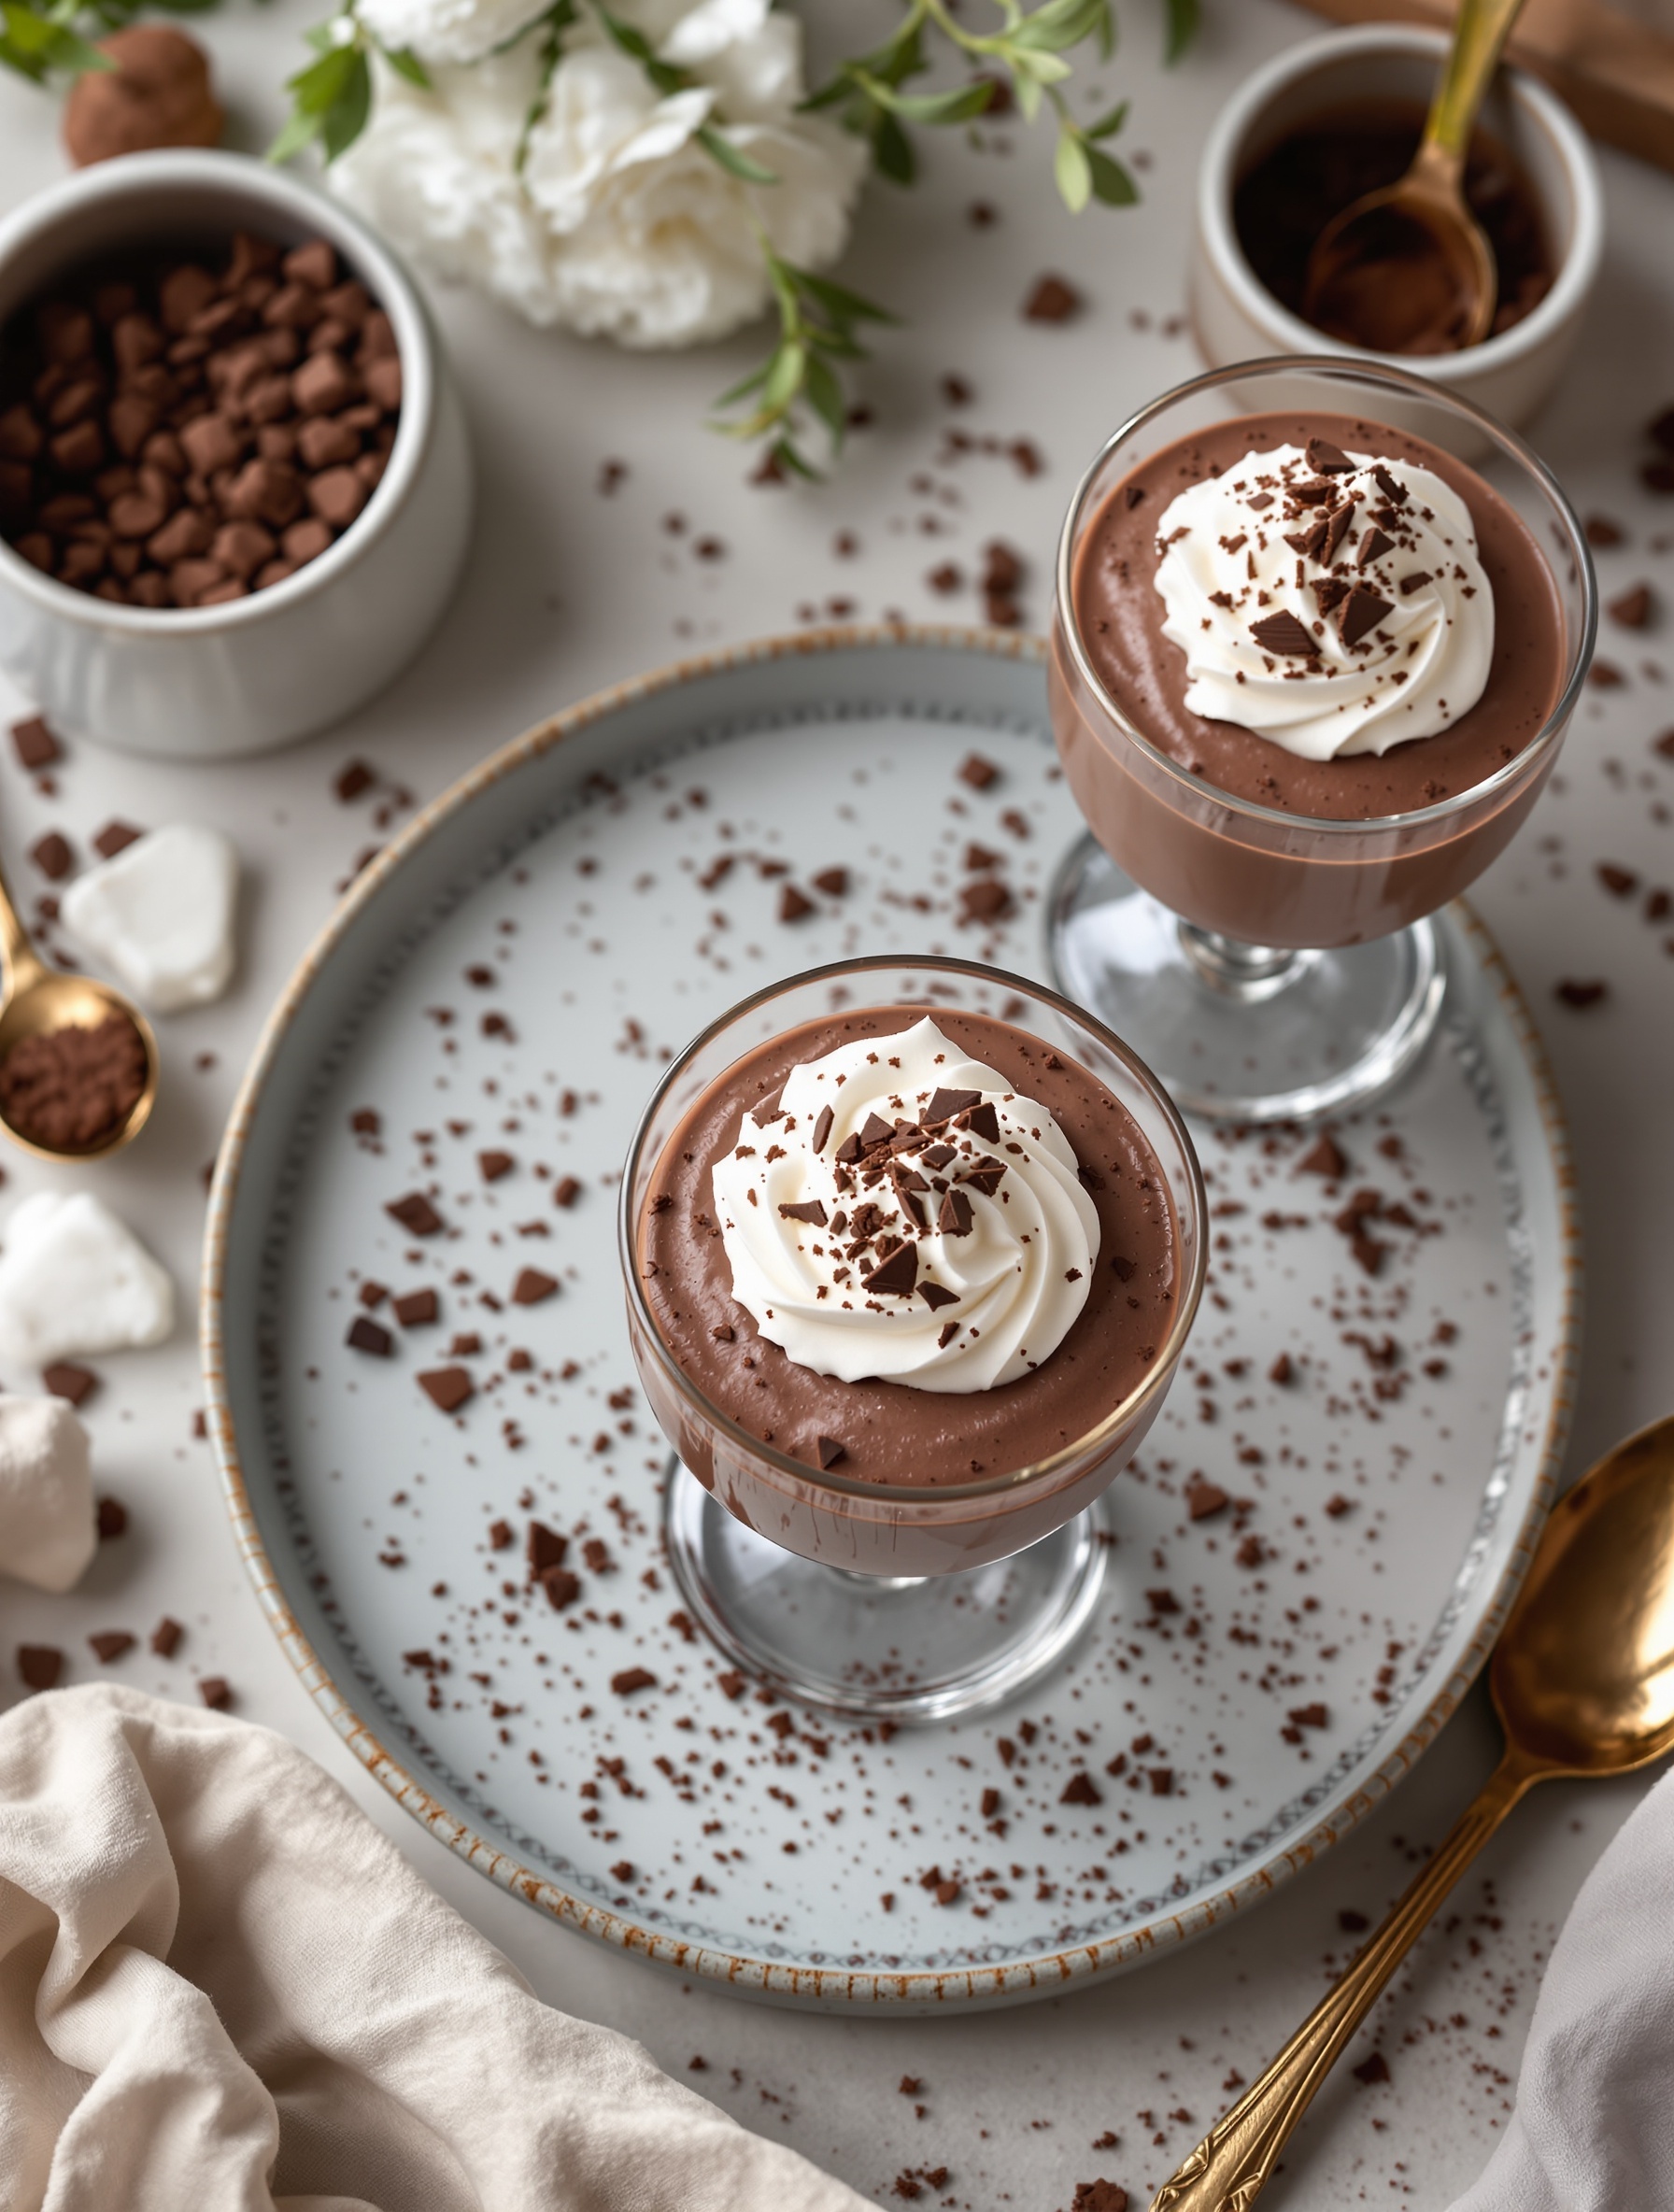
Chocolate mousse cups are a delightful treat that brings a touch of elegance to any dessert table. These creamy, rich cups are perfect for satisfying your sweet tooth. The smooth chocolate combined with a light, airy texture makes them irresistible. Topped with whipped cream and chocolate shavings, they look as good as they taste!
Making chocolate mousse cups is easier than you might think. You can whip them up in no time, making them a great option for gatherings or a cozy night in. The best part? They can be prepared ahead of time, allowing you to enjoy your time with family and friends without the stress of last-minute dessert prep.
Here’s how to make your own chocolate mousse cups:
Ingredients
- 1 cup heavy cream
- 1 cup semi-sweet chocolate chips
- 2 large eggs
- 1/4 cup granulated sugar
- 1 teaspoon vanilla extract
- Whipped cream for topping
- Chocolate shavings for garnish
Instructions
- Melt the Chocolate: In a microwave-safe bowl, melt the chocolate chips in 30-second intervals, stirring until smooth. Let it cool slightly.
- Whip the Cream: In a separate bowl, whip the heavy cream until soft peaks form. Set aside.
- Mix Eggs and Sugar: In another bowl, whisk together the eggs and granulated sugar until pale and fluffy. Stir in the melted chocolate and vanilla extract.
- Combine: Gently fold the whipped cream into the chocolate mixture until fully combined. Be careful not to deflate the mixture.
- Chill: Spoon the mousse into serving cups and refrigerate for at least 2 hours to set.
- Serve: Top with whipped cream and chocolate shavings before serving. Enjoy your delicious chocolate mousse cups!
S’mores Dip with Graham Crackers
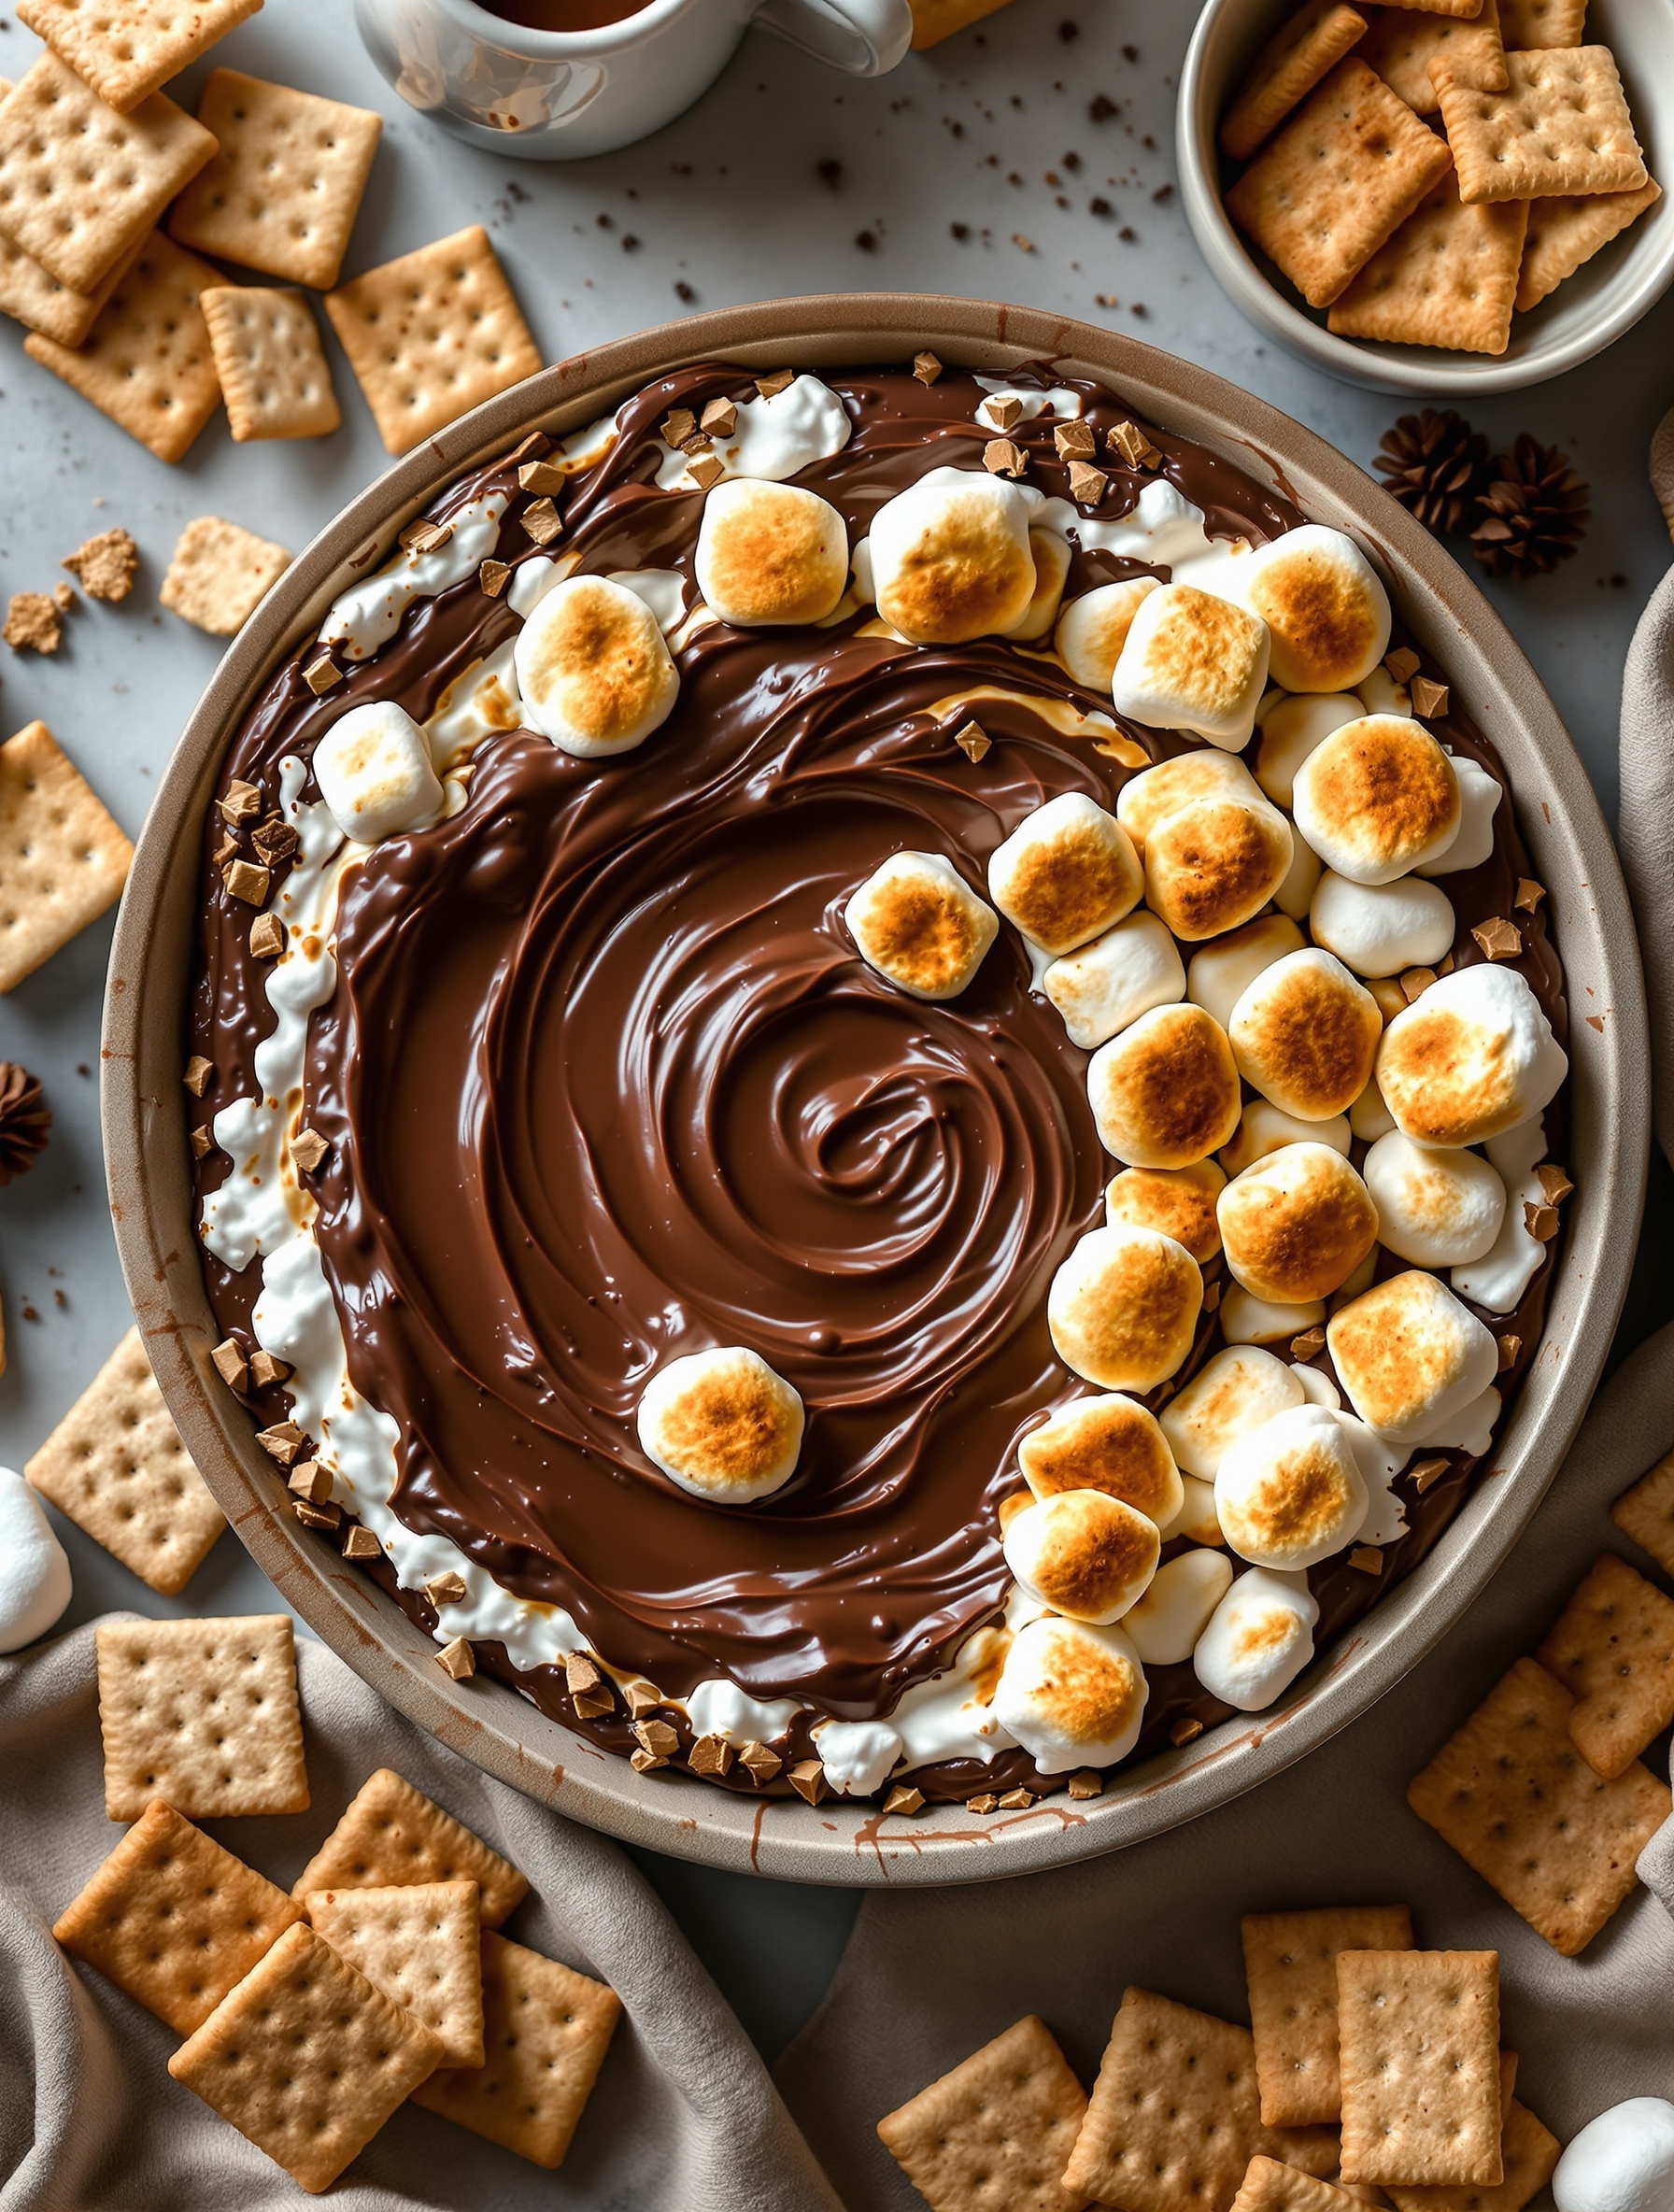
S’mores dip is a fun twist on the classic campfire treat. Imagine a warm, gooey mixture of chocolate and toasted marshmallows, perfect for dipping. The image shows a beautifully arranged s’mores dip, topped with golden-brown marshmallows and surrounded by crunchy graham crackers. It’s a delightful dessert that brings back memories of summer nights.
This dip is not only easy to make but also a crowd-pleaser. Gather your friends and family around for a cozy evening. Just grab some graham crackers and dig in! The combination of melted chocolate and fluffy marshmallows creates a sweet experience that everyone will love.
Ingredients
- 1 cup chocolate chips (semi-sweet or milk chocolate)
- 1 cup mini marshmallows
- 1/4 cup heavy cream
- 1/4 cup crushed graham crackers
- Extra mini marshmallows for topping
- Graham crackers for dipping
Instructions
- Preheat your oven to 350°F (175°C).
- In a baking dish, combine the chocolate chips and heavy cream. Stir until well mixed.
- Spread the mixture evenly in the dish and top with mini marshmallows and crushed graham crackers.
- Bake for about 10 minutes, or until the marshmallows are golden brown.
- Remove from the oven and let it cool slightly before serving.
- Serve warm with graham crackers for dipping. Enjoy!
Conclusion
There you have it—your ultimate roadmap to conquering that sweet tooth once and for all! It’s amazing how a little bit of sugar and a lot of love can totally reset your mood. I’m dying to know: which of these treats are you heading to the kitchen to make first?
If you try any of these out, snap a photo and tag me—seeing your creations is the best part of my day! Don’t forget to save this post for the next time those cravings strike, and subscribe to the newsletter so you never miss a delicious update. Until next time, stay sweet!