Before You Grab a Spoon…
If you’re the kind of baker who loves desserts that feel nostalgic, cozy, and secretly impressive, this banana pudding recipe is your new best friend. It’s silky without being runny, luscious without being too sweet, and full of real banana flavor—not the artificial “banana milkshake” kind. This is the banana pudding I bring to cookouts when I want people to ask, “Wait… did you actually make this from scratch?”
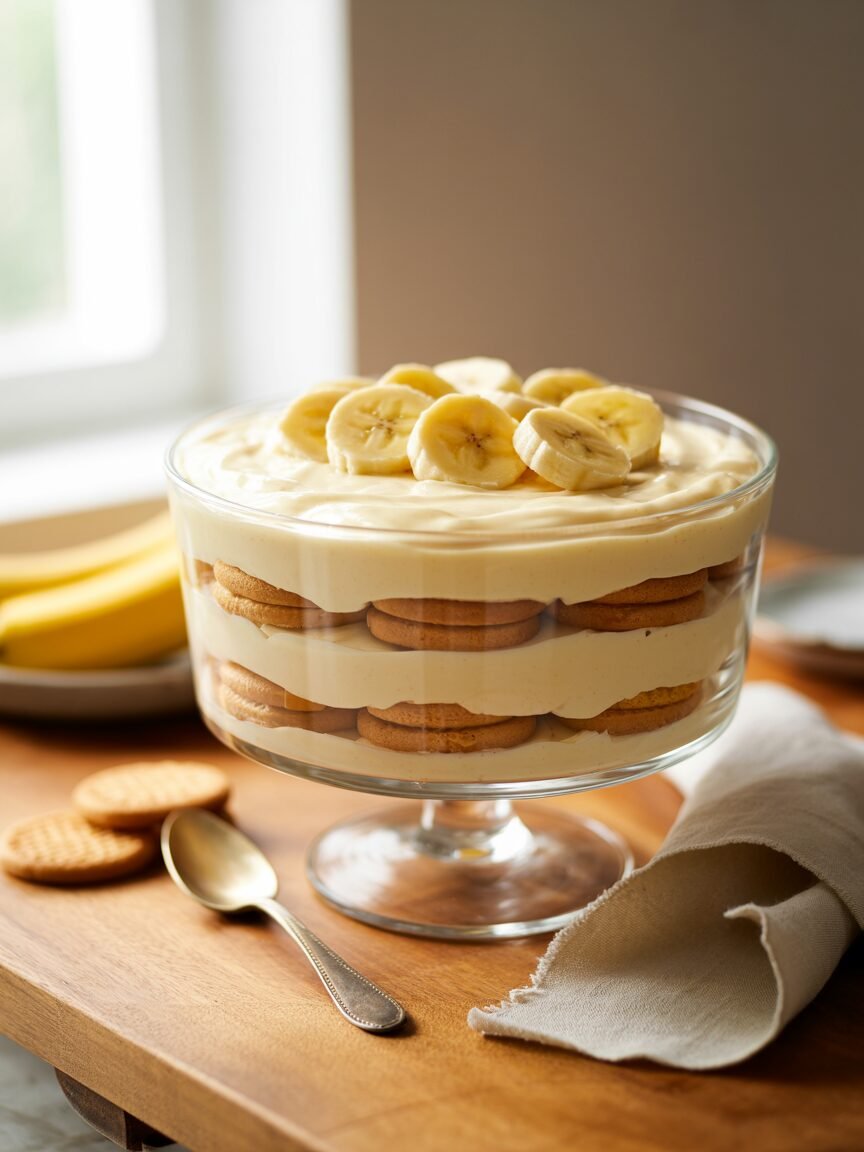
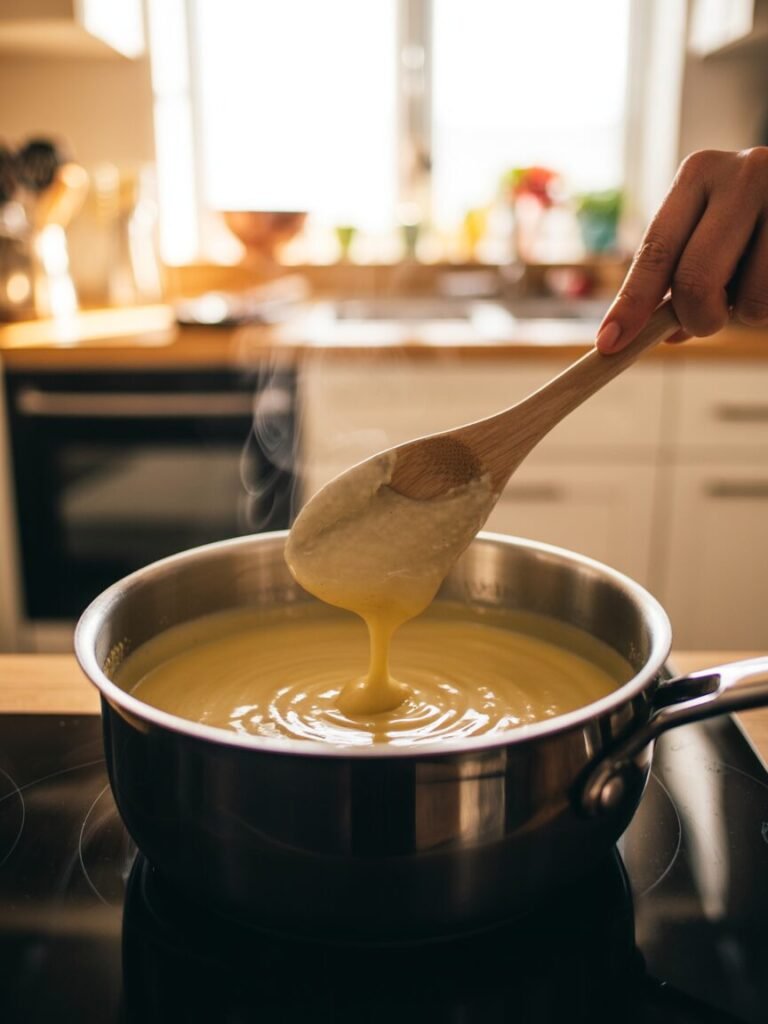
My signature trick? I cook the pudding low and slow until it coats the back of a spoon and leaves a clean swipe when you run a finger through it. That’s the sweet spot for a pudding that sets beautifully every single time. Whether you’re assembling it in a deep dish, a trifle bowl, or small jars, this recipe stays stable while giving you that dreamy cream-cloud texture.
Why This Banana Pudding Works (The Real Science)
A good banana pudding needs two things: structural integrity and creamy mouthfeel. Here’s how this recipe guarantees both:
- Cornstarch + egg yolks = stable custard. Cornstarch gelatinizes at about 95°C (203°F), allowing the pudding to thicken without curdling. The yolks add richness but also emulsify everything, preventing separation.
- Room-temperature dairy prevents lumps. Cold milk hitting hot starch can shock the mixture and create instant lumps. Warming the milk slightly helps the starch swell gradually and evenly.
- Ripe bananas affect sweetness AND color. The more freckled the banana, the more natural sugars break down—this helps deepen flavor. But overripe bananas also brown faster because of oxidative enzymes. That’s why we layer ripe bananas between pudding layers instead of stirring them in.
- Whipped cream stabilized by pudding. The pudding must be cold before folding in the cream. Warm pudding + whipped cream = deflated, sad dessert.
Did you know? Bananas brown slower when they’re not directly exposed to air. That’s why layering them tightly between pudding and cookies keeps them fresh-looking for up to 24 hours.
Ingredients
For the Pudding:
- Whole milk — 600 g (2 ½ cups) — creamy base
- Heavy cream — 120 g (½ cup) — adds richness
- Granulated sugar — 120 g (½ cup + 1 tbsp) — sweetness that balances banana acidity
- Egg yolks — 3 large (about 54 g) — thickening + emulsifying
- Cornstarch — 30 g (¼ cup) — main thickener for stability
- Salt — 1 g (⅛ tsp) — flavor enhancer
- Unsalted butter — 28 g (2 tbsp) — silky finish
- Vanilla extract — 5 g (1 tsp) — warms the flavor
For Assembly:
- Ripe bananas — 3–4, sliced — main flavor
- Vanilla wafer cookies or butter biscuits — 200–240 g — layering + texture
- Heavy cream — 240 g (1 cup), whipped — lightens the pudding
Equipment
Required:
- Medium saucepan
- Whisk
- Heatproof spatula
- Mixing bowls
- Kitchen scale
- Fine sieve
- 8×8 inch dish, trifle bowl, or small jars
Nice to Have:
- Cold metal bowl for whipped cream
- Offset spatula for clean layers
- Thermometer (optional but helpful)
- Parchment for covering warm pudding without a skin forming
Step-by-Step Instructions (With Timing & Texture Cues)
Step 1 — Heat the Dairy (3 minutes)
Warm the milk and cream together in a saucepan over medium heat until just steaming—not boiling.
Visual cue: You should see wisps of steam, no bubbling.
This step prevents instant lumps later.

Step 2 — Whisk the Yolks, Sugar & Cornstarch (1 minute)
In a bowl, whisk egg yolks, sugar, cornstarch, and salt until smooth.
Visual cue: The mixture should fall in thick ribbons and lighten slightly in color.
Step 3 — Temper the Eggs (1–2 minutes)
Slowly drizzle in about one cup of the warm milk while whisking constantly.
Visual cue: Mixture loosens and becomes pourable without curdling.
Step 4 — Cook the Pudding (6–8 minutes)
Return everything to the saucepan over medium-low heat. Keep whisking.
Visual cue:
- First stage: tiny bubbles around the edges
- Mid stage: mixture thickens noticeably
- Final stage: pudding coats the back of a spoon; when you drag a finger across the spoon, the line stays clean
Incorrect cue: If you see rapid bubbles or scrambled-egg bits, heat is too high.
Step 5 — Finish & Chill (2 minutes + chilling)
Remove from heat; whisk in butter and vanilla.
Strain through a sieve into a clean bowl.
Press parchment directly onto the surface to prevent a skin.
Chill completely for 2–3 hours.
Step 6 — Whip the Cream (3 minutes)
Whip cold cream to soft-medium peaks.
Visual cue: Peaks curl at the tip like a hook.

Step 7 — Fold & Layer (5–10 minutes)
Fold half the whipped cream into the cold pudding to lighten it.
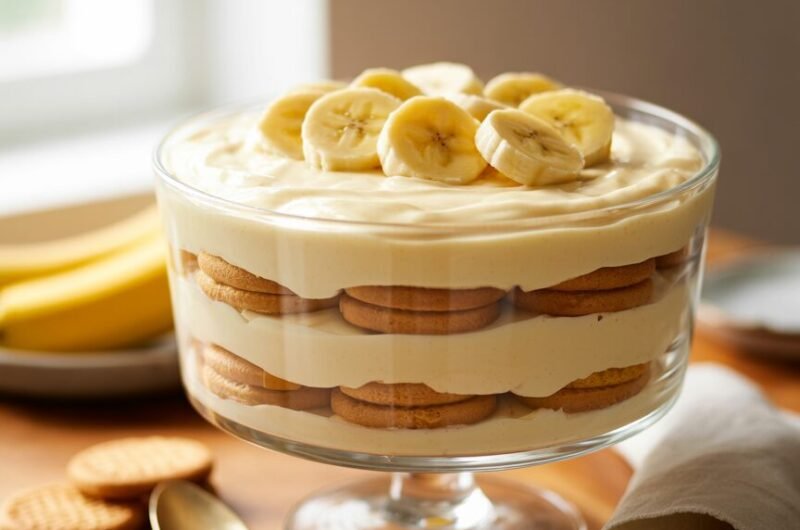
Layer cookies → pudding → bananas → pudding → cookies.
Finish with remaining whipped cream.
Texture note: Cookies will soften after 4–6 hours.
Troubleshooting: Common Issues & Fixes
Problem: Watery pudding
Likely causes: Undercooked starch, hot pudding folded with cream
Fix: Cook to 95°C (203°F), chill completely before mixing cream
Problem: Lumpy pudding
Likely causes: Added dairy too quickly, heat too high
Fix: Always temper; whisk constantly over medium-low heat
Problem: Pudding tastes eggy
Likely causes: Overheating the yolks
Fix: Lower heat, cook gradually
Problem: Cookies turned to mush
Cause: Assembled too early
Fix: Assemble 2–4 hours before serving for best texture
Problem: Bananas browned
Cause: Exposed to air
Fix: Fully cover bananas with pudding layers
Problem: Runny whipped cream
Cause: Cream not cold enough
Fix: Chill bowl + cream in freezer for 10 minutes
Substitutions & Variations
Egg-Free Version
Replace egg yolks with:
- Cornstarch — 45 g (⅓ cup) total
Texture: Slightly less rich but still velvety.
Dairy-Free Version
Use:
- Full-fat coconut milk — 400 g
- Oat milk — 300 g
- Coconut cream for whipping
Note: Coconut flavor will be noticeable.
Gluten-Free Option
Use gluten-free vanilla wafers or shortbread-style cookies.
Flavor Variations
- Salted caramel drizzle
- Cinnamon or nutmeg in pudding
- Vanilla bean paste instead of extract
- Chocolate layer (add 60 g melted dark chocolate into warm pudding)
- Tropical version with mango slices (reduce bananas)
Scaling Guide
Small Batch (2–3 servings)
Use ½ of all ingredients.
Standard Batch (6–8 servings)
Use full recipe as written.
Party Size (12–14 servings)
Multiply recipe by 1.5 and use a 9×13 inch dish.
Storage, Make-Ahead & Freezing
Fridge:
- Keeps 3 days in an airtight container
- Layers soften over time; best texture is within 24 hours
Freezer:
Not recommended — bananas darken and pudding becomes grainy.
If you must freeze, freeze only the pudding base (without bananas or cookies) for up to 1 month.
Make-Ahead:
- Pudding can be prepared 2 days ahead
- Assemble on the day of serving
Refreshing Texture:
If pudding thickens too much in the fridge, whisk in 1–2 tbsp milk before layering.
Serving Ideas & Pairings
- Drizzle with homemade caramel
- Add toasted coconut flakes
- Mix in crushed chocolate cookies
- Top with chopped strawberries for acidity
- Add shaved dark chocolate
- Serve with espresso for contrast
FAQs
1. Can I use instant pudding mix?
Yes, but the texture and flavor will be simpler and sweeter. This recipe is richer and uses real bananas.
2. How do I keep bananas from browning?
Seal layers fully with pudding and cream so bananas aren’t exposed to air.
3. Can I make this the night before?
Yes, but cookies will soften more. For best results, assemble within 6 hours of serving.
4. Why did my pudding turn grainy?
It was overheated. Cook on medium-low and stop once it thickens.
5. Can I reduce sugar?
Yes—reduce by 20–30 g without affecting texture.
6. Can I make this in an OTG?
No oven needed! Entire recipe is stovetop + assembly.
Notes From My Kitchen (Testing Log)
- Batch 1: Pudding too loose — I stopped cooking early. Learned to wait for the “coat the spoon” stage.
- Batch 2: Bananas browned overnight — fixed by fully sealing with pudding.
- Batch 3: Tried low-fat milk — pudding lacked body. Sticking to whole milk.
- Batch 4: Over-whipped the cream — pudding tasted buttery. Soft peaks only.
- Batch 5: Tried assembling 12 hours ahead — cookies became too soft. Sweet spot is 4–6 hours.
- Final method: Low heat, whole milk, ripe bananas, and folding whipped cream only after pudding is fully cold gave the best balance of stability and fluffiness.
Nutrition & Food-Safety Disclaimer
Approx. 280–340 calories per serving, depending on portion size.
Values are estimates.
Remember to cook the pudding until thickened and store dairy desserts chilled. Consume within 3 days for safety.
Final Thoughts
If you’ve been searching for a banana pudding that’s creamy, stable, and built for real-life kitchens (not just Pinterest-perfect photos), this is the one. It’s simple enough for beginners and satisfying enough for seasoned bakers who want something nostalgic but elevated. Once you’ve made this version, try playing with flavors—caramel, cocoa, cinnamon, or even toasted coconut. This base is strong enough to handle it all.
And if you make it, I hope it becomes one of those desserts your family begs you to bring again.
Happy layering! 🥄🍌
Ultimate Banana Pudding Dessert — Thick, Creamy & So Addictive
Course: DessertCuisine: AmericanDifficulty: Easy6
servings20
minutes10
minutes300
kcal3
hours20
minutesA creamy, silky homemade banana pudding made with real bananas, a smooth stovetop custard, softened vanilla wafers, and light whipped cream. This version is rich but not overly sweet, stable enough for layering, and perfect for potlucks, holidays, or cozy weeknight desserts. Uses real bananas and a cooked custard for the best flavor and texture.
Ingredients
Pudding Base
Whole milk — 600 g (2 ½ cups)
Heavy cream — 120 g (½ cup)
Granulated sugar — 120 g (½ cup + 1 tbsp)
Egg yolks — 3 large (about 54 g)
Cornstarch — 30 g (¼ cup)
Salt — 1 g (⅛ tsp)
Unsalted butter — 28 g (2 tbsp)
Vanilla extract — 5 g (1 tsp)
- For Assembly
Ripe bananas — 3–4, sliced
Vanilla wafer cookies or butter biscuits — 200–240 g
Heavy cream — 240 g (1 cup), whipped to soft-medium peaks
Directions
- Warm the Dairy (3 minutes)
Heat whole milk and heavy cream in a saucepan over medium heat until steaming (not boiling). - Mix the Yolks & Dry Ingredients (1 minute)
In a bowl, whisk together egg yolks, sugar, cornstarch, and salt until smooth and pale - Temper the Eggs (1–2 minutes)
Slowly pour about 1 cup of the warm milk into the yolk mixture while whisking constantly. - Cook the Pudding (6–8 minutes)
Return all mixture to the saucepan.
Cook on medium-low, whisking constantly, until noticeably thickened and it coats the back of a spoon.
Do not boil aggressively. - Finish & Chill (2 minutes + chilling)
Remove from heat; whisk in butter and vanilla.
Strain through a fine sieve into a clean bowl.
Press parchment to surface to prevent skin.
Chill completely for 2–3 hours. - Whip the Cream (3 minutes)
Beat the 1 cup (240 g) heavy cream to soft–medium peaks. - Fold & Assemble (5–10 minutes)
Fold half the whipped cream into the chilled pudding.
Layer in a dish:
Cookies
Pudding
Banana slices
More pudding
Cookie top layer
Finish with remaining whipped cream.
Let sit 4–6 hours for cookies to soften (optional but recommended).
Notes
- Substitutions
Egg-Free: Use 45 g cornstarch total (no yolks).
Dairy-Free: Use full-fat coconut milk + oat milk; coconut cream for whipping.
Gluten-Free: Swap in GF vanilla wafers. - Tips
Cook pudding until thick enough to leave a clean line when you swipe a finger on the spoon.
Always chill pudding before adding whipped cream to prevent deflating.
Use ripe, freckled bananas for best flavor but don’t use overripe (they brown quickly).
For the best texture, assemble 2–4 hours before serving. - Serving Suggestions
Add caramel drizzle
Sprinkle toasted coconut
Top with shaved dark chocolate
Serve with berries or espresso for contrast - Nutrition Disclaimer
Calories are approximate and vary by brand and portion size.
Always store dairy-based desserts chilled and consume within 3 days.