This Chocolate Orange Trifle Cups recipe gives you clean layers (no soggy mess), a bright orange lift, and a chocolate finish that tastes like a fancy dessert glass—but it’s totally doable for a beginner with just a bowl, whisk, and fridge space. You’ll build it from quick chocolate cake cubes (or brownies), a no-fuss orange syrup, and stabilized whipped cream so the tops don’t slump overnight. Pro tip: chill the cups for 30 minutes after adding the syrup-soaked cake layer—this “sets” the base and keeps your cream layer sharply defined.
Why this recipe works (the “why” behind it)
These cups work because each layer is engineered for texture. First, a light syrup adds orange flavor without flooding the cake; sugar binds water, so the sponge tastes moist but stays structured rather than turning gummy. Second, cocoa and chocolate taste richer when paired with a tiny bit of salt and warm aromatics (vanilla + orange zest), which amplifies perceived sweetness without extra sugar.
Stabilizing the whipped cream with a little cream cheese (or gelatin option) gives you a firmer foam. Fat globules in cream trap air; a stabilizer strengthens that network so it doesn’t weep in the fridge. Finally, chilling between layers reduces mixing at the boundaries, so your cups look tidy even if you’re assembling them quickly.
Ingredients (weights + purpose)
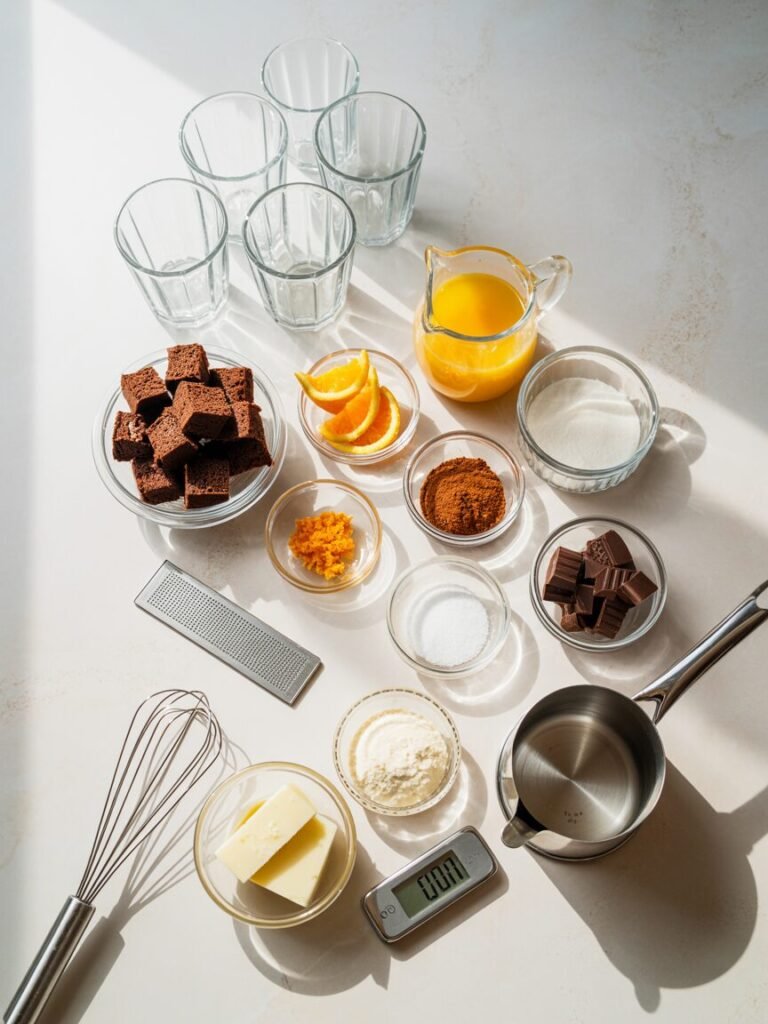
- Chocolate sponge or brownies, cubed — 300 g (≈3 cups cubes) — base structure (store-bought works)
- Fresh orange juice — 120 g (1/2 cup) — syrup flavor + moisture
- Granulated sugar — 25 g (2 tbsp) — balances acidity, controls soak
- Orange zest — from 1 orange (≈2 tsp) — bright aroma (don’t skip)
- Unsweetened cocoa powder (natural or Dutch) — 12 g (2 tbsp) — deepens chocolate note in syrup
- Fine salt — 1 g (1/4 tsp) — sharpens flavor
- Heavy cream ( 35%+ ) — 360 g (11/2 cups) — whipped layer
- Icing sugar — 35 g (1/3 cup) — sweetens + slightly stabilizes
- Cream cheese, cold — 90 g (3 oz) — stabilizes whipped cream, tangy balance
- Vanilla extract — 5 g (1 tsp) — rounds flavor
- Dark chocolate, chopped — 80 g (1/2 cup) — topping/shavings
- Optional: orange liqueur — 10–15 g (2–3 tsp) — adult version (stir into syrup)
Equipment
Required
- Digital scale (or measuring cups)
- Small saucepan or microwave-safe bowl
- Whisk + mixing bowl (no stand mixer needed)
- Hand mixer (helpful) or sturdy whisk
- Zester/fine grater
- 6 small cups/glasses (200–250 ml each) or 8 smaller ones
Nice-to-have
- Piping bag (or zip-top bag with corner snipped)
- Fine sieve (for cocoa)
- Instant-read thermometer (optional)
Step-by-step (with timing + visual cues)
Step 1: Prep your cake (5 minutes)
Cut sponge/brownies into 1.5–2 cm cubes.
Visual cue: cubes should hold edges when pinched; if your cake is very crumbly, cut slightly larger so it doesn’t disintegrate after soaking.
Step 2: Make quick orange-cocoa syrup (5–6 minutes)
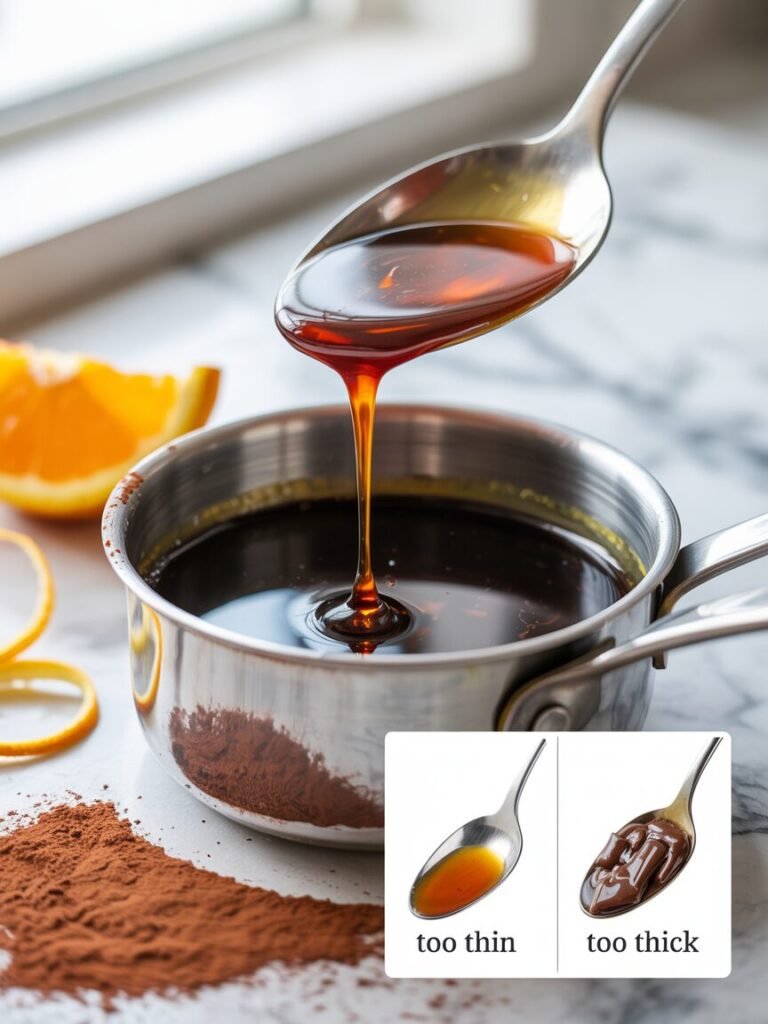
In a small saucepan, warm orange juice, sugar, cocoa, zest, and salt over medium heat for 2–3 minutes, whisking until smooth. Don’t boil hard—just a gentle steam. Cool 5 minutes.
Visual cue: syrup looks like thin hot chocolate and lightly coats a spoon. If it looks grainy, whisk 30 seconds more.
Avoid this: pouring piping-hot syrup onto cake in the glasses—it can melt into paste. Warm is fine; scorching hot is not.
Step 3: Make stabilized orange whipped cream (8–10 minutes)
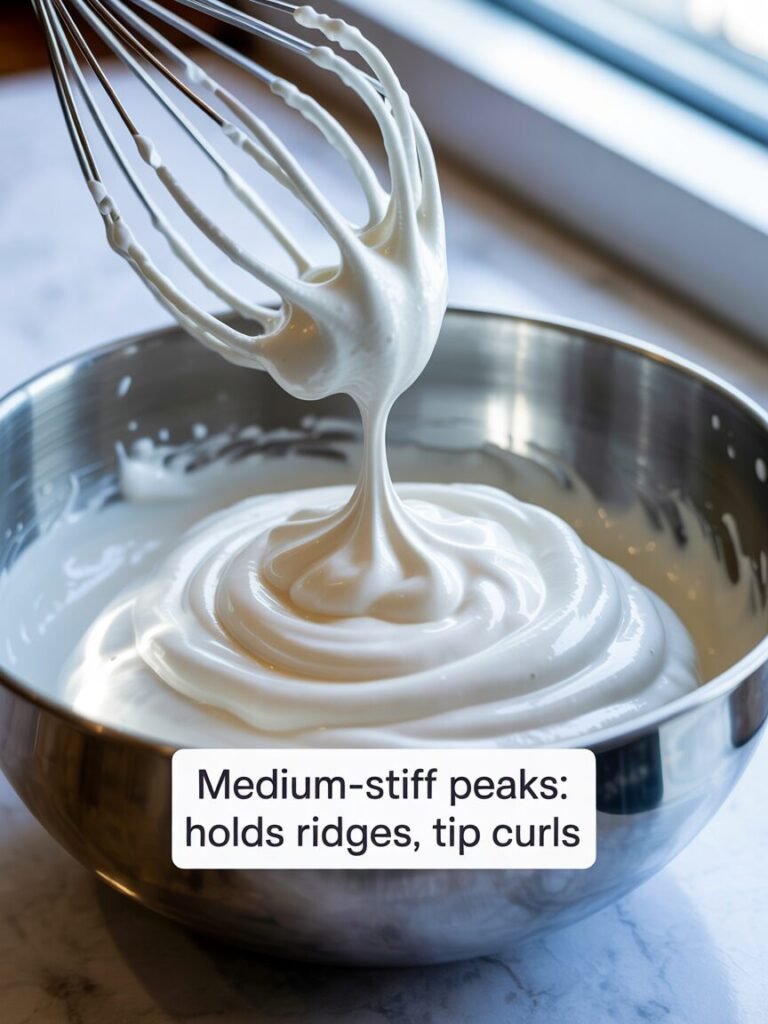
In a bowl, whisk cream cheese until smooth (about 30–45 seconds). Add icing sugar and vanilla; whisk again. Pour in cold heavy cream and whip to medium-stiff peaks.
Visual cue: peaks stand up but the tip bends slightly; when you lift the whisk, the cream holds ridges. If it looks curdled, you overwhipped—see troubleshooting.
Pro tip: chill the bowl 10 minutes if your kitchen is warm (Delhi summers especially).
Step 4: Assemble cups (15–20 minutes)
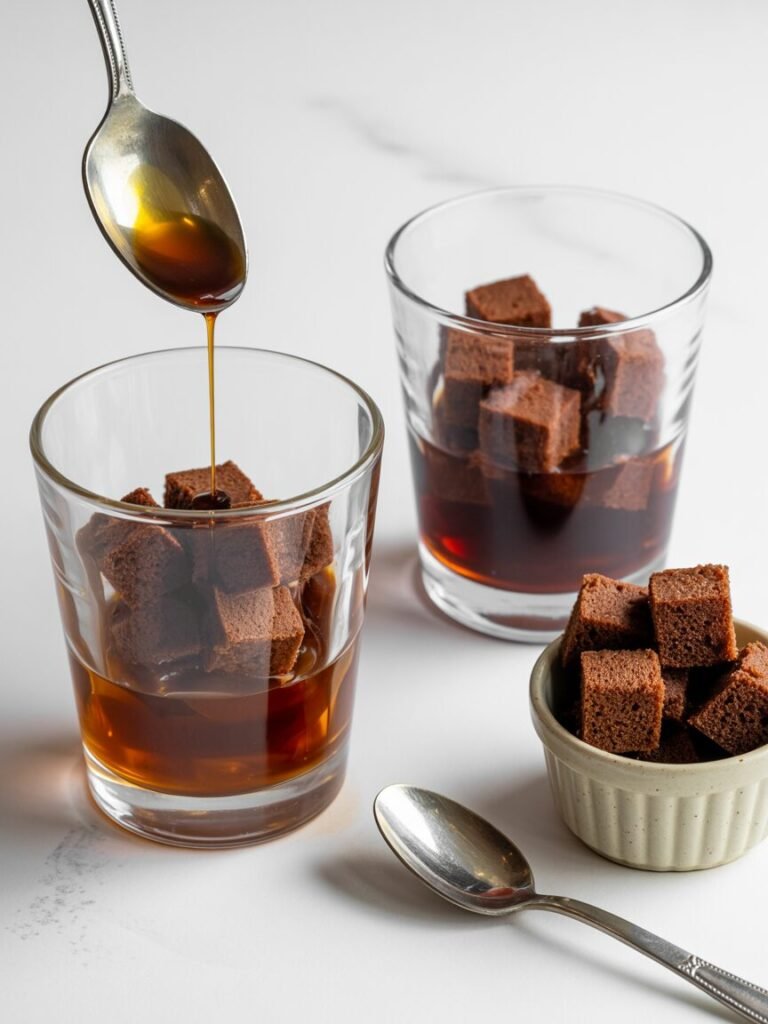
For each cup:
- Add a layer of cake cubes (≈40–50 g).
- Spoon 2–3 tsp syrup over the cake.
- Press very gently with the back of a spoon (don’t mash).
- Chill 30 minutes (this step makes clean layers).
- Pipe/spoon a generous whipped cream layer.
- Repeat once more if your cups are tall: cake + syrup + cream.
Finish with shaved chocolate and a pinch of fresh zest.
Visual cue: the cake layer should look darker and moist but not swimming. If you see syrup pooling at the bottom, you used too much—add a few dry cubes to balance.
Step 5: Chill and serve (minimum 2 hours)

Refrigerate at least 2 hours, ideally 6–12 hours for the best flavor.
Visual cue: after chilling, the spoon should glide through cream, then meet a soft but still bready cake layer (not sludge).
Troubleshooting (common issues + fixes)
- Problem: Cake turns soggy and dense
Likely causes: too much syrup, cake cubes too small
Fix next time: reduce syrup to 1–2 tsp per layer; cut 2 cm cubes - Problem: Layers smear, look messy
Likely causes: no chill between layers, syrup too hot
Fix next time: chill 30 minutes after the first soak; cool syrup 5–10 minutes - Problem: Whipped cream collapses overnight
Likely causes: underwhipped, cream too warm, no stabilizer
Fix next time: use 35%+ cream; chill bowl; whip to medium-stiff peaks - Problem: Cream looks grainy/curdled
Likely causes: overwhipped cream
Fix next time: stop at medium-stiff peaks; rescue by folding in 2–3 tbsp unwhipped cream gently - Problem: Bitter chocolate flavor
Likely causes: too much cocoa, very dark chocolate, not enough sugar/salt balance
Fix next time: use 8 g cocoa instead of 12 g; keep salt; add 5 g more sugar - Problem: Orange flavor disappears
Likely causes: no zest, using bottled juice only
Fix next time: add zest to syrup and a pinch on top right before serving
Substitutions and variations
Dietary swaps
- Egg-free: use eggless chocolate sponge or eggless brownies (store-bought or homemade). The trifle method stays the same.
- Dairy-free: use coconut cream (360 g, chilled overnight) whipped with 25–30 g icing sugar. Skip cream cheese; add 1/2 tsp vanilla + a pinch more salt.
- Gluten-free: use a gluten-free chocolate cake/brownie. Cut larger cubes because GF cakes crumble more easily.
Flavor variations (tested-style ideas)
- Terry’s-style vibe: add 1 drop orange extract (or 1/8 tsp) to the syrup plus extra zest.
- Mocha-orange: dissolve 2 g instant coffee into the warm syrup.
- Fruit layer: add 60 g segmented oranges or strawberries per 6 cups (pat dry first).
Scaling (quick guide)
- Makes 6 cups: as written (cups 200–250 ml)
- Makes 12 smaller cups: multiply everything by 1.5 (or keep same and make thinner layers)
Storage, make-ahead, and freezing
Counter: not recommended (cream layer needs refrigeration).
Fridge: 3 days, covered tightly. Best texture is day 1–2.
Freezer: not ideal once assembled—the whipped layer can weep and turn icy. You can freeze the cake cubes up to 2 months, thaw at room temp 30–45 minutes, then assemble.
What not to freeze: finished cups (cream texture degrades and layers separate).
Serving suggestions and pairing ideas
Serve straight from the fridge with coffee or masala chai for a fun contrast. If you like sharper balance, add a teaspoon of plain Greek yogurt into the cream cheese mixture (it makes the orange pop). For extra crunch, top with toasted sliced almonds or cocoa nibs right before serving so they stay crisp.
FAQs
Can I use store-bought brownies or cake?
Yes—choose a brownie that’s fudgy but not gooey. Very gooey brownies can turn pasty after soaking; reduce syrup and use larger cubes.
How do I prevent the cream from melting in warm weather?
Use cold cream, chill the bowl, and don’t skip cream cheese stabilization. Assemble and keep refrigerated; pull out only what you’ll serve.
Can I make this without a hand mixer?
Yes. Whisking by hand works, but it takes 6–10 minutes of vigorous whisking. Use a wide bowl and keep the cream very cold.
Can I halve or double the recipe?
Yes. Halve everything for 3 cups. Double everything for a party tray; assemble in a 20×20 cm (8×8 in) dish and chill 6 hours.
Can I make it in an OTG-only kitchen?
Yes—this recipe is no-bake if you use store-bought cake/brownies. If baking a sponge, bake on the middle rack with full preheat (usually 15–20 minutes).
Notes from my kitchen (testing log)
- Batch 1: I poured hot syrup straight onto tiny cake cubes; the bottom turned pudding-like and the layers blurred. Cooling the syrup 5–10 minutes fixed it.
- Batch 2: I skipped zest and relied on juice—tasted “sweet chocolate” but not chocolate-orange. Zest made it instantly brighter.
- Batch 3: Whipped cream with only icing sugar looked great, then slumped after 12 hours. Cream cheese stabilized it without needing gelatin.
- Batch 4: Dutch-process cocoa gave a smoother, less acidic chocolate note; natural cocoa tasted a bit sharper. Both work—salt matters more than cocoa type here.
- Batch 5: I tried adding orange segments wet from peeling; they leaked and made a watery layer. Patting fruit dry prevented seepage.
- Final method: chill between the first cake layer and cream layer, use medium-stiff peaks, and keep syrup measured (not “free-poured”) for clean, repeatable cups.
Nutrition and disclaimer
Approximate per serving (1 of 6): calories 420–520 depending on cake/chocolate brands and portion size.
Values are estimates; adjust for your ingredients and serving size. Keep desserts with dairy refrigerated and follow food-safety best practices (don’t leave out more than 2 hours at room temperature).
Conclusion and final thoughts
If you want a showy dessert that still feels low-stress, these Chocolate Orange Trifle Cups are the sweet spot: fast assembly, reliable layers, and a flavor combo that tastes “special occasion” without complicated pastry steps. Measure the syrup, chill once mid-assembly, and whip to medium-stiff peaks—those three choices make the difference between a messy cup and a clean, bakery-style trifle glass.
To conclude the post: Make the components (cake cubes, syrup, whipped layer), assemble with a short chill for crisp layers, then let the fridge do the final work for you. When you scoop in, you should get chocolate, orange, and cream in one bite—no sliding, no weeping, no soggy base.