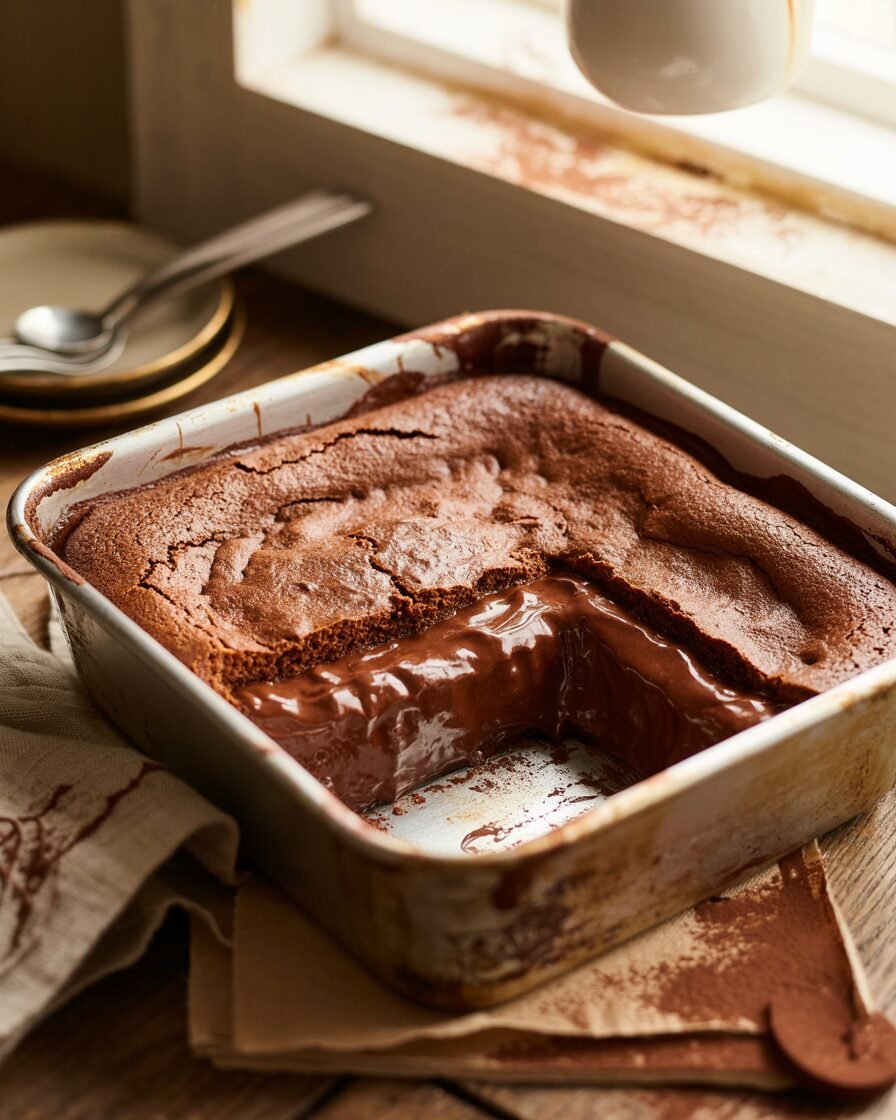
If you’ve ever wanted a dessert that magically creates its own hot fudge sauce while it bakes, this Warm Chocolate Pudding Cake is your new weeknight obsession. It’s the kind of comforting chocolate dessert that tastes like a hybrid of molten cake, brownie sundae, and old-school pudding all in one spoonful. And yes, it’s absolutely beginner-friendly.
What makes my version special? A carefully balanced wet-to-dry ratio that guarantees a gooey, saucy base without turning the cake layer gummy. Expect a soft, tender chocolate cake on top and a thick, glossy pudding underneath. Pro tip: Blooming cocoa in hot water unlocks deeper chocolate flavor and prevents bitterness.
Why This Recipe Works
Chocolate pudding cake relies on a peculiar but predictable chemical chain reaction. When sugar and cocoa dissolve in the hot liquid topping, they sink to the bottom. As the cake batter bakes, moisture migrates downward, forming a thick chocolate sauce while the top gently sets.
Two science-backed principles make this version reliable:
- Cocoa Blooming: Hydrating natural cocoa with hot water releases fat-soluble flavor compounds, making the chocolate taste fuller and less chalky.
- Controlled Leavening: A modest amount of baking powder allows the batter to rise without disturbing the pudding layer underneath. Too much would make the cake bubble unevenly and collapse.
- High Sugar-to-Liquid Ratio: Sugar lowers the mixture’s boiling point, helping the bottom layer stay fluid instead of firming up. This creates the signature pudding consistency.
The result: a consistent, saucy, ultra-moist cake every time.
Ingredients
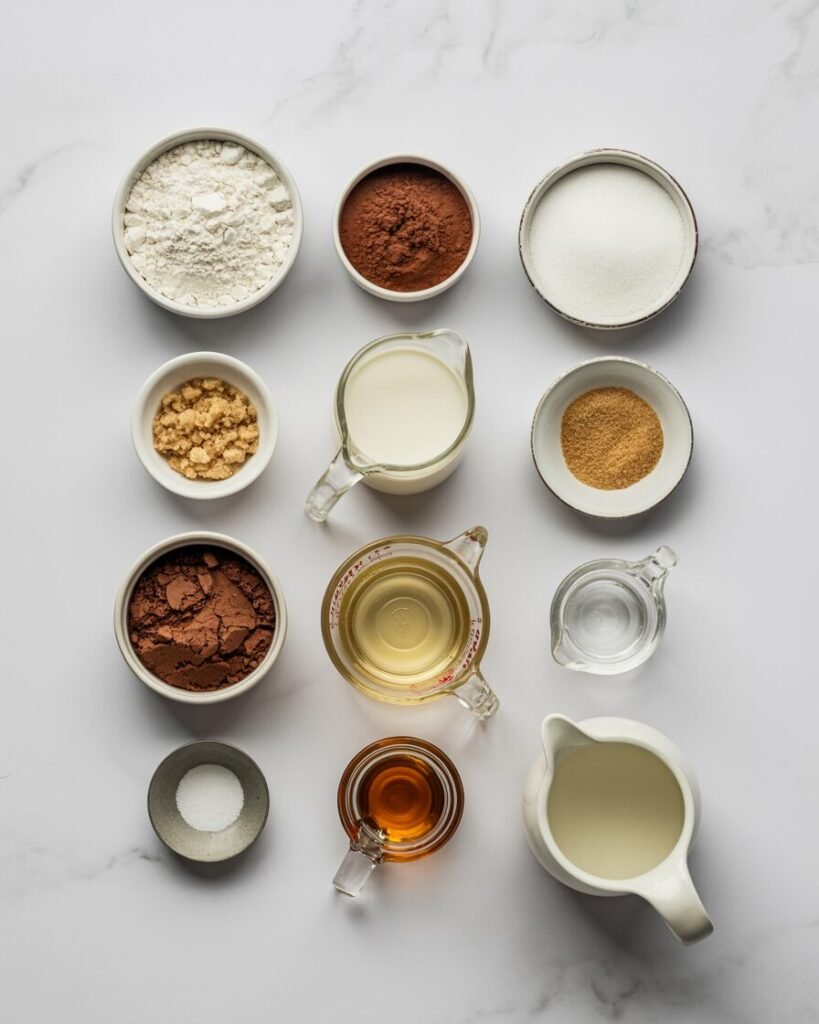
Dry Ingredients
- All-purpose flour — 120 g (1 cup)
Structure; keeps the top cake layer tender. - Natural cocoa powder — 30 g (⅓ cup)
Natural cocoa reacts best with baking powder; deeper flavor when bloomed. - Granulated sugar — 150 g (¾ cup)
Sweetness + moisture control. - Baking powder — 5 g (1 tsp)
Lift for the cake layer without destabilizing the pudding. - Fine salt — 2 g (¼ tsp)
Balances sweetness and enhances cocoa.
Wet Ingredients
- Whole milk — 180 g (¾ cup)
Moisture + richness. - Neutral oil — 45 g (3 tbsp)
Keeps cake soft even when cooled. - Vanilla extract — 5 g (1 tsp)
Rounds flavor.
Pudding Layer (Topping)
- Brown sugar — 100 g (½ cup)
Caramel notes + deeper sauce color. - Natural cocoa powder — 20 g (3 tbsp)
For a richer pudding base. - Hot water — 360 g (1½ cups)
Creates the molten sauce underneath.
Equipment
Required
- 8-inch (20 cm) square baking pan
- Whisk + mixing bowls
- Kitchen scale (strongly recommended)
- Oven or OTG
- Rubber spatula
Nice-to-Have
- Sieve for cocoa
- Offset spatula
- Oven thermometer for accuracy
- Parchment for lining bottom
Step-by-Step Instructions
Step 1 — Preheat & Prep
Preheat oven to 175°C (350°F). Grease your 8-inch pan lightly.
Visual cue: Pan should have a thin sheen, not a greasy puddle.
Step 2 — Combine Dry Ingredients (2 minutes)
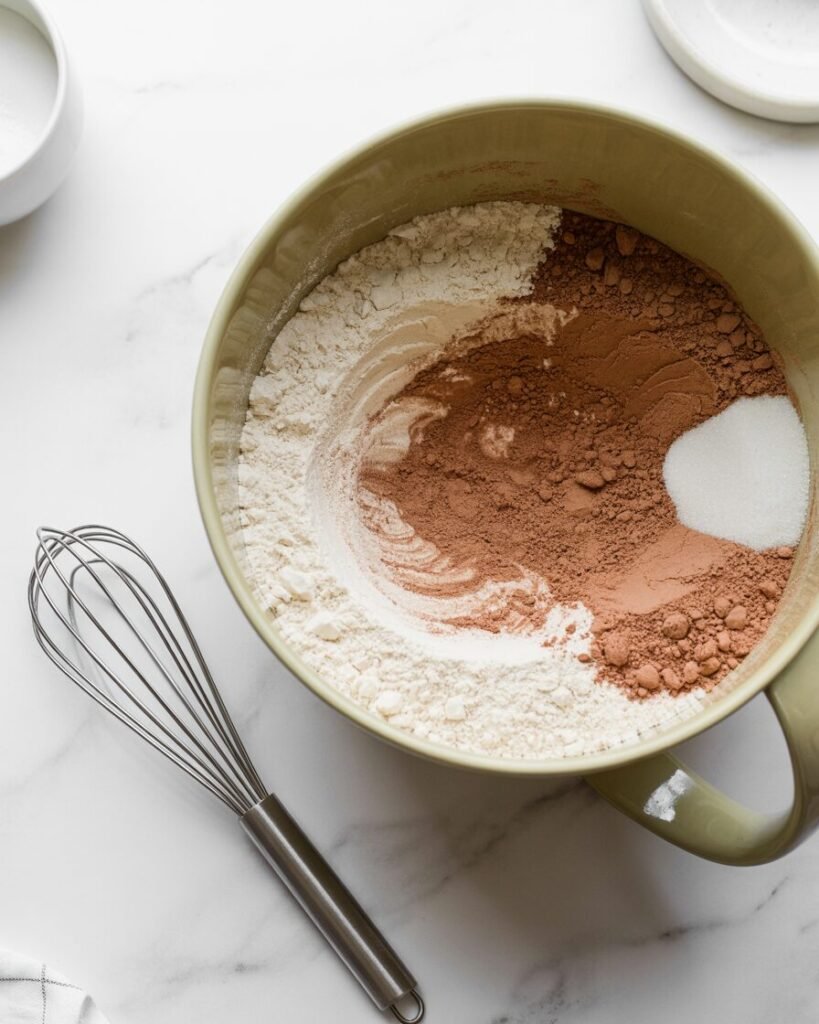
Whisk flour, 30 g cocoa, granulated sugar, baking powder, and salt.
Visual cue: Mixture should look evenly brown and lump-free.
Step 3 — Add Wet Ingredients (1–2 minutes)
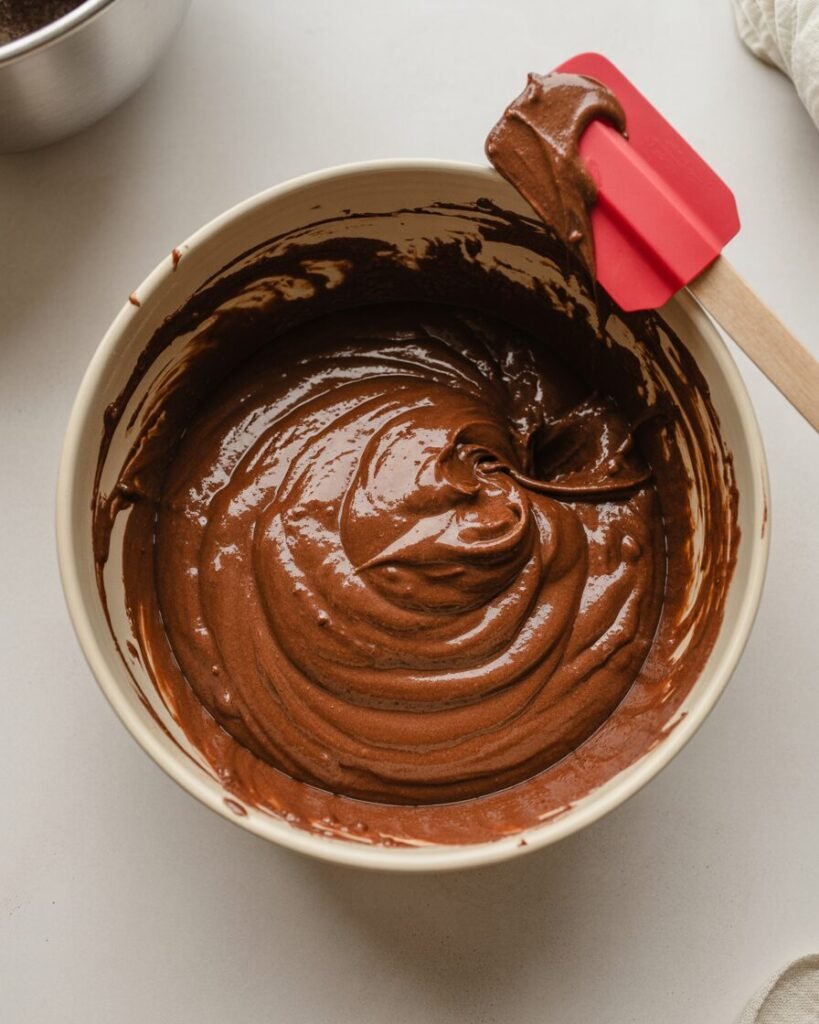
Add milk, oil, and vanilla. Whisk until a smooth, pourable batter forms.
Visual cue: Batter should flow like thick pancake batter—no grainy bits.
Step 4 — Spread Batter (20 seconds)
Pour into prepared pan and smooth the top.
Avoid this: Overmixing; it toughens the cake layer.
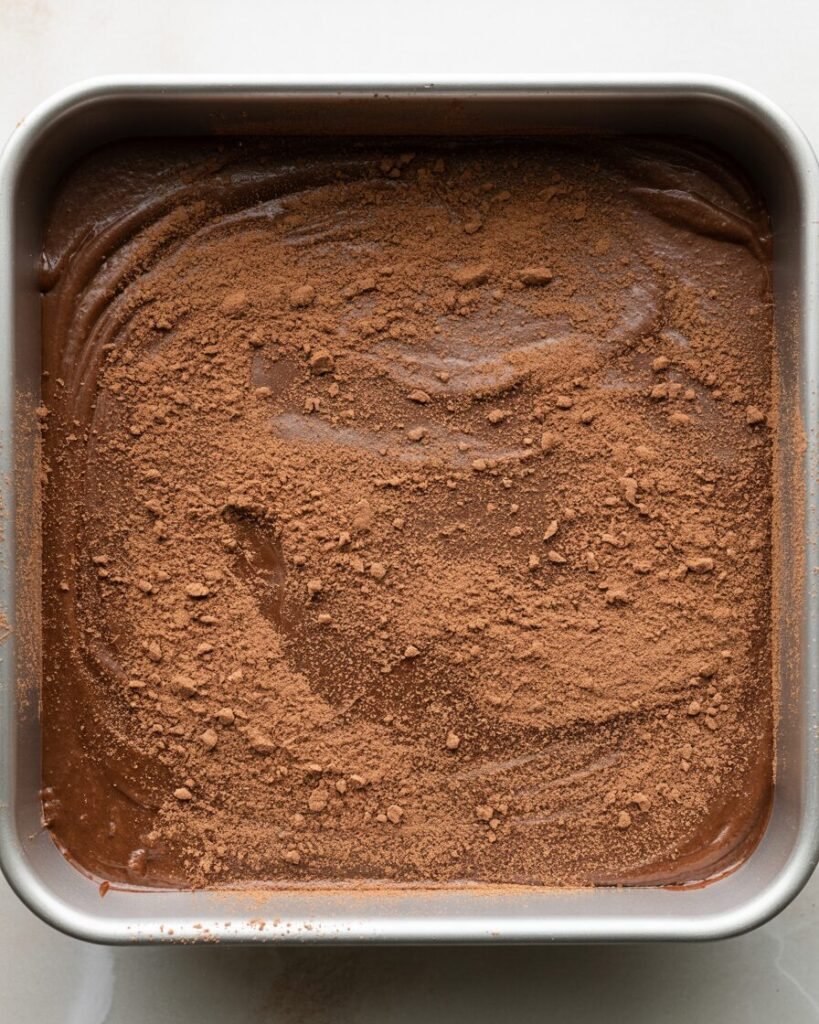
Step 5 — Mix Pudding Topping (1 minute)
Stir brown sugar + 20 g cocoa together. Sprinkle evenly over batter.
Visual cue: Entire surface should be covered in a dry sugar-cocoa layer.
Step 6 — Add Hot Water (30 seconds)
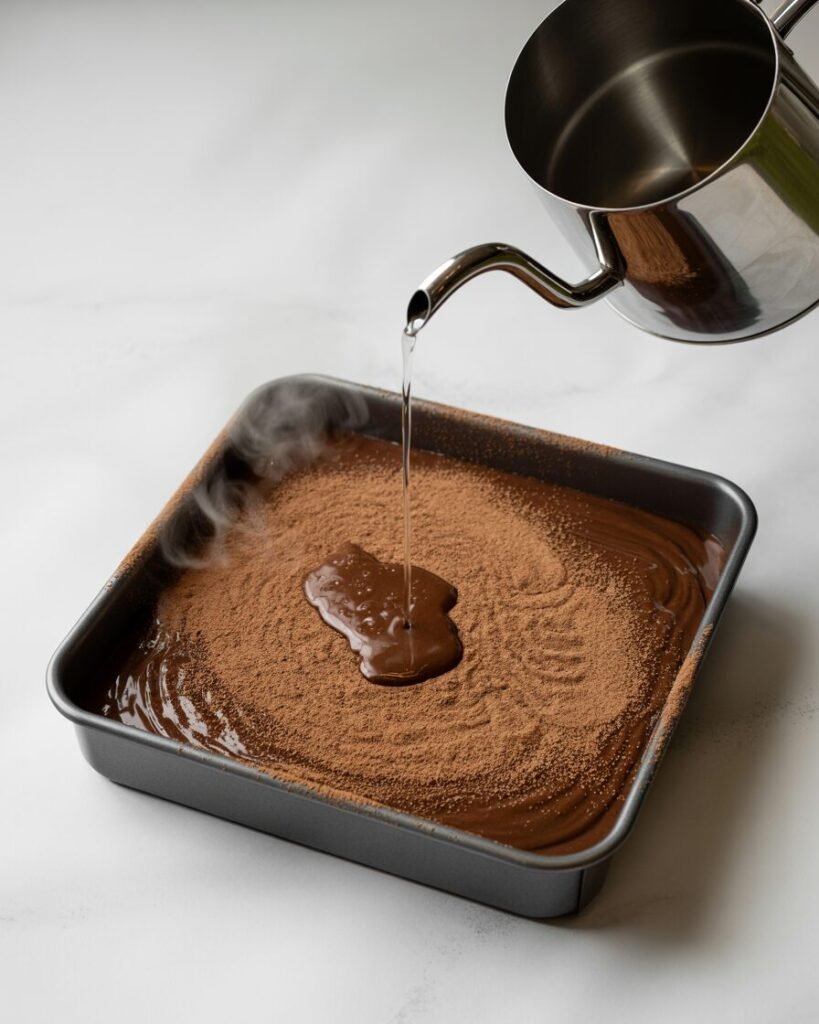
Slowly pour hot water over the topping. Do not stir.
Visual cue: Water will look weirdly separate—that’s correct. It sinks and forms pudding later.
Step 7 — Bake (28–32 minutes)
Bake on center rack until the top looks set but springs slightly when tapped.
Doneness:
- Cake top: matte, not shiny
- Pudding underneath: bubbling around edges
- Skewer test: inserted halfway should come out with moist crumbs, not liquid
Step 8 — Cool Briefly & Serve

Let rest 5 minutes. Scoop warm with ice cream.
Visual cue: Spoon should reveal a glossy, thick chocolate sauce underneath.
Troubleshooting
Problem: Cake collapsed while cooling
Likely causes: Undercooked center; oven temp too low.
Fix: Bake until edges bubble vigorously; check oven accuracy.
Problem: Pudding layer too thin
Likely causes: Too little cocoa/sugar in topping; water too cool.
Fix: Use freshly boiled water; measure cocoa precisely.
Problem: Dry cake top
Likely causes: Overbaking or too much flour.
Fix: Weigh flour; bake ≤32 minutes.
Problem: Bitter taste
Likely causes: Dutch-process cocoa (too alkaline) or burnt edges.
Fix: Use natural cocoa; reduce bake time by 2–3 minutes.
Problem: Watery pudding
Likely causes: Stirred after water was added.
Fix: Don’t disturb the topping step—ever.
Substitutions & Variations
Dietary Swaps
- Egg-free (already eggless!) — no changes needed.
- Dairy-free: Use oat milk or soy milk 1:1. Avoid almond milk—too thin.
- Gluten-free: Use a 1:1 gluten-free baking blend. Add 10 g more milk to compensate for starch dryness.
Flavor Variations
- Add ½ tsp espresso powder to intensify cocoa.
- Stir orange zest into the batter for citrus-chocolate notes.
- Use peppermint extract (⅛ tsp) for holiday pudding cake.
- Substitute coconut sugar in the topping for smoky caramel tones.
Scaling Table
| Pan Size | Multiply Recipe By | Bake Time |
|---|---|---|
| 6-inch square | 0.75× | 24–26 min |
| 9-inch square | 1.5× | 30–35 min |
| 12 cupcakes | 1× | 16–18 min |
Storage, Make-Ahead & Freezing
Counter
Store covered for 1 day. Cake will absorb some sauce but stay delicious.
Fridge
Keeps 3–4 days. Warm individual servings in microwave for 15–20 seconds to reactivate pudding texture.
Freezing
Freeze up to 2 months in airtight containers.
Thaw: Overnight in fridge, then warm gently.
What not to freeze: Entire pan—texture becomes uneven as sauce settles. Freeze portions instead.
Serving Suggestions
- Scoop into bowls and top with vanilla ice cream for hot-cold contrast.
- Add fresh raspberries or strawberries for acidity.
- Drizzle with salted caramel for an extra dessert-shop moment.
FAQs
1. Can I use Dutch-process cocoa?
You can, but expect a darker, slightly more bitter result. Reduce cocoa by 5 g.
2. How do I prevent a runny pudding layer?
Use boiling water and avoid stirring after topping.
3. Can I halve the recipe?
Yes—bake in a 6-inch pan and reduce time to ~24 minutes.
4. What oil works best?
Neutral oils like canola or sunflower keep the flavor clean; olive oil adds fruitiness.
5. Can I bake this in an OTG?
Yes—preheat fully and place pan in the middle rack with both rods on.
Notes From My Kitchen
Batch 1:
Used 100% milk for pudding layer—sauce turned too thick. Switched to hot water in next batch.
Batch 2:
Tried Dutch-process cocoa—great color but slightly bitter. Reduced cocoa by 5 g.
Batch 3:
Adjusted sugar ratio to increase glossiness and sauce thickness—success.
Final Method:
Natural cocoa, bloomed topping, and precise hot water quantity delivered the most reliable pudding texture: glossy, thick, and not grainy.
Nutrition & Disclaimer
Approx. per serving (based on 8 servings): ~260–290 calories. These values are estimates and vary by brand. Always follow standard food-safety practices for dairy handling and storage.
Conclusion
Warm Chocolate Pudding Cake is one of those recipes that rewards even the simplest effort with maximum comfort. It’s forgiving, fast, and satisfies every chocolate craving without demanding special tools or advanced techniques. Whether you’re baking on a cozy night in, feeding last-minute guests, or just indulging in a nostalgic dessert, this pudding cake delivers consistent results and an unforgettable molten center.