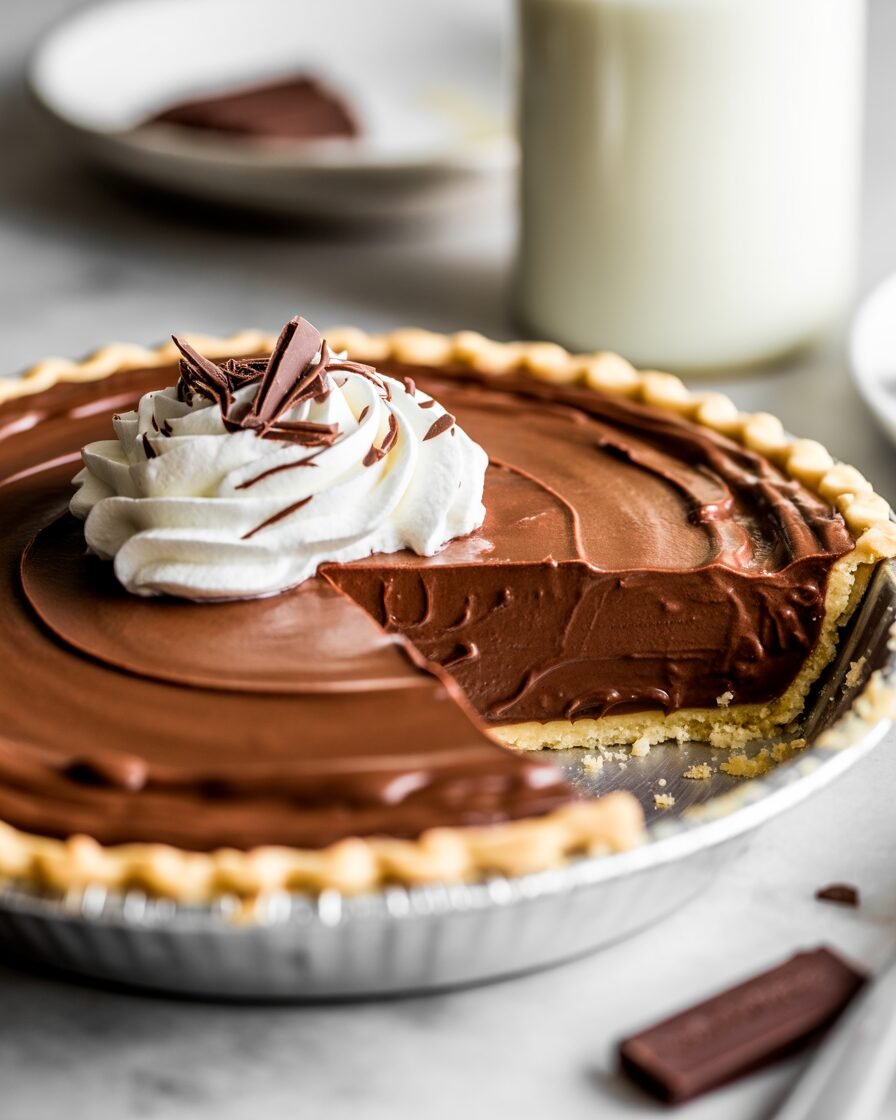
If you’ve been craving a chocolate dessert that’s rich, silky, and ridiculously easy for beginner bakers, this chocolate pudding pie is exactly the kind of recipe you’ll want to print and tape inside your cabinet door. This pie sets into a smooth, sliceable filling without gelatin or eggs—it relies entirely on cocoa, cornstarch, and the right simmering window for a fail-proof texture.
Expect: a glossy chocolate filling that cuts cleanly, a crisp cookie crust that stays crunchy for days, and a flavor that lands somewhere between chocolate mousse and a classic French pot-de-crème.
Pro Tip: The pudding must bubble for at least 60 seconds. Anything less and you’ll get a soft, slouchy pie that never fully sets.
Why This Recipe Works
Chocolate pudding pie looks simple, but the structure depends on a tight balance of fat, starch, and heat.
- Cornstarch Gelatinization: Cornstarch thickens only when heated above 88–90°C (190–194°F). This is why “just warm” pudding never sets. Sustained simmering activates starch molecules, which then hold the filling together as it chills.
- Cocoa + Fat = Creamy Texture: Dutch-process cocoa dissolves more smoothly because it’s alkalized, giving a deeper flavor and a darker, velvety finish. Combined with whole milk and a touch of butter, it creates a pudding that’s stable but not rubbery.
- Slow Cooling Prevents Graininess: Cooling the pudding covered with parchment directly on the surface avoids condensation and prevents a skin from forming, which can turn lumpy when stirred in later.
These small scientific details ensure your pie turns out smooth every single time.
Ingredients (With Weights & Purpose)

For the Cookie Crust
- Chocolate cookies, crushed — 180g (about 1 ½ cups) — structure and crisp base
- Unsalted butter, melted — 75g (5 tbsp) — binds crumbs and prevents crumbling
For the Chocolate Pudding Filling
- Granulated sugar — 120g (½ cup) — sweetness + balances cocoa bitterness
- Dutch-process cocoa powder — 40g (½ cup) — deeper flavor and smoother texture
- Cornstarch — 35g (¼ cup) — primary thickener
- Fine salt — 1g (⅛ tsp) — enhances chocolate
- Whole milk — 720ml (3 cups) — body and creaminess
- Unsalted butter — 28g (2 tbsp) — glossy finish + flavor
- Vanilla extract — 1 tsp — rounds out bitterness
Optional Topping
- Lightly sweetened whipped cream — 1–2 cups
- Shaved chocolate — for garnish
Equipment
Required
- 9-inch (23 cm) pie pan
- Medium saucepan
- Whisk
- Heat-safe spatula
- Kitchen scale (recommended)
- OTG/oven or stovetop
- Instant-read thermometer (helpful for beginners)
Nice to Have
- Fine-mesh sieve
- Offset spatula
- Silicone pie shield (optional)
Step-by-Step Instructions with Visual Cues
1. Make the cookie crust

- Preheat oven to 175°C (350°F).
- Mix crushed cookies and melted butter until the mixture resembles wet sand — if grabbed, it should clump lightly.
- Press firmly into your pie pan, making sure the edges are compact.
- Bake for 8–10 minutes, just until fragrant.
- Cool completely before adding filling.
2. Mix dry ingredients

In a saucepan, whisk sugar, cocoa, cornstarch, and salt.
Visual Cue: No lumps of cocoa or starch; the mixture should look uniform and dusty.
3. Add milk and heat
- Add about ½ cup milk and whisk into a thick paste (prevents lumps).
- Add the rest of the milk gradually.
- Cook over medium heat, whisking constantly, until the mixture begins to thicken.
Visual Cue: When it first thickens, it will look like thin hot chocolate, then quickly turn glossy and thick.
4. Cook to activate the starch

Once bubbling, let the pudding boil for a full 60 seconds, whisking continuously.
- Temp should reach 88–90°C (190–194°F).
Visual Cue: Large bubbles “blorp” up slowly through the thick pudding.
5. Finish the pudding
Remove from heat and whisk in butter and vanilla.
Visual Cue: The mixture becomes shiny and silky.
6. Fill the crust

Pour the hot pudding into the cooled crust.
Use an offset spatula to smooth the top.
Important: Lay a piece of parchment directly on the surface to prevent skin formation.
7. Chill

Refrigerate at least 4 hours, ideally overnight for the cleanest slices.
Visual Cue when slicing: The knife should glide smoothly with minimal pudding drag.
Troubleshooting (Common Failures & Fixes)
1. Pie didn’t set
- Cause: Under-cooked pudding; simmered less than 60 seconds.
- Fix: Ensure it reaches 88–90°C and bubbles heavily for 1 full minute.
2. Grainy texture
- Cause: Skin formed and was mixed back in.
- Fix: Place parchment directly on pudding during cooling.
3. Watery layer on bottom
- Cause: Condensation trapped under crust; crust not baked long enough.
- Fix: Bake crust 8–10 minutes; cool fully before filling.
4. Lumps of cocoa/starch
- Cause: Adding all milk at once.
- Fix: Start with a paste of dry ingredients + small milk addition.
5. Crust crumbling
- Cause: Too few crumbs/butter ratio off.
- Fix: Crumbs should clump when squeezed; increase butter by 10g next time.
Substitutions & Variations
Dietary Swaps
- Egg-Free: Already eggless.
- Dairy-Free: Use oat milk or soy milk (720ml). Replace butter with 2 tbsp coconut oil. Texture will be slightly softer; chill overnight.
- Gluten-Free: Use gluten-free cookies for the crust.
Flavor Variations
- Add 1 tsp espresso powder to intensify chocolate.
- Add ½ tsp cinnamon for a Mexican chocolate version.
- Use 70% dark chocolate: reduce cocoa by 10g and whisk in 80g chopped dark chocolate at the end.
Scaling the Recipe
| Pie Size | Multiply Ingredients By |
|---|---|
| 8-inch | 0.85× |
| 10-inch | 1.25× |
| Mini tartlets (6) | 1× for 6 small shells |
Storage, Make-Ahead & Freezing
Counter
Not recommended—pudding contains dairy.
Fridge
- Keeps 4–5 days tightly covered.
- Whipped cream topping should be added fresh before serving.
Freezer
- Freeze whole pie (without whipped cream) for up to 2 months.
- Thaw overnight in the fridge.
- Do not freeze whipped cream topping — it weeps when thawed.
Texture Refresh
If crust softens, chill pie uncovered for 30 minutes before serving.
Serving Suggestions
- Top with whipped cream or stabilized whipped cream.
- Serve with raspberry coulis for acidity.
- Add shaved chocolate for texture contrast.
- For a kid-friendly version, sprinkle mini chocolate chips before chilling.
FAQs
1. Can I use natural cocoa instead of Dutch-process?
Yes, but flavor becomes lighter and slightly sharper. Increase sugar by 10g for balance.
2. How do I prevent lumps?
Create a paste first. Add milk gradually, whisking until smooth before heating.
3. Can I make this in an air fryer/OTG?
Yes — only the crust is baked. Bake at 160°C (320°F) for 8–10 minutes in the OTG.
4. My pie is runny even after chilling. Why?
It wasn’t boiled long enough or the milk-to-starch ratio was off. Ensure full simmer for 60 seconds.
5. Can I double the recipe?
Yes, but use a large pot and whisk vigorously. Pudding thickens quickly in big batches.
Notes From My Kitchen — Testing Log
Batch 1
Used natural cocoa. Flavor was good but too light; pie set soft. Increased cornstarch by 5g.
Batch 2
Boiled only 20 seconds — pie slumped slightly. Confirmed that full 60-second boil is essential.
Batch 3
Tried dairy-free oat milk; filling set softer but sliceable after overnight chill.
Final Version
Dutch cocoa + whole milk + 60-second boil gave the cleanest slice and most luxurious texture.
Nutrition & Disclaimer
Approximate (per slice, 1 of 10): ~285 kcal.
Numbers vary by brands and serving size.
Note: Follow safe dairy-handling and chilling practices; do not leave pudding pie unrefrigerated for more than 1 hour.
Conclusion
This chocolate pudding pie is one of those desserts that makes you look like you spent hours in the kitchen when, in reality, the most technical part is whisking for one minute. It’s forgiving, crowd-pleasing, and adaptable no matter what equipment you have. If you follow the timing and texture cues—especially the boiling step—you’ll get a pie with a silky, sliceable filling every single time.