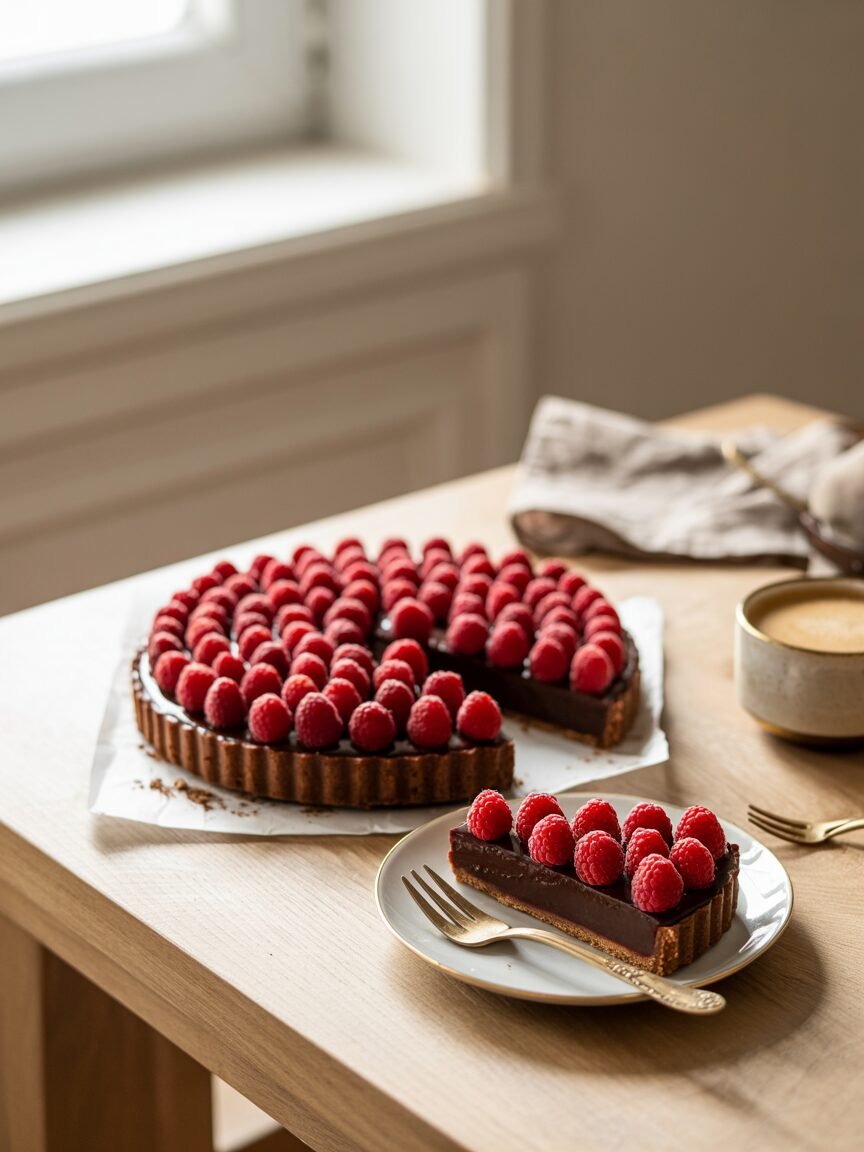
This chocolate raspberry tart delivers a perfect balance: a crisp, buttery chocolate crust paired with a silken, bittersweet chocolate filling and a burst of fresh raspberries on top. The result is a dessert that’s elegant enough for a dinner party, but easy enough for a quiet weekend bake. My pro tip: let the tart set at room temperature for at least an hour before chilling—this improves texture and prevents over-condensation.
Why This Recipe Works
What sets this recipe apart is the combination of a chilled chocolate ganache filling and a ready-to-serve tart that doesn’t need baking. The crust is made from simple pantry ingredients, ensuring accessibility even if you don’t have a stand mixer. The key scientific points that make this work:
- Chocolate ganache melts smoothly when the cream is heated to just below a simmer, allowing the cocoa solids and fats to emulsify into a silky filling.
- Most tart shells benefit from a “blind bake” (pre-baking with weights) to prevent puffing and ensure a crisp crust.
- Room-temperature ingredients blend more easily and result in a uniform texture, which is critical for both crust and filling.
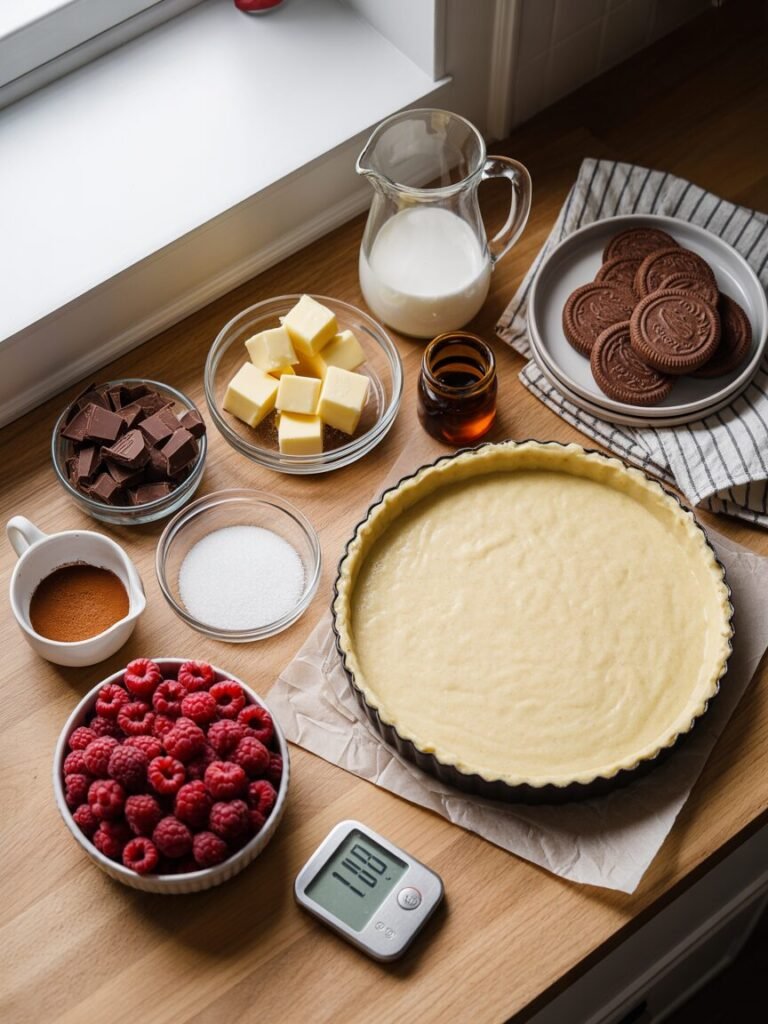
Ingredients with Weights and Purpose
| Ingredient | Grams | Cups (U.S.) | Purpose |
|---|---|---|---|
| Chocolate biscuit/cookie | 200g | 2 cups | Base for crust; provides sweet crunch and structure. Use Oreo or similar. |
| Butter (melted) | 100g | 7 tbsp | Binds crust and adds richness. Use unsalted for best flavor control. |
| Dark chocolate (70%) | 300g | 2⅔ cups | Filling; rich flavor and smooth texture. |
| Heavy cream (35%) | 150g | ¾ cup | Ganache liquid; emulsifies chocolate for smoothness. |
| Vanilla extract | 1 tsp | 5 ml | Enhances flavor and aroma. |
| Fresh raspberries | 200g | 1½ cups | Topping; adds freshness and color. |
Pro tip: Use a high-quality dark chocolate (70% cocoa) for best results. Avoid Dutch-processed chocolate unless specified, as it can affect flavor and texture.
Equipment
- Required:
- 9-inch removable-bottom tart pan
- Food processor (or rolling pin and bowl)
- Measuring cups and spoons, or digital scale
- Small saucepan
- Spatula or spoon
- Baking paper
- Oven or toaster oven (for crust)
- Nice-to-have:
- Parchment circles
- Sieve for dusting
- Offset spatula for smooth filling
Step-by-Step Instructions
Step 1: Prepare the Crust

- Crush cookies into fine crumbs (use a food processor or a plastic bag and rolling pin).
- Add melted butter and mix until well combined.
- Press mixture firmly into the tart pan, reaching about 2 cm up the sides.
- Bake at 160°C (325°F) for 10 minutes. Cool completely.
- Visual cue: The crust should be golden and firm, not soft or crumbling.
Step 2: Make the Ganache
- Chop chocolate into small, even pieces.
- Heat cream just until it starts to steam (do not boil).
- Pour hot cream over chocolate; let sit for 2 minutes.
- Stir gently until smooth. Add vanilla.
- Visual cue: Ganache should be glossy and without streaks.
Step 3: Assemble the Tart


- Pour ganache into cooled crust.
- Smooth the top with a spatula.
- Warm or cool the tart for 1 hour at room temperature (this helps prevent cracks).
- Add raspberries on top in a circular pattern.
- Chill in the fridge for 3–4 hours, or until set.
Troubleshooting: Common Failures and Fixes
- Crust is soggy:
- Causes: underbaked, too much butter, not blind-baked.
- Fix: Bake crust longer, blind-bake with weights, keep filling minimal.
- Ganache is grainy:
- Causes: over-heated chocolate, cream too hot.
- Fix: Let chocolate cool slightly, use gentle heat.
- Raspberry release moisture:
- Causes: Adding berries too early, tart not chilled.
- Fix: Add berries just before serving.
- Tart is hard or cracked:
- Causes: Over-chilled or too much chocolate.
- Fix: Let set at room temperature before chilling.
- Bitter taste:
- Causes: Low-quality chocolate, too much cocoa.
- Fix: Use balanced chocolate, adjust sweetness.
Substitutions and Variations
- Gluten-free: Use gluten-free chocolate cookies for the crust.
- Dairy-free: Use coconut cream and vegan chocolate.
- Egg-free: No eggs needed in this recipe.
- Flavor swaps: Try orange zest, almond extract, or swap raspberries for strawberries or blueberries.
- Scaling: For a 6-inch tart, halve all ingredients. For 12 small tarts, multiply by 1.5 and divide evenly.
Storage, Make-Ahead, and Freezing
- Counter: Store covered for up to 2 days.
- Fridge: Keep for up to 5 days.
- Freezer: Up to 1 month. Thaw at room temperature for 1–2 hours.
- Do not freeze once berries are added—they will become mushy.
- Re-crisp: Warm unfilled crust briefly in the oven before filling.
Serving Suggestions
Serve with a dusting of cocoa powder or a side of whipped cream. Pair with coffee, tea, or a light red wine for elegant contrast to the chocolate’s sweetness.
FAQs
- Can I use milk chocolate instead of dark? Yes, but expect sweeter filling—reduce sugar if needed.
- How to prevent cracks in the ganache? Let it set at room temperature before chilling.
- Can I make this egg-free? Yes, this recipe is naturally egg-free.
- Best way to store for later? Assemble, chill, and add berries just before serving.
- How to bake in an OTG? Use the same oven temperature and blind-bake the crust.
- Can I use frozen berries? Yes, but thaw and pat dry for best appearance.
Notes from My Kitchen
- Batch 1: Used store-bought cookies and low-fat cream. Crust was soft and ganache was too thick. Adjusted to full-fat cream and a better-quality chocolate.
- Batch 2: Tried a gluten-free crust. Slightly crumbly, so added a pinch of xanthan gum—improved texture.
- Final: Used high-quality chocolate, full-fat cream, and fresh raspberries. Perfect balance of crisp, smooth, and fresh.
Nutrition and Disclaimer
Per serving (1/8 of tart): ~280 kcal, 18g fat, 27g carbs, 4g protein.
Values are estimates; adjust for brands and portion sizes. Practice food safety: keep refrigerated and serve chilled.
Conclusion
This chocolate raspberry tart is a stellar example of how simple ingredients can create a show-stopping dessert. With clear steps, tested tips, and adaptable substitutions, it’s a recipe you can rely on for any occasion. Happy baking!
Rich Chocolate Raspberry Tart – Oreo Cookie Crust & Ganache Filling
Course: DessertCuisine: EuropeanDifficulty: Easy, Medium10
servings25
minutes10
minutes380
kcal3
hours45
minutesChill Time: 3–4 hours
A rich and silky chocolate raspberry tart with a crisp chocolate cookie crust, a smooth dark chocolate ganache filling, and a crown of fresh raspberries. This is a simple, no-fuss showstopper that looks bakery-level but is fully doable in a home kitchen, without a stand mixer. Perfect for date nights, holidays, or any time you want a dessert with serious “wow” factor and bright berry contrast.
Ingredients
Chocolate Cookie Crust (9-inch tart)
Chocolate sandwich cookies (Oreo-style), finely crushed – 200 g (about 2 cups packed crumbs, from 22–24 cookies)
Unsalted butter, melted and slightly cooled – 100 g (7 tbsp)
- Chocolate Ganache Filling
Dark chocolate, 60–70% cocoa, finely chopped – 300 g (about 2⅔ cups chopped or callets)
Heavy cream (whipping cream, 30–35% fat) – 180 g (¾ cup + 2 tbsp)
Vanilla extract – 1 tsp
Fine sea salt – ⅛ tsp (small pinch, optional but recommended to balance sweetness)
- Raspberry Topping
Fresh raspberries – 250–300 g (2–2½ cups, enough to cover the top in tight circles)
Optional: Icing sugar (powdered sugar), for dusting – 1–2 tsp
Directions
- Prep the pan and oven
Lightly grease the base and sides of a 9-inch tart pan with a thin film of butter or neutral oil.
Preheat oven/OTG to 160°C (325°F), with the rack in the middle position.
Visual cue: By the time the crust is mixed, the oven should be fully preheated. - Make the chocolate cookie crust
Add chocolate sandwich cookies to a food processor and pulse until you have fine, even crumbs with no large pieces.
Visual cue: The texture should look like slightly damp sand.
Pour the crumbs into a mixing bowl, add melted butter, and stir until every crumb looks coated and slightly darker.
If you squeeze a handful, it should hold together without crumbling apart.
Transfer the mixture into the prepared tart pan.
Use your fingers to spread crumbs evenly, then use the flat bottom of a measuring cup or glass to firmly press crumbs over the base and up the sides (about 3–4 cm / 1–1½ inches high).
Visual cue: The surface should be smooth and compact, not patchy or crumbly.
Bake the crust at 160°C (325°F) for 10 minutes.
Visual cue: The crust will look slightly set and matte, and will firm up more as it cools.
Place the tart pan on a cooling rack and let the crust cool completely to room temperature, at least 20–30 minutes, before adding the filling.
Avoid this: Adding ganache to a hot crust can cause butter to melt and the crust to slump or become greasy. - Make the chocolate ganache filling
Place finely chopped dark chocolate into a heatproof bowl. Smaller, even pieces melt more smoothly.
In a small saucepan, gently heat the heavy cream over medium-low heat until it just starts to steam and small bubbles appear around the edges.
Do not boil; aim for just below simmer.
Visual cue: The surface should quiver and there may be a bit of steam, but no rolling bubbles.
Immediately pour the hot cream over the chocolate, making sure all the chocolate is submerged. Let sit undisturbed for 2–3 minutes to soften.
Starting from the center, gently stir with a spatula in small circles, gradually moving outward until the mixture becomes glossy, smooth, and fully combined.
Visual cue: No visible bits of chocolate, no oily streaks; the ganache should look like thick, liquid velvet.
Stir in vanilla extract and a pinch of fine sea salt.
Let the ganache sit at room temperature for 5–10 minutes so it thickens slightly before pouring.
Check: Lift the spatula—ganache should flow in a slow ribbon that briefly sits on the surface before disappearing. - Fill the tart shell
Make sure the crust is completely cool. Place the tart pan on a flat tray or board for easier handling.
Pour the ganache into the cooled crust, starting in the center and allowing it to spread outward.
Gently tilt and rotate the pan to help the ganache level out, or use an offset spatula to smooth the surface.
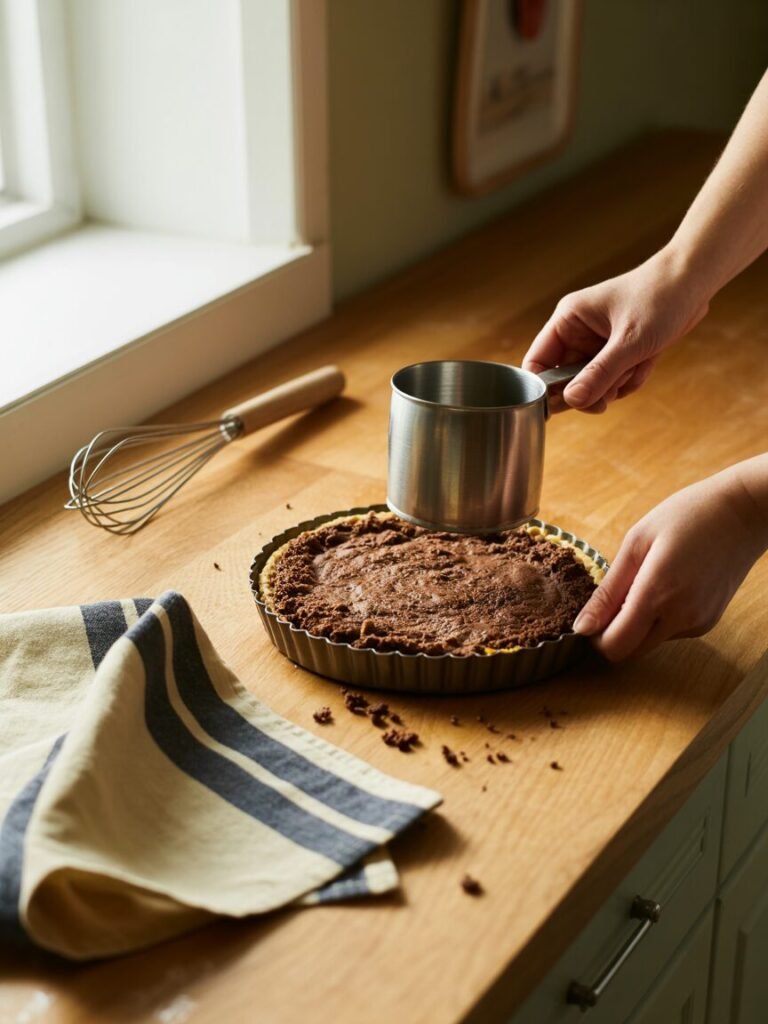
Visual cue: The top should be smooth, glassy, and level, with no exposed crumbs. - Set the ganache (important pro tip from the article)
Let the tart sit at room temperature for 45–60 minutes to begin setting.
Reason: This reduces condensation and helps prevent tiny surface cracks that can appear if ganache is shocked by the cold.
Then transfer the tart to the refrigerator and chill for at least 2–3 hours, or until the ganache is fully set.
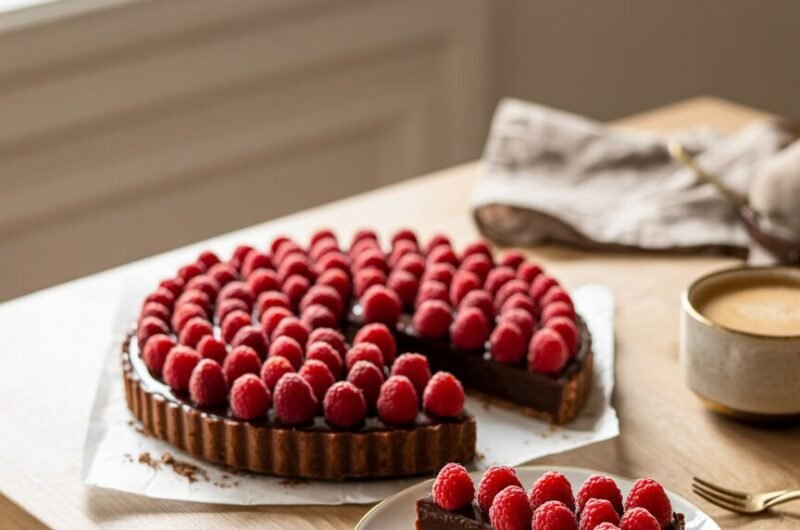
Visual cue: When gently nudged, the center should feel firm but still slightly soft, not liquid. - Add the raspberry topping
Once the ganache is set, arrange fresh raspberries on top in tight concentric circles. Start from the outer edge and work inward.
Place berries upright for a classic look; tuck them close together so little of the ganache shows through.
Visual cue: The top should look generously covered and full, with bright red pop against the dark chocolate.
If using, lightly dust the top with icing sugar just before serving. - Slice and serve
For clean slices, dip a sharp knife in hot water, wipe it dry, and cut straight down through the tart. Wipe the knife between each cut.
Serve slices slightly chilled or at cool room temperature. Many people prefer the texture after the tart has sat out of the fridge for 10–15 minutes.
Notes
- Notes & Tips
Texture balance: The crust is intentionally thin and crisp, so it snaps cleanly but doesn’t overpower the filling. If you prefer a thicker base, you can increase cookie crumbs to 230 g and butter to 115 g (½ cup) and bake 1–2 minutes longer.
Chocolate choice: A 60–70% cocoa dark chocolate gives the best balance of richness and sweetness. If using 50–55% chocolate, the tart will be sweeter and slightly softer; if using 72% or higher, the flavor will be more intense and slightly less sweet.
Ganache troubleshooting:
If the ganache looks grainy, the cream was probably too hot. Add 1–2 tbsp room-temperature cream and stir gently or blend with an immersion blender.
If it seems too runny, let it sit longer at room temp before chilling; it thickens as it cools.
Crust issues:
If the baked crust looks greasy, the butter may have been too hot or there was slightly too much. Next time, cool the melted butter for a few minutes before mixing, and press the crumbs more firmly.
If it crumbles when slicing, press the mixture more firmly next time and ensure it’s fully cooled before filling. - Make-Ahead and Storage
Make-ahead:
Crust can be baked 1 day ahead. Cool completely, cover well, and keep at room temperature.
The fully assembled tart (without raspberries) can be chilled up to 24 hours before serving. Add raspberries on the day of serving for best freshness.
Counter:
Keep the finished tart (with fruit) at cool room temperature for up to 4 hours while serving.
Fridge:
Store covered in the refrigerator for up to 3–4 days. The crust will gradually soften, but flavor stays great.
Freezer:
For best results, freeze without raspberries. Chill the tart until firm, wrap well in plastic and foil, and freeze up to 1 month.
Thaw overnight in the fridge, then top with fresh raspberries before serving.
Avoid freezing with berries already on top—thawed raspberries become mushy and can weep onto the ganache. - Nutrition (Estimate)
Per serving (1/12 of tart):
Calories: ~380 kcal
Carbohydrates: ~33 g
Protein: ~4 g
Fat: ~26 g
Saturated fat: ~15 g
Fiber: ~4 g
Sodium: ~130 mg
Values are rough estimates based on generic ingredients and may vary by brand and portion size. This recipe is for enjoyment and is not intended as dietary advice. Always follow general food-safety best practices: keep dairy-based desserts chilled, avoid leaving them out at warm room temperatures for extended periods, and store leftovers promptly.