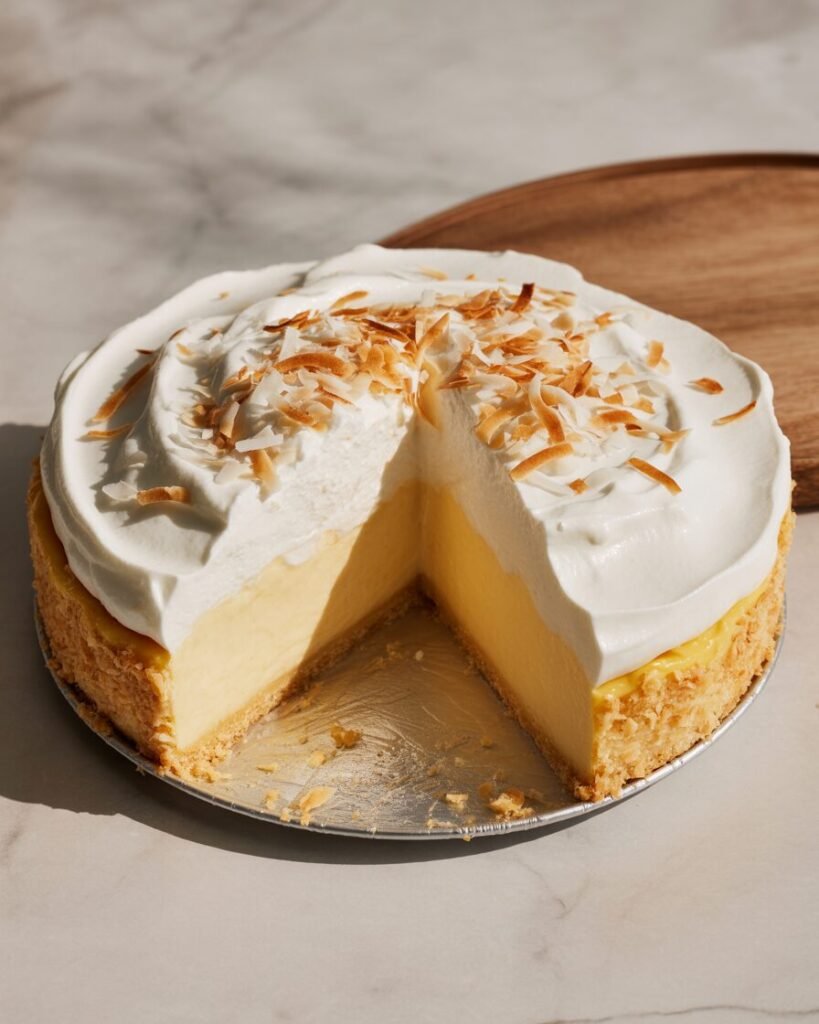
If you’ve ever sliced into a coconut cream pie and found soupy filling or a weepy crust, this one’s for you. This coconut cream pie recipe is designed for beginner to intermediate home bakers, especially if you’re working with an OTG oven and a simple whisk (no stand mixer needed).
You’ll get a silky, sliceable coconut custard, a crisp, fully baked crust, and stable whipped cream that holds for hours. The pro tip that changes everything? Cook the custard to 82–84°C (180–183°F) and strain it before filling the crust. That single step prevents graininess and ensures clean slices every time.
This is the version I serve at home — tested, tweaked, and made practical.
Why this recipe works
Coconut cream pie is essentially a stovetop custard stabilized with starch and eggs.
1. Cornstarch + egg yolks = structure.
Cornstarch thickens at around 95°C (203°F), but egg yolks begin setting earlier. Cooking gently to 82–84°C ensures the eggs thicken without scrambling while the starch activates fully.
2. Full-fat coconut milk matters.
Fat carries coconut flavor and gives the custard body. Reduced-fat versions create a thinner, slightly chalky texture.
3. Blind baking prevents sogginess.
Custard fillings release moisture as they cool. A fully baked crust with sealed pores (from egg wash) keeps the base crisp.
Did you know? Whipped cream collapses faster in humid weather. A little powdered sugar (contains starch) stabilizes it naturally.
Ingredients (9-inch / 23 cm pie, 8 slices)

Crust
- All-purpose flour — 190 g (1½ cups) — structure
- Unsalted butter, cold — 115 g (½ cup) — flakiness
- Sugar — 15 g (1 tbsp) — slight sweetness
- Salt — 3 g (½ tsp) — balance
- Ice water — 45–60 ml (3–4 tbsp) — hydration
Coconut Custard Filling
- Full-fat coconut milk — 400 ml (1 can) — flavor & fat
- Whole milk — 240 ml (1 cup) — lightens richness
- Egg yolks — 4 large (70 g) — thickening
- Granulated sugar — 120 g (½ cup) — sweetness
- Cornstarch — 35 g (¼ cup) — stability
- Salt — 2 g (¼ tsp) — balance
- Unsalted butter — 20 g (1½ tbsp) — silkiness
- Vanilla extract — 5 ml (1 tsp) — warmth
- Sweetened shredded coconut — 60 g (¾ cup) — texture
Whipped Cream
- Heavy cream (35% fat) — 240 ml (1 cup) — topping
- Powdered sugar — 15 g (2 tbsp) — stabilization
- Vanilla — 2 ml (½ tsp)
Equipment
Required
- 23 cm (9-inch) pie dish
- Rolling pin
- Whisk
- Heavy saucepan
- Fine sieve
- Oven/OTG
- Thermometer (recommended)
Nice to have
- Pie weights or dry beans
- Offset spatula
- Parchment paper
Step-by-step instructions
[Process photo: rolling out dough]
Step 1: Make the crust (15 min prep + 1 hr chill)
Rub cold butter into flour until pea-sized crumbs form. Add ice water gradually until dough holds when pressed.
Visual cue: Dough should look shaggy, not smooth. If smooth, you’ve overworked it.
Form disc, wrap, chill 1 hour.
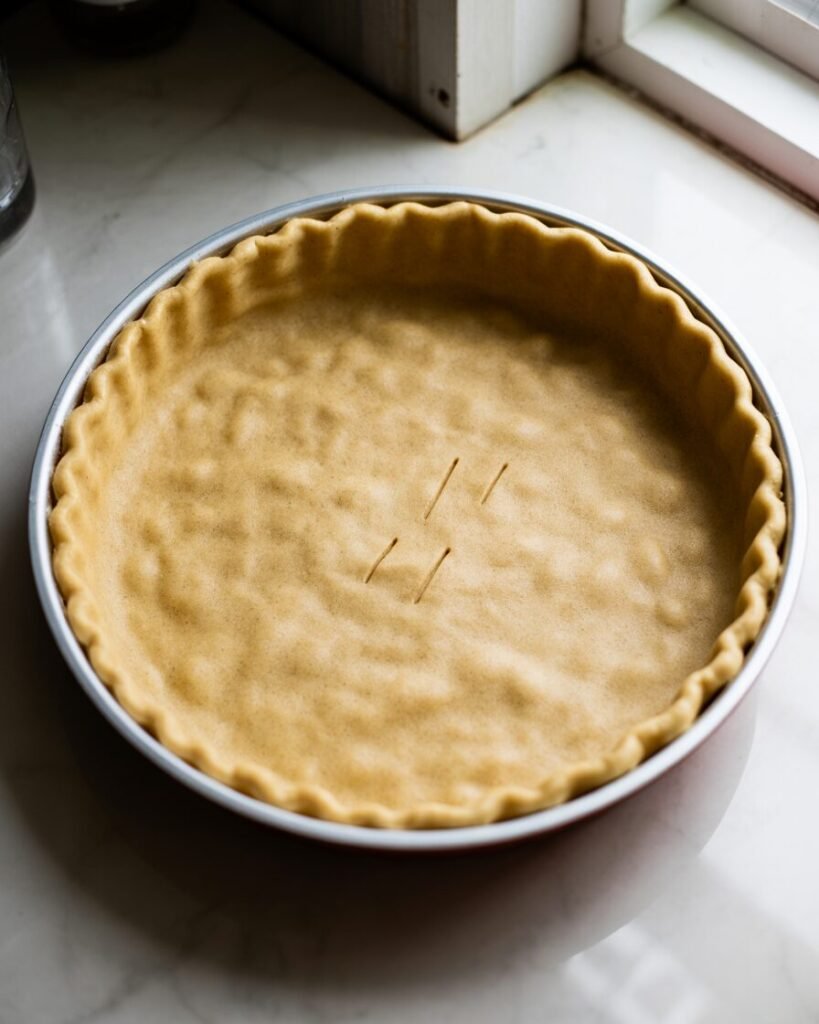
Step 2: Blind bake (25–30 min)
Preheat oven to 190°C (375°F), middle rack, 15 minutes.
Roll to 3 mm thickness. Fit into dish. Chill 15 minutes again.
Line with parchment + weights. Bake 15 minutes. Remove weights. Brush lightly with egg white. Bake 10–15 more minutes until golden.
Visual cue: Bottom should look matte and dry, not glossy.
Cool completely.
[Process photo: golden blind-baked crust]
Step 3: Cook the custard (10 minutes)
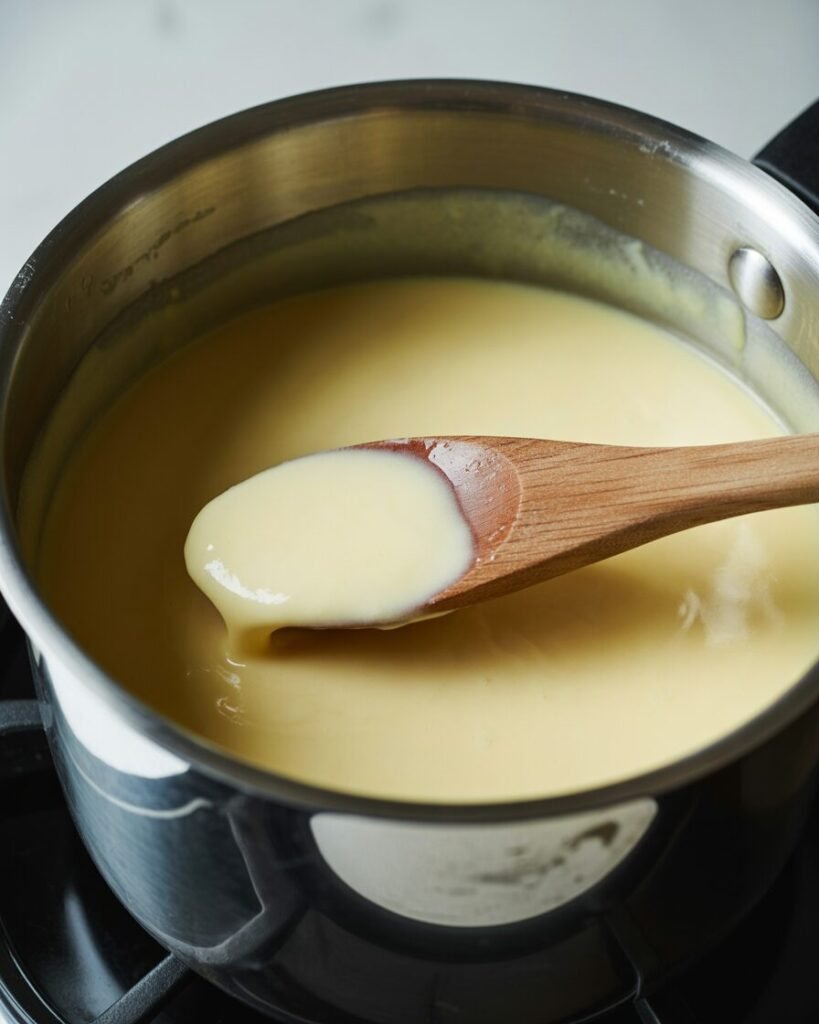
In saucepan, whisk sugar, cornstarch, salt. Add yolks, whisk smooth. Slowly whisk in coconut milk + milk.
Cook over medium, stirring constantly.
At 82–84°C (180–183°F), mixture thickens noticeably.
Checkpoint: Drag spoon through custard — line should hold for 2 seconds.
Remove from heat. Stir in butter, vanilla, coconut. Strain.
[Process photo: thick custard coating spoon]
Step 4: Fill and chill (4 hours minimum)
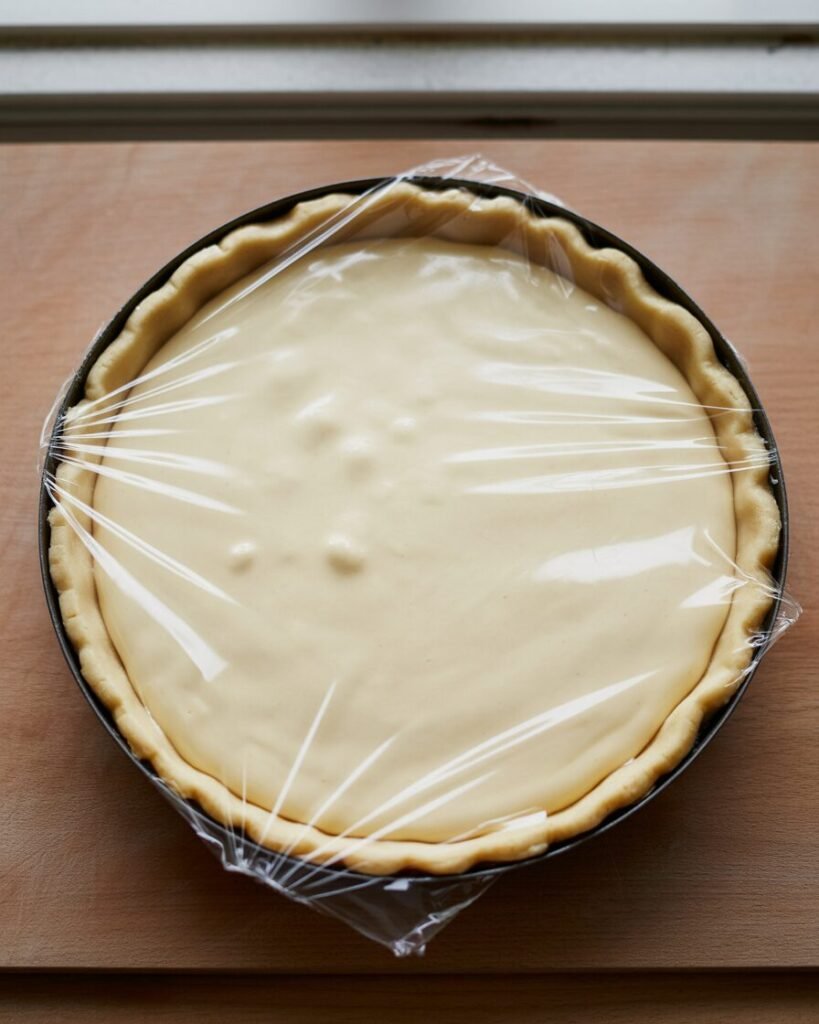
Pour hot custard into crust. Press plastic wrap directly onto surface.
Refrigerate 4–6 hours until fully set.
Avoid this: Don’t rush chilling. Warm centers cause sliding slices.
Step 5: Whipped cream topping (5 minutes)
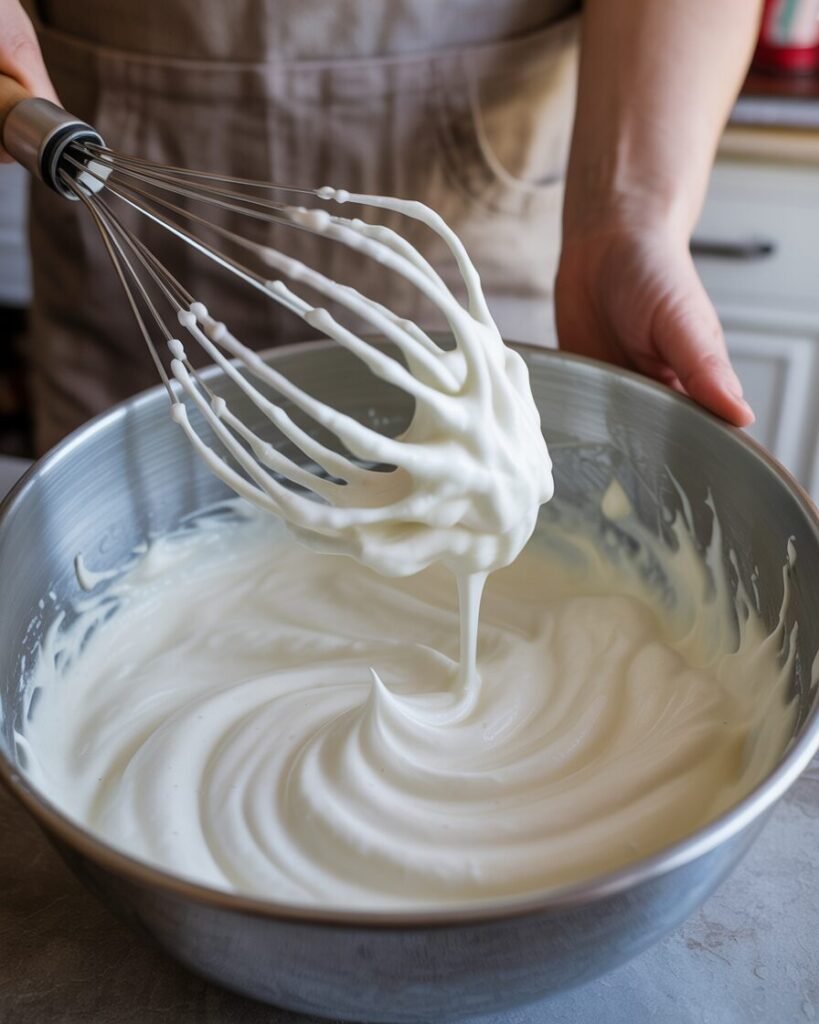
Whip cold cream + sugar + vanilla to medium peaks.
Visual cue: Peaks should bend slightly like a hook. Stiff peaks look grainy.
Spread or pipe over chilled pie. Sprinkle toasted coconut.
[Process photo: piping whipped cream]
Troubleshooting
Problem: Runny filling
Likely: Undercooked custard.
Fix: Cook to 82–84°C next time.
Problem: Custard tastes eggy
Likely: Overheated eggs.
Fix: Lower heat; stir constantly.
Problem: Soggy crust
Likely: Underbaked shell.
Fix: Bake until deep golden.
Problem: Lumpy custard
Likely: Eggs scrambled.
Fix: Always strain.
Problem: Cracked top
Likely: Overchilling uncovered.
Fix: Plastic wrap directly on surface.
Problem: Whipped cream deflates
Likely: Overwhipped then collapsed.
Fix: Stop at medium peaks.
Substitutions and variations
Egg-free
Replace yolks with:
- 60 g additional cornstarch (total 95 g)
Texture: Slightly firmer, less rich.
Dairy-free
Use 100% coconut milk (640 ml total).
Skip butter; add 1 tbsp coconut oil.
Gluten-free
Use 1:1 GF flour blend in crust. Chill longer (90 min).
Flavor swaps
- Add lime zest (1 tsp) for brightness
- Toast coconut before adding for nuttier taste
- Add 30 g white chocolate for sweeter custard
Scaling
| Pan Size | Adjustment |
|---|---|
| 6-inch (15 cm) | Use 60% of recipe |
| 8-inch (20 cm) | Use 80% |
| 12 cupcakes | Makes 12 tartlets |
Storage, make-ahead, freezing
Fridge: 3 days, loosely covered.
Best texture: Day 1–2.
Freezing: Custard does not freeze well (weeps on thawing). Crust alone can freeze 2 months.
Bring chilled pie to room temp 15 minutes before serving for best flavor.
Serving suggestions
Pair with:
- Fresh mango slices
- Dark chocolate shavings
- Raspberry coulis (acid balances sweetness)
Coffee pairing: Medium roast or espresso cuts richness nicely.
FAQs
Can I use desiccated coconut?
Yes, but soak in 2 tbsp warm milk first to soften texture.
Can I halve the recipe?
Yes. Use 6-inch pan and reduce chilling to 3 hours.
Why did my custard split?
Heat too high. Cook gently; never boil aggressively.
Can I make this in an OTG?
Absolutely. Bake on middle rack, no fan mode.
Best coconut milk brand?
Use full-fat canned coconut milk with at least 17% fat. Shake well before opening.
Notes from my kitchen (testing log)
Batch 1: Used reduced-fat coconut milk. Result: loose filling.
Batch 2: Increased cornstarch. Too firm, slightly pasty.
Batch 3: Balanced full-fat coconut milk + whole milk. Best texture.
Batch 4: Skipped straining. Tiny egg bits visible.
Batch 5: Tried whipping cream to stiff peaks. Looked grainy after 2 hrs.
Final method: Cook to 83°C, strain, medium whipped cream. Smooth, stable slices with creamy mouthfeel.
I also tested 3 sugar levels — 100 g was bland, 140 g too sweet. 120 g is the sweet spot.
Nutrition and disclaimer
Approximate per slice (1/8):
Calories: 420
Fat: 28 g
Carbs: 38 g
Protein: 5 g
Values are estimates and vary by brand. Keep custard refrigerated below 4°C (40°F). Consume within 3 days.
Conclusion
Coconut cream pie sounds fancy, but it’s really about control — temperature control, texture control, and patience during chilling. Once you understand how custard behaves, it becomes predictable and reliable.
This version gives you a pie that slices cleanly, tastes deeply coconutty, and holds beautifully on the table.
Final thoughts
If you’re new to custards, trust the thermometer. If you’re experienced, trust your spoon. Either way, don’t skip straining — it’s the small step that makes a big difference.
Bake it once, and you’ll realize coconut cream pie isn’t tricky — it’s technical. And now you know exactly how to master it.