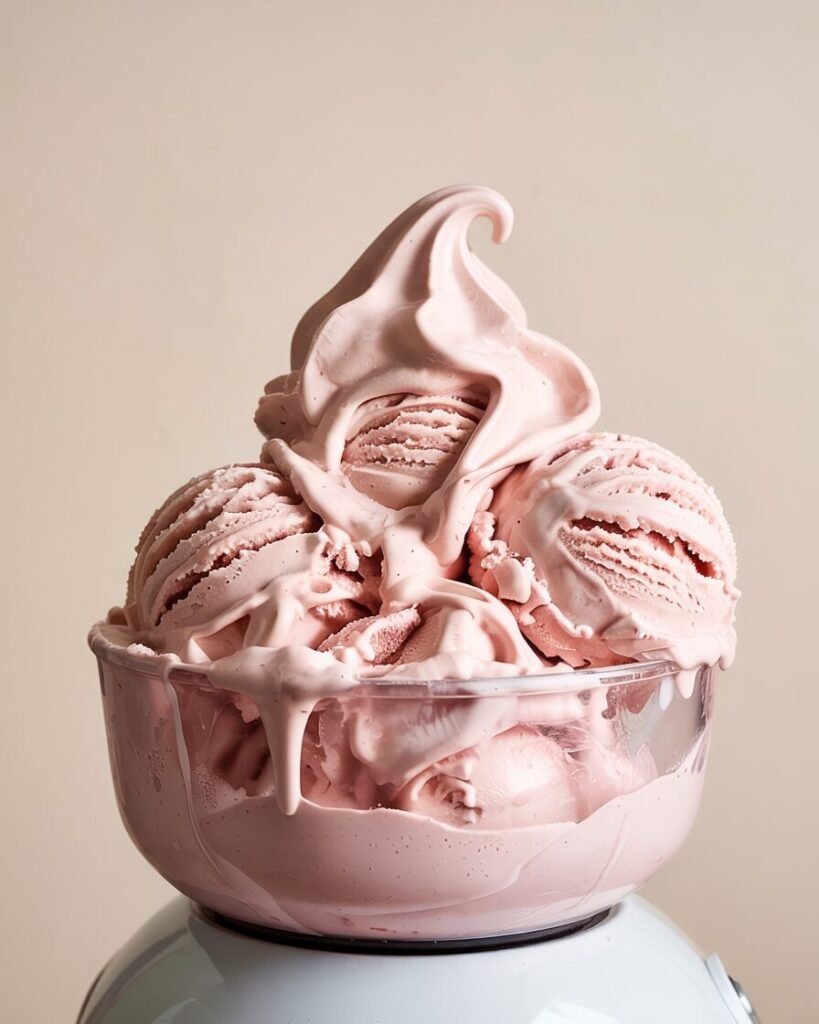
If you’ve ever wanted to bottle up the magic of a fairground and scoop it into a cone, this cotton candy ice cream recipe is exactly that. It’s pastel, fluffy-looking, and melts into a creamy, nostalgic swirl that tastes like spun sugar clouds — without being overly sweet or artificial.
What makes this version unique? We build a stable custard-style base that holds flavor beautifully and churns into a silky texture — even if you’re using a basic home ice cream maker and only a regular freezer (no blast chiller needed).
Pro tip: A tiny pinch of salt and real cotton candy flavoring make the difference between “sugary” and “wow, that tastes like the fair.”
This recipe is designed for beginner to intermediate home bakers with standard kitchen equipment and a metric scale.
Why This Recipe Works (The Science)
Ice cream is about balance: fat, sugar, water, and air.
- Egg yolks = emulsification + stability
Yolks contain lecithin, which helps fat and water stay blended. This prevents icy texture and creates a creamy mouthfeel. - Sugar lowers freezing point
Sugar doesn’t just sweeten — it keeps the mixture scoopable. Too little and your ice cream freezes solid; too much and it won’t set. - Fat traps air during churning
Heavy cream (35% fat) creates structure and holds tiny air bubbles. This makes the ice cream lighter instead of dense and icy. - Salt enhances sweetness
A small pinch prevents the flavor from tasting flat or one-dimensional.
Did you know? Overheating custard above 85°C (185°F) scrambles yolks and ruins texture — temperature control matters.
Ingredients (with Purpose)
- 480 g whole milk (2 cups) — base liquid
- 360 g heavy cream, 35% fat (1½ cups) — richness & smooth texture
- 150 g granulated sugar (¾ cup) — sweetness & softness
- 4 large egg yolks (about 70 g) — thickening & emulsifying
- 1½ tsp cotton candy flavoring — signature taste
- 1 tsp vanilla extract — rounds sweetness
- 1/8 tsp fine salt — flavor enhancer
- Gel food coloring (pink & blue) — optional, for swirl
Flavoring note: Use concentrated cotton candy flavoring (bakery supply grade). Avoid diluted candy syrups — they weaken texture.
Equipment
Required
- Medium saucepan (heavy bottomed)
- Whisk
- Heatproof spatula
- Instant-read thermometer
- Fine sieve
- Ice bath setup
- Ice cream maker (with freezer bowl)
- Freezer-safe container (1–1.5 L)
Nice to Have
- Silicone spatula for swirling colors
- Infrared thermometer (quick temp checks)
Step-by-Step Instructions
Step 1: Heat the Dairy (5–7 minutes)
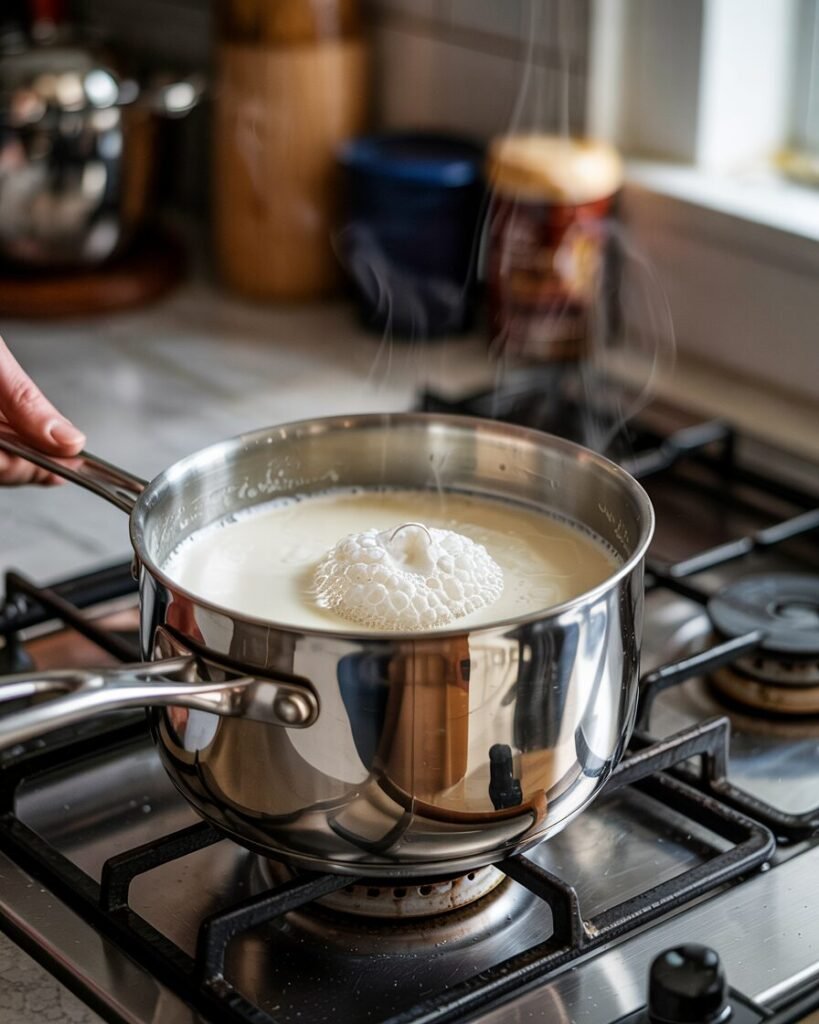
In a saucepan, combine milk, cream, and half the sugar (75 g). Heat over medium until steaming (about 70–75°C / 160–170°F).
Visual cue: Small bubbles around the edge; steam rising; not boiling.
Avoid this: If it boils vigorously, you risk splitting fat and overcooking later.
Step 2: Whisk Yolks (2 minutes)
In a bowl, whisk yolks with remaining 75 g sugar until pale and slightly thickened.
Visual cue: Color lightens; mixture flows in thick ribbons for 2–3 seconds.
Step 3: Temper the Eggs (3 minutes)
Slowly pour 1 ladle of hot milk into yolks while whisking constantly. Repeat once more.
Then pour the tempered yolk mixture back into the saucepan.
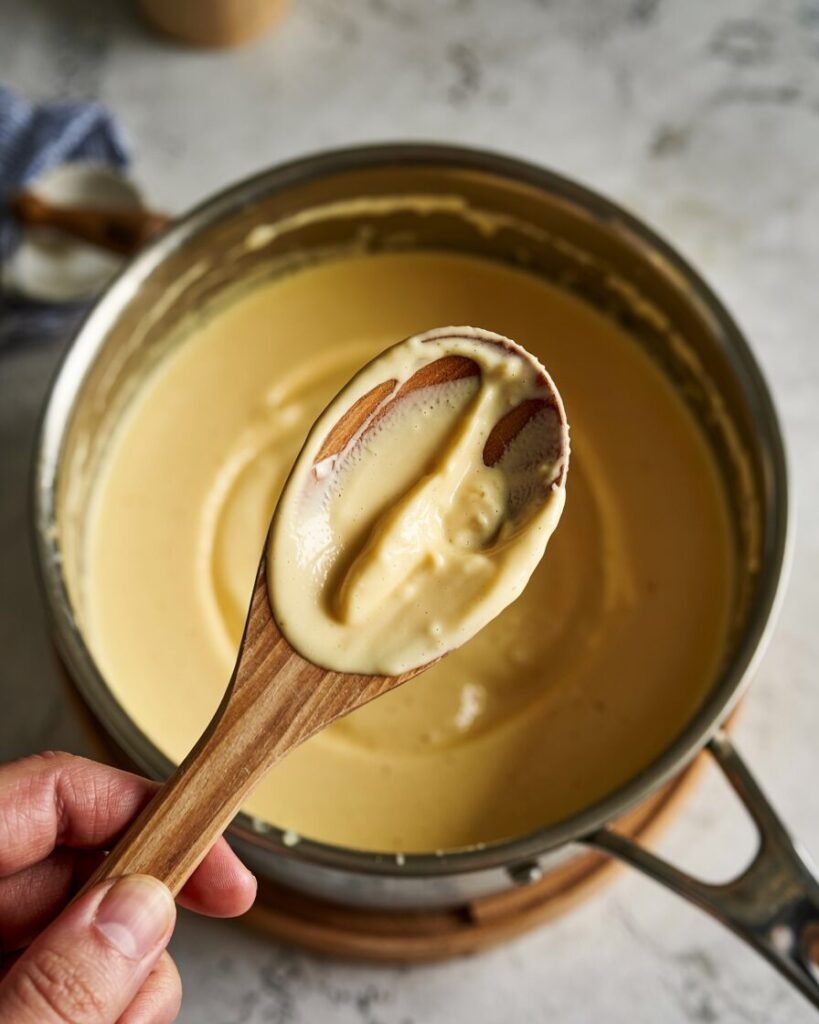
Step 4: Cook the Custard (5–8 minutes)
Cook over low-medium heat, stirring constantly with a spatula, scraping bottom.
Target temperature: 82–84°C (180–183°F)
Checkpoint: Custard coats the back of a spoon and you can draw a clean line with your finger.
If it looks grainy, it overheated. Immediately strain and cool — it may still be salvageable.
Step 5: Strain and Cool (30–45 minutes)
Pour through sieve into a clean bowl. Stir in cotton candy flavoring, vanilla, and salt.
Place bowl in ice bath and cool to room temperature. Then refrigerate at least 4 hours (preferably overnight).
Visual cue: Base should be completely cold — below 5°C (41°F) before churning.
Step 6: Churn (20–25 minutes)
Pour chilled base into pre-frozen ice cream maker bowl. Churn until thick and soft-serve consistency.
Visual cue: Mixture pulls away from bowl sides and forms soft peaks.
Avoid this: Over-churning causes butter-like texture.
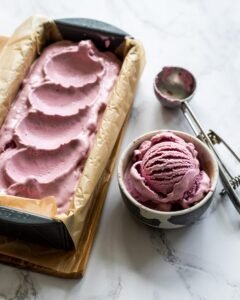
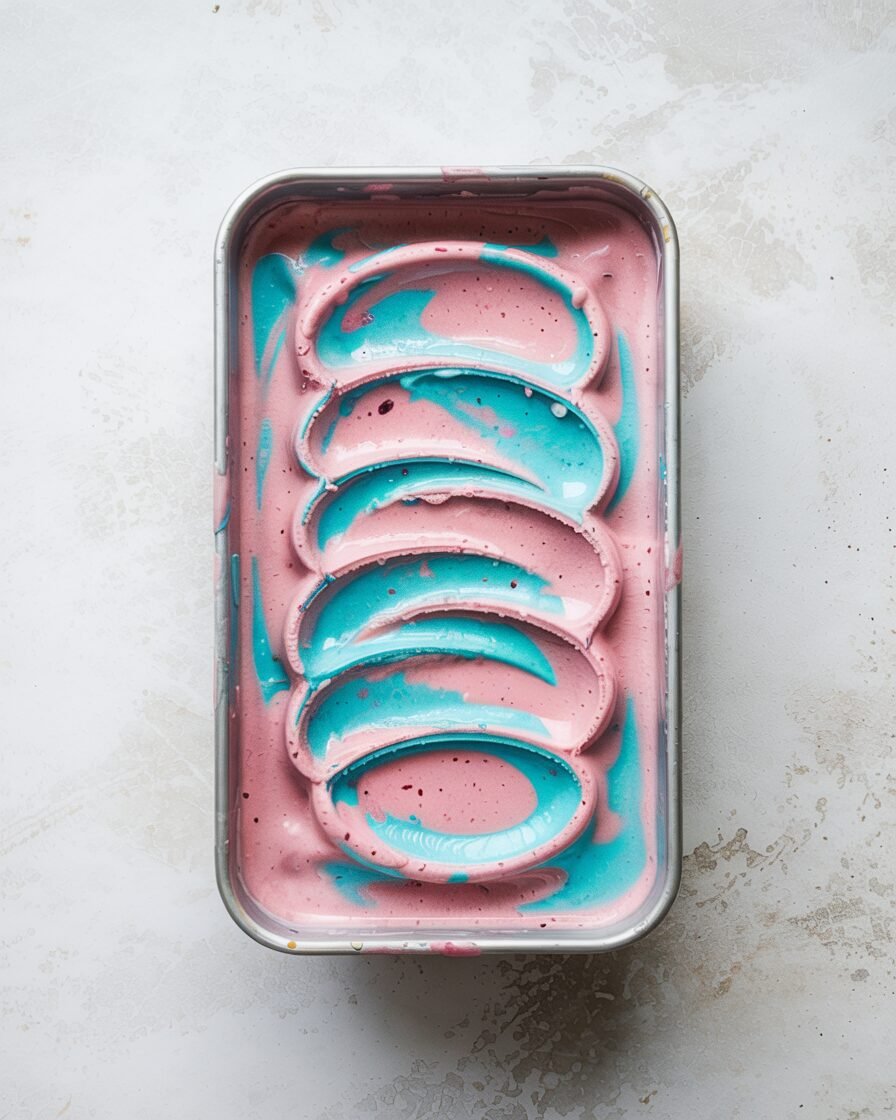
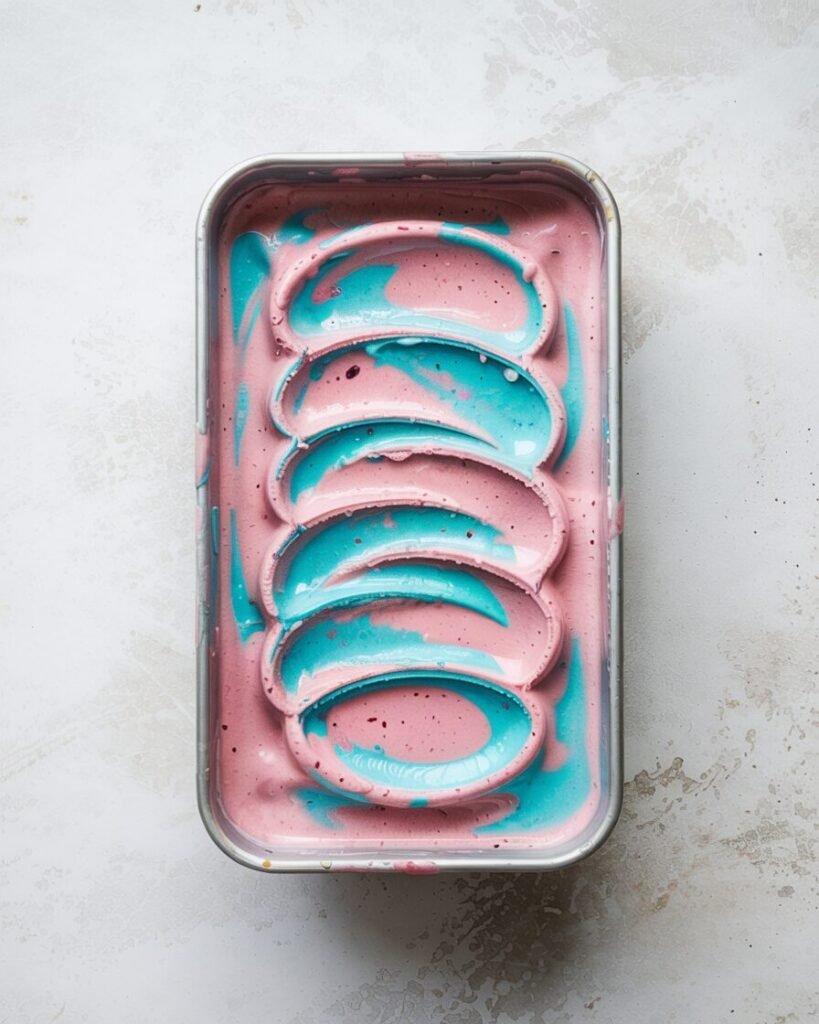
Step 7: Color Swirl (5 minutes)
Divide into two bowls. Tint one pink, one blue. Layer into container, gently swirling.
Do not overmix — colors should streak, not blend into purple.
Step 8: Freeze to Set (4–6 hours)
Press parchment directly onto surface. Freeze until firm.
Best texture after 6 hours.
Troubleshooting
Problem: Ice cream icy or hard
Likely cause: Under-churned or too little sugar.
Fix next time: Churn longer; measure sugar precisely; ensure base is fully chilled.
Problem: Grainy texture
Cause: Overheated custard.
Fix: Cook to max 84°C; use thermometer.
Problem: Too sweet/artificial taste
Cause: Excess flavoring.
Fix: Use 1 tsp first, increase gradually.
Problem: Custard scrambled
Cause: Heat too high.
Fix: Lower flame; stir constantly.
Problem: Ice cream melts instantly
Cause: Low fat content.
Fix: Use 35% cream only.
Problem: Colors bleed together
Cause: Over-swirling.
Fix: Fold gently just twice.
Substitutions & Variations
Egg-Free Version
Replace yolks with:
- 20 g cornstarch dissolved in 50 g milk
Cook until thickened at 90°C (194°F). Texture slightly less rich but stable.
Dairy-Free Version
- 400 g full-fat coconut milk
- 300 g coconut cream
Flavor shifts slightly coconut-forward but works well.
Reduced Sugar Version
Reduce sugar to 120 g total. Expect firmer freeze.
Scaling Guide
| Pan/Batch | Milk | Cream | Sugar | Yolks |
|---|---|---|---|---|
| Standard (1 L) | 480 g | 360 g | 150 g | 4 |
| Half Batch | 240 g | 180 g | 75 g | 2 |
| Double | 960 g | 720 g | 300 g | 8 |
Storage, Make-Ahead & Freezing
- Freezer: Up to 2 months in airtight container.
- Press parchment on surface to prevent ice crystals.
- To serve: Rest at room temp 5–8 minutes before scooping.
- Do not refreeze fully melted ice cream — texture degrades.
Serving Suggestions
- Serve in waffle cones with sprinkles.
- Pair with vanilla cupcakes.
- Sandwich between sugar cookies.
- Top with white chocolate drizzle for contrast.
Sweetness balance works well with slightly salty caramel sauce.
FAQs
Can I skip eggs?
Yes — use cornstarch method above. Texture slightly lighter.
Can I make without ice cream maker?
Yes. Freeze base in shallow tray; whisk every 30 minutes for 3 hours. Texture less smooth.
Best food coloring?
Gel colors. Liquid colors dilute mixture.
Can I halve the recipe?
Yes — see scaling table. Churn time slightly shorter.
How to use OTG freezer?
Ensure freezer section reaches −18°C (0°F) for proper setting.
Notes From My Kitchen (Testing Log)
Batch 1: Used 2 tsp flavoring. Result overly sweet and artificial. Reduced next time.
Batch 2: Cooked to 88°C accidentally. Slight graininess. Learned 84°C max.
Batch 3: Tried low-fat cream (25%). Ice cream froze too hard.
Batch 4: Skipped salt. Flavor flat and sugary.
Batch 5 (Final): 1½ tsp flavoring + pinch salt = balanced nostalgic flavor.
Tested three brands of flavoring; concentrated bakery version gave cleanest taste.
Nutrition & Disclaimer
Approximate per ½ cup serving (based on 8 servings):
- 240 kcal
- 18 g fat
- 18 g carbs
- 4 g protein
Values are estimates and vary by brand. Follow proper food safety: cook custard to safe temperature and chill promptly.
Conclusion & Final Thoughts
This cotton candy ice cream recipe brings playful fairground flavor into a creamy, scoopable dessert you can confidently make at home. With proper temperature control and full chilling time, you’ll get a smooth, pastel swirl that tastes nostalgic but balanced — not cloying.
Ice cream rewards patience. Chill thoroughly, churn properly, and don’t rush the freeze. Once you master the base, you can adapt it to endless flavors.
If you make this, I’d love to know how you swirl your colors — bold streaks or soft pastels?