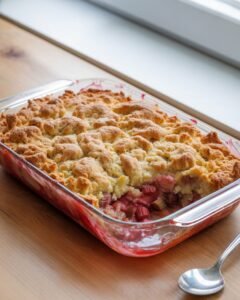
If you want the classic strawberry shortcake vibe but in a party-friendly, no-fuss format, these cups are it: crisp-tender biscuit “shortcake” bites, syrupy berries, and creamy clouds of vanilla whipped cream in every spoonful. You’ll get layers that hold their shape for hours in the fridge (so you can prep early), plus a texture contrast that stays interesting—not soggy, not dry.
You don’t need a stand mixer or fancy tools: a bowl, a whisk (or hand mixer), and a baking tray are enough. Pro tip: stabilize the whipped cream with bloomed gelatin; it helps the cream keep defined peaks and prevents the sad, watery collapse that can happen overnight.
Why this recipe works
Shortcake biscuits are “short” because fat coats flour, limiting gluten formation—so you get a tender, crumbly bite instead of a chewy bread texture. When you keep the butter cold and mix just until the dough holds together, the butter melts in the oven and creates little pockets (lightness without needing eggs).
Macerating strawberries with sugar pulls out moisture, creating a glossy syrup that soaks slightly into the biscuit layer and carries strawberry flavor through the whole cup. The whipped cream is stabilized with a small amount of gelatin: gelatin sets as it chills, giving whipped cream structure so it can be piped and layered without melting or weeping (especially helpful in warm kitchens).
Ingredients (weights + purpose)
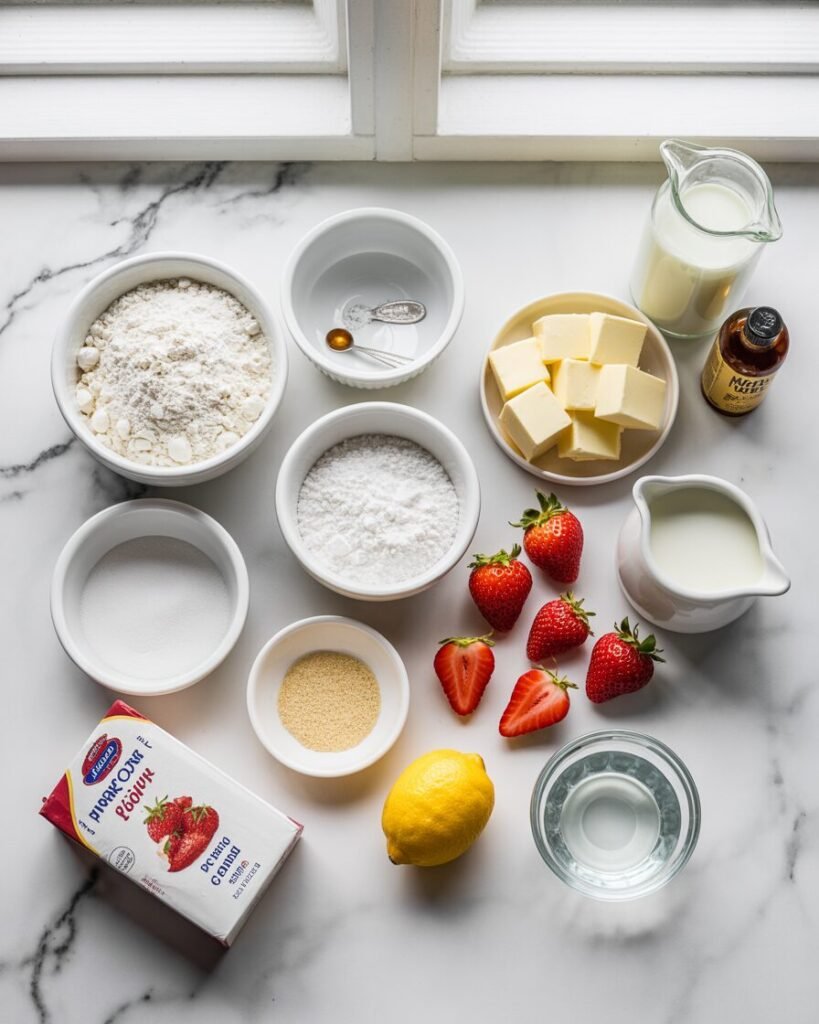
For the macerated strawberries
- Strawberries (hulled, sliced) — 450 g (about 3 cups) — main fruit + juices for layering
- Granulated sugar — 35–50 g (3–4 tbsp) — draws out syrup, sweetens
- Lemon juice — 10 g (2 tsp) — brightens, helps balance sweetness
For the shortcake biscuit bites
- All-purpose flour — 240 g (2 cups) — structure
- Baking powder — 12 g (1 tbsp) — lift
- Fine salt — 4 g (3/4 tsp) — flavor
- Granulated sugar — 35 g (about 3 tbsp) — slight sweetness, browning
- Unsalted butter (cold, cubed) — 85 g (6 tbsp) — tenderness (“short” crumb)
- Cold milk or buttermilk — 160 g (2/3 cup) — moisture + tenderness
- Vanilla extract — 5 g (1 tsp) — flavor
- Heavy cream (for brushing, optional) — 15 g (1 tbsp) — shiny tops
- Coarse sugar (optional) — 8–12 g (1–2 tbsp) — crunch on top
For stabilized whipped cream (gelatin method)
- Heavy whipping cream (cold) — 300 g (1 1/4 cups) — base
- Powdered sugar — 30 g (about 1/4 cup) — sweetness + slight thickening
- Vanilla extract — 2–5 g (1/2–1 tsp) — flavor
- Unflavored gelatin — 3 g (1 tsp) — stabilizer
- Cold water — 10 g (1 tbsp) — to bloom gelatin
Yield: 6–8 cups (depending on glass size), best in 200–250 ml (6–8 oz) dessert cups.
Equipment
Required
- Oven/OTG (preheats well) + middle rack
- Digital scale (best) + measuring cups/spoons
- Mixing bowls + whisk (hand mixer helpful for cream)
- Baking tray + parchment paper
- 6–8 dessert cups/jars (200–250 ml)
Nice-to-have
- Pastry cutter or fork (for cutting butter into flour)
- 5 cm (2-inch) round cutter (or just cut squares)
- Piping bag + star tip (pretty swirls)
Step-by-step instructions (timing + visual cues)
Plan your timing (so nothing melts)
- Strawberries: 30 minutes (mostly hands-off)
- Biscuits: 15 minutes prep + 14–18 minutes bake + 20 minutes cool
- Whipped cream: 10–12 minutes
Step 1: Macerate the strawberries (30 minutes)
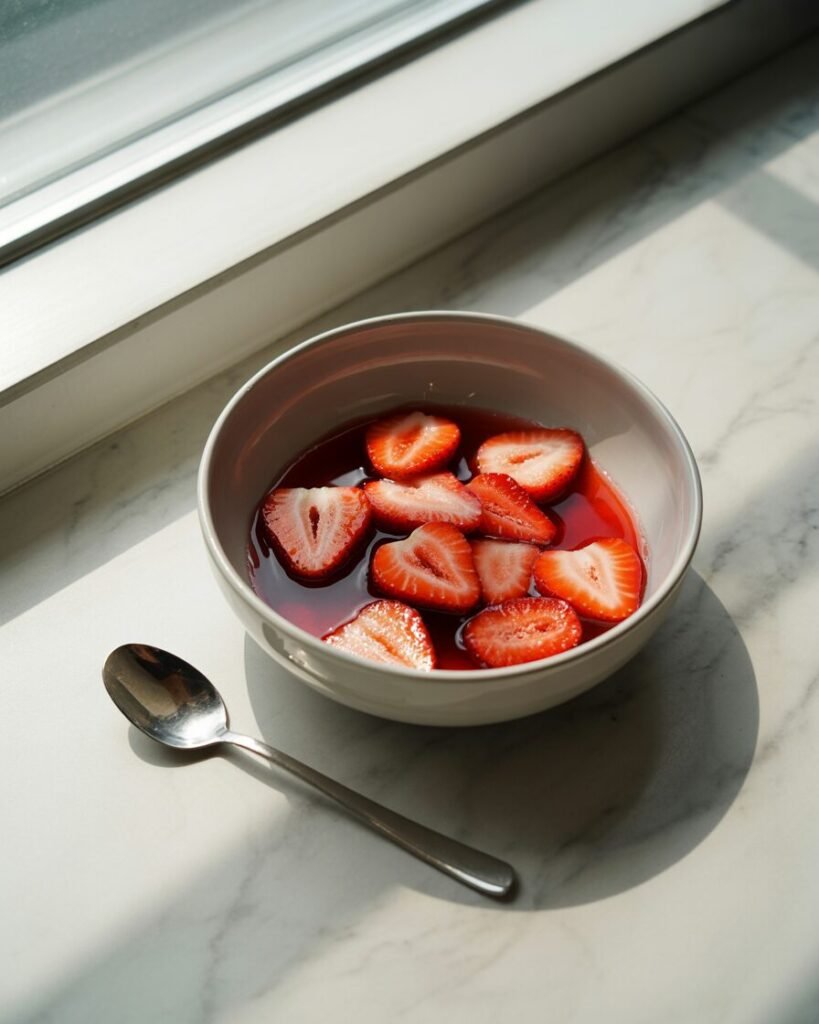
- Slice strawberries into 5–7 mm (1/4 inch) slices.
- Toss with sugar and lemon juice. Rest 30 minutes at room temp.
Visual cue (right): berries look glossy and juicy, with a puddle of red syrup.
Wrong: dry-looking slices after 30 minutes = underripe berries or not enough sugar; add 1–2 tsp more sugar and wait 10 minutes.
Step 2: Preheat and prep (10 minutes)
- Preheat oven to 220°C (425°F).
- Line a baking tray with parchment. Keep rack in the middle.
Avoid this: starting with a not-hot oven = biscuits spread and bake up dense.
Step 3: Mix biscuit dough (8 minutes)
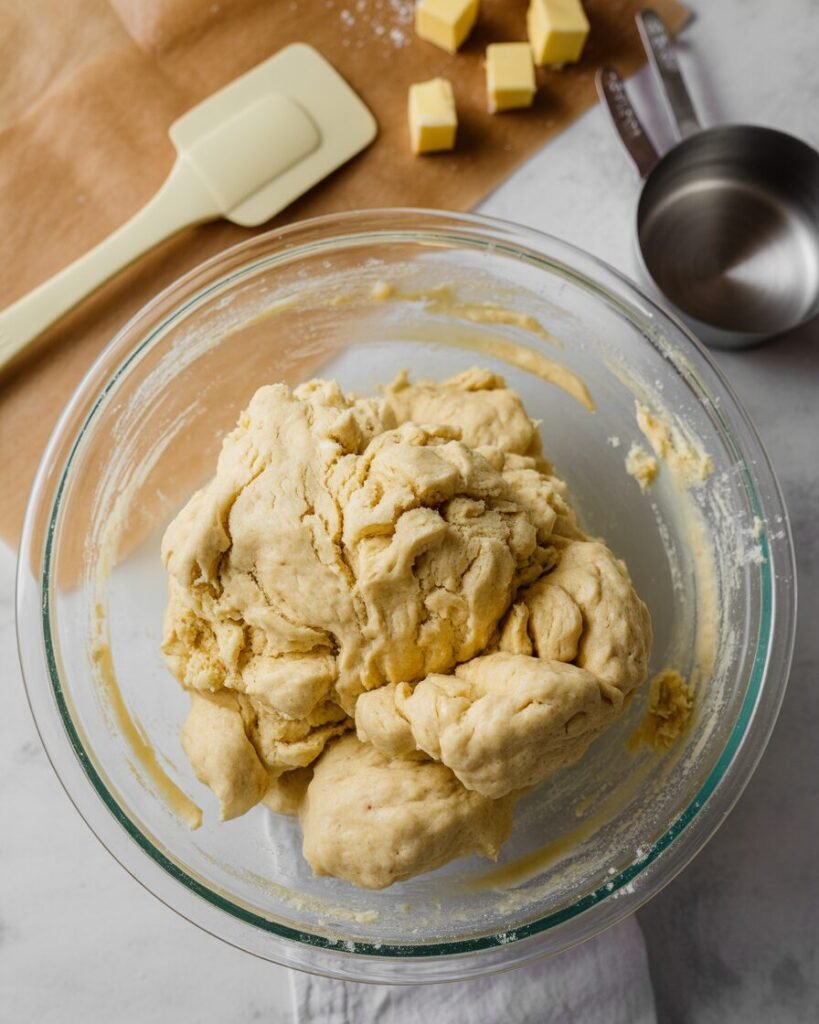
- In a bowl: flour, baking powder, salt, sugar. Whisk 15 seconds.
- Add cold butter cubes; rub in with fingertips (or cut with fork) until you get pea-size bits + some sandy crumbs.
- Stir vanilla into cold milk/buttermilk, pour in, and mix just until you see no dry flour.
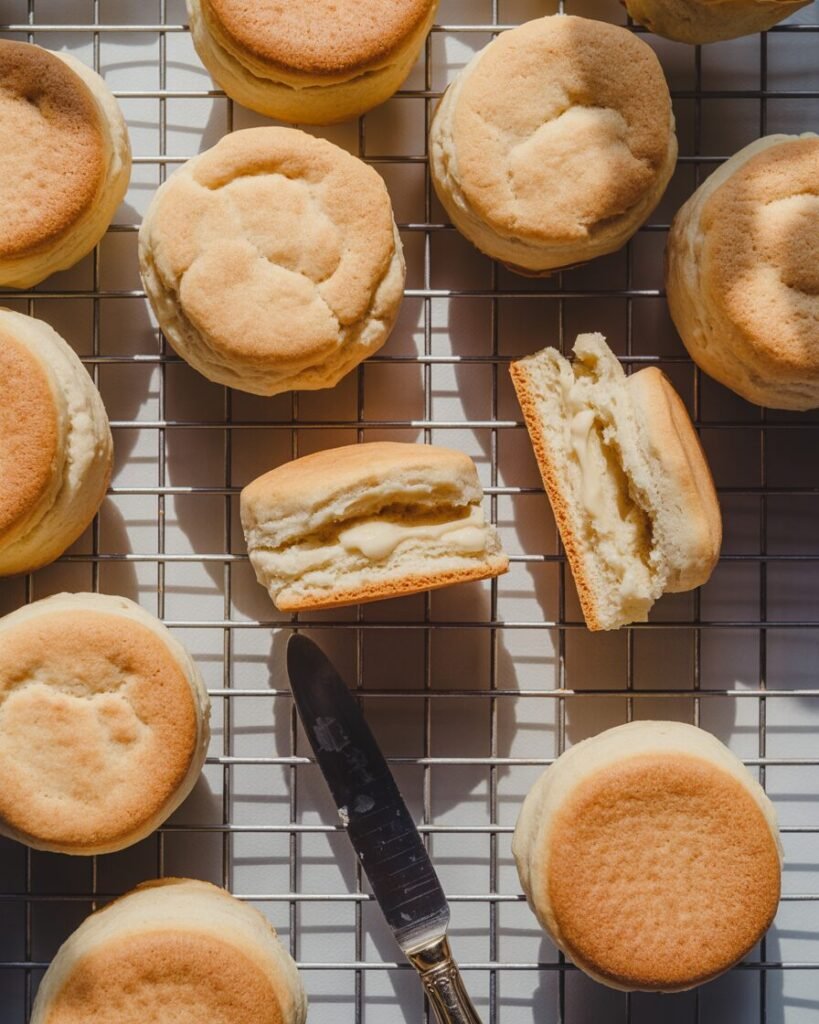
Visual cue (right): shaggy dough that holds when squeezed.
Wrong: smooth, elastic dough = overmixed (tougher shortcake).
Step 4: Shape and bake (14–18 minutes)
- Tip dough onto counter, gently pat to 2 cm (3/4 inch) thick.
- Cut into small rounds/squares (about 4–5 cm / 1.5–2 inch). Place on tray.
- Brush tops with cream and sprinkle coarse sugar (optional).
- Bake 14–18 minutes at 220°C (425°F) until deep golden.
Doneness cues: tops are golden, bottoms browned, and centers feel set (not squishy).
Cool 20 minutes, then cut/break into bite-size chunks.
Step 5: Make stabilized whipped cream (10–12 minutes)
- In a small bowl, mix gelatin + cold water; let bloom 5 minutes (it should look like thick applesauce).
- Melt the bloomed gelatin gently until clear (microwave in short bursts or warm-water bath). Don’t boil.
- Whip cold cream with powdered sugar + vanilla to very soft peaks (lines just start to show).
- With mixer on low, drizzle in melted gelatin; then whip to medium-firm peaks.
Visual cue (right): peaks stand, but the very tip bends slightly.
Wrong: grainy/lumpy cream = gelatin too cold when added; next time, warm gelatin slightly and drizzle slowly.
Step 6: Assemble the cups (10 minutes)
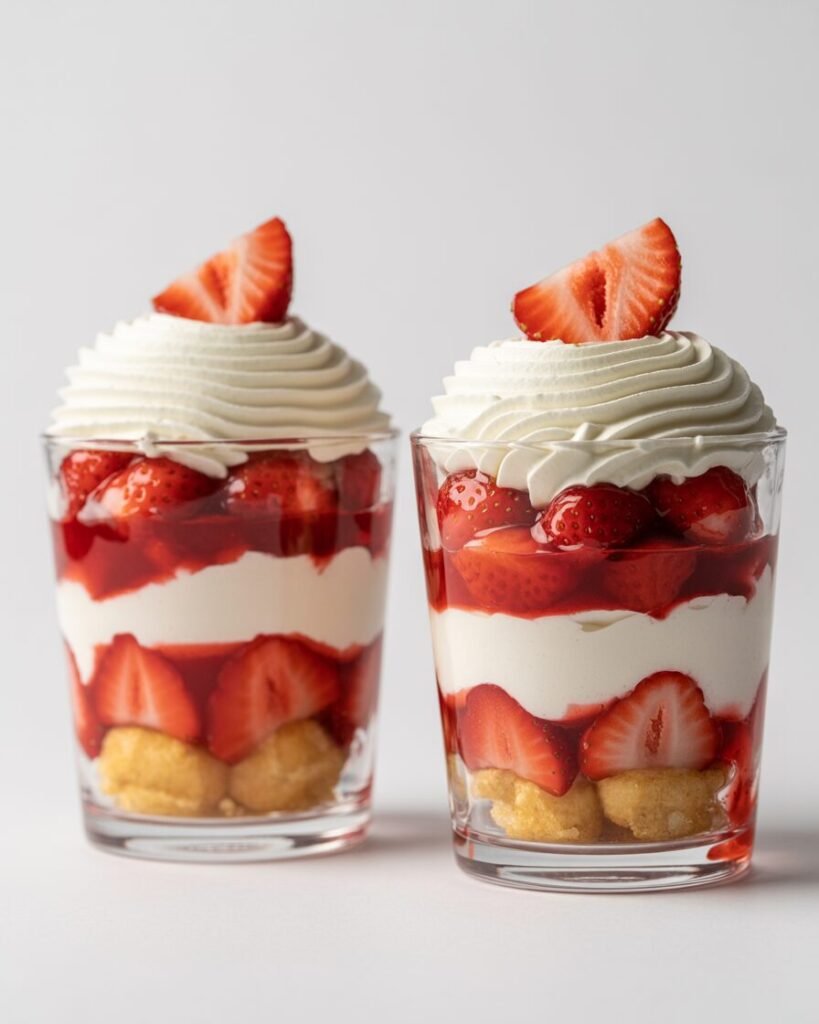
Layer each cup:
- Biscuit chunks (about 2–3 tbsp)
- Strawberries + a spoon of syrup
- Whipped cream (pipe or spoon)
Repeat once more. Finish with a swirl of cream and a few strawberry slices.
Serve: immediately for maximum biscuit crispness, or chill 2–6 hours for best “set” layers.
Media placeholders:
- Hero image: finished strawberry shortcake cup with visible layers
- Process: (1) butter rubbed into flour, (2) shaggy dough, (3) baked biscuits color check, (4) macerated berry syrup, (5) whipped cream peak stage, (6) assembly layers, (7) finished top swirl
- Optional: close-up “perfect peaks” vs “overwhipped grainy”
Troubleshooting (common failures + fixes)
- Problem: Biscuits spread flat.
Likely causes: butter too warm, oven not fully preheated.
Fix next time: chill cut dough 10 minutes; preheat oven a full 20 minutes. - Problem: Biscuits dry/crumbly.
Likely causes: too much flour (scooped cup), overbaked.
Fix: weigh flour (240 g); pull when deep golden, not dark brown. - Problem: Tough/chewy shortcake.
Likely causes: overmixed dough, too much kneading.
Fix: mix just until no flour pockets; pat gently, don’t “work” it. - Problem: Soggy layers.
Likely causes: too much syrup, assembled too far ahead.
Fix: drain berries slightly for longer storage; assemble within 6–8 hours. - Problem: Whipped cream turns lumpy.
Likely causes: gelatin cooled and set on contact.
Fix: ensure gelatin is liquid and warm (not hot) and drizzle slowly. - Problem: Whipped cream becomes grainy/buttery.
Likely causes: overwhipped after gelatin added.
Fix: stop at medium-firm peaks; if slightly over, fold in 2–3 tbsp extra cold cream to soften. - Problem: Strawberries taste bland/watery.
Likely causes: off-season berries.
Fix: add an extra 1–2 tsp sugar + 1 tsp lemon juice; let sit longer.
Substitutions and variations
Egg-free
This base recipe is naturally egg-free (biscuit-style shortcake).
Dairy-free (best effort)
- Biscuits: use plant butter (firm, block-style) and cold soy/oat milk; expect slightly less lift.
- “Cream”: use coconut cream (chilled, solids only) + powdered sugar; it won’t taste like dairy whipped cream and sets firmer.
Gluten-free
Use a 1:1 gluten-free baking blend (with xanthan) in place of flour. Expect a slightly sandier crumb; keep dough a touch thicker (about 2.5 cm / 1 inch) to reduce crumbling.
Flavor variations
- Lemon shortcake: add zest of 1 lemon to flour mix; keep lemon juice in berries.
- Vanilla-bean vibe: swap vanilla extract for vanilla paste (same amount).
- Balsamic berries (adult): add 1 tsp balsamic to maceration (reduce sugar by ~5 g).
Scaling
- For 12 cups: double everything; bake biscuits in 2 trays (rotate once).
- For 24 mini cups: keep recipe 1x, but cut biscuits smaller and use 60–90 ml (2–3 oz) cups.
Storage, make-ahead, and freezing
- Best make-ahead plan: bake biscuits up to 24 hours ahead (airtight at room temp), macerate berries up to 24 hours ahead (fridge), whip cream up to 3 days ahead if gelatin-stabilized (fridge).
- Assembled cups: keep refrigerated and serve within 24 hours for best texture (biscuits soften over time).
- Macerated strawberries: store airtight in fridge and aim to use within 3–5 days for quality/safety.
- Freezing: freeze biscuits (unassembled) up to 2 months; thaw uncovered 30 minutes and re-crisp 5 minutes at 160°C (320°F).
What not to freeze: fully assembled cups; whipped cream texture can get spongy and berries go very soft.
Serving suggestions and pairing ideas
- Add a thin layer of strawberry jam under the first biscuit layer for extra berry punch.
- Pair with: lemon curd (tangy), dark chocolate shavings (bittersweet), or a spoon of vanilla custard for a richer dessert.
FAQs
Can I stabilize whipped cream without gelatin?
Yes—instant pudding mix, cornstarch, cream of tartar, or powdered milk can stabilize whipped cream, but gelatin gives the cleanest, most pipeable result for layered jars.
Why did my gelatin whipped cream get little bits?
Gelatin likely cooled and set before it dispersed; it needs to be fully melted (clear) and drizzled in while mixing so it blends smoothly.
How far ahead can I assemble strawberry shortcake cups?
For best texture, assemble 2–6 hours ahead; by 24 hours the biscuits noticeably soften, even though the stabilized cream holds well.
Can I use granulated sugar instead of powdered sugar in the cream?
You can, but powdered sugar dissolves faster and is commonly used for whipped cream; gelatin stabilization is what mainly keeps structure here.
How do I make this in an OTG or air fryer oven?
OTGs often brown faster on top; bake on the middle rack and start checking at 12–14 minutes, aiming for deep golden tops and set centers.
Notes from my kitchen (testing log)
Batch 1: I assembled right away with unstabilized cream—looked great at first, but the cream softened and slid after a few hours in the fridge.
Batch 2: I macerated berries too long at room temp; they turned very soft and the syrup flooded the bottom layer. Fridge maceration after the first 30 minutes fixed it.
Batch 3: I overmixed biscuit dough until it looked “smooth”; baked biscuits tasted a bit bready. Shaggy dough = better crumb.
Batch 4: I melted gelatin and poured it straight into cold cream—tiny gelatin threads formed. Drizzling while mixing + slightly cooling the gelatin solved it.
Batch 5: I whipped to stiff peaks; the cream tasted a little dense in the cup. Medium-firm peaks tasted lighter and still held shape.
Batch 6: I cut biscuit chunks too small; they softened quickly. Slightly bigger chunks kept texture longer.
Final: Cold-butter biscuits + 30-minute maceration + gelatin-stabilized cream gave the best balance of crisp-tender bite, juicy berries, and clean layers that last overnight in the fridge.
Nutrition and disclaimer (short)
Nutrition varies by brands and portion size; stabilized whipped cream can be kept refrigerated for up to 3 days, and for food safety it shouldn’t sit at room temperature for more than about 2 hours. Values are estimates—follow food-safety best practices and refrigerate dairy-based desserts promptly.
Conclusion
If you want strawberry shortcake that’s easy to serve, easy to prep ahead, and still feels bakery-pretty, these cups are the sweet spot. Keep your biscuit dough lightly handled, let the strawberries get syrupy (not mushy), and use stabilized whipped cream for layers that stay defined in the fridge.