Last Updated: September 4, 2025
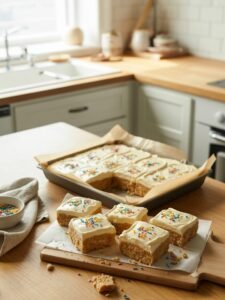
French macarons, the glossy, smooth-topped cookies with ruffled “feet,” have a reputation for being tricky. But here’s my tested beginner-friendly recipe that will help you succeed on your first attempt. Expect crisp shells that give way to a chewy interior, ready to sandwich with buttercream, ganache, or jam.
Pro tip: It’s not about perfection on day one — it’s about learning to read the batter. Once you understand what the right macaronage texture looks like, you’ll be surprised at how repeatable they become.
Why This Recipe Works
Macarons are sensitive to ratios, moisture, and technique. Here’s why this version is structured to set you up for success:
- Aging egg whites (12–24h): Slight water evaporation improves protein elasticity, leading to stronger meringues that deflate less during folding.
- Fine almond flour + powdered sugar base: Sifting twice ensures smooth tops and prevents lumpy shells. Coarser flours in India often give grainy results — this extra step is crucial.
- Macaronage folding method: The number of folds isn’t as important as checking the lava-like flow test. This is the deciding factor that separates failed shells from successful ones.
- Resting before baking: That matte skin you wait for forms a natural barrier, forcing the batter to rise in the oven and create “feet.”
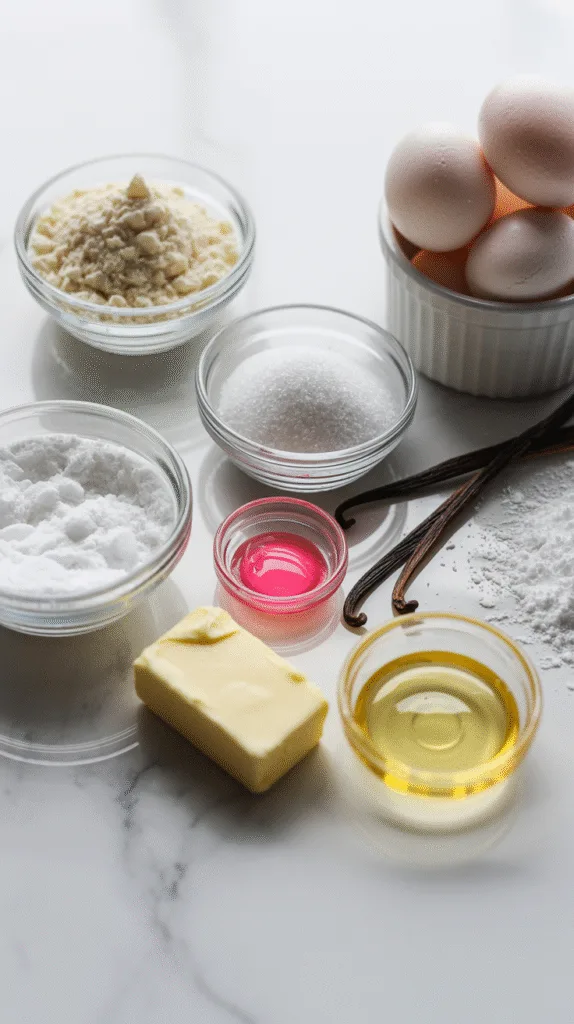
Ingredients
For shells:
- Almond flour — 100 g (1 cup, very lightly packed) — Structure & chew
- Powdered sugar (icing sugar, no cornflour added if possible) — 100 g (¾ cup) — Sweetness & fine texture
- Egg whites (aged, room temp) — 70 g (from 2 large eggs) — Protein for meringue
- Caster sugar (superfine) — 65 g (⅓ cup) — Stabilizes meringue
- Gel or powder food coloring (optional) — small drop/pinch — Won’t dilute batter
For filling (basic buttercream):
- Unsalted butter — 80 g (⅓ cup) softened — Creamy base
- Powdered sugar — 120 g (1 cup) — Sweetness & stability
- Vanilla extract — ½ tsp — Flavor
Equipment You’ll Need
- Kitchen scale (non-negotiable for accuracy)
- Large mixing bowl (metal or glass, grease-free)
- Electric hand mixer (stand mixer nice-to-have)
- Fine mesh sieve
- Rubber spatula
- Silicone baking mat or parchment paper
- Piping bag with 1 cm round nozzle
- Baking tray (light-colored heats more evenly in OTG ovens)
- Oven thermometer (OTGs often run hot/cold)
Nice-to-have: offset spatula, template for piping circles.
Step-by-Step Instructions with Visual Cues
1. Prep Ingredients and Tray (10 min)
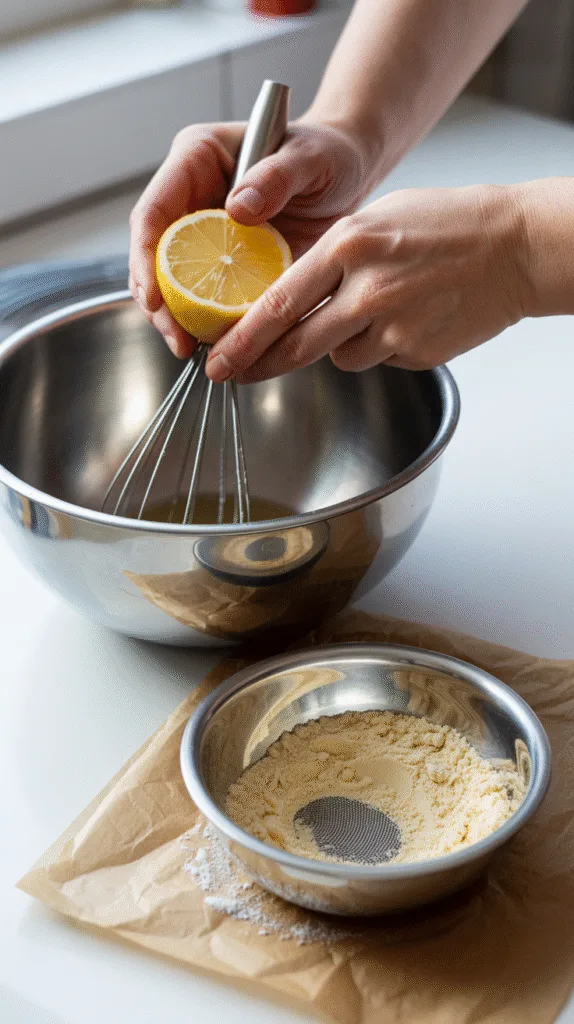
- Wipe bowls/nozzles with vinegar or lemon juice to remove grease.
- Sift almond flour + icing sugar twice. Visual cue: powder should feel like talcum.
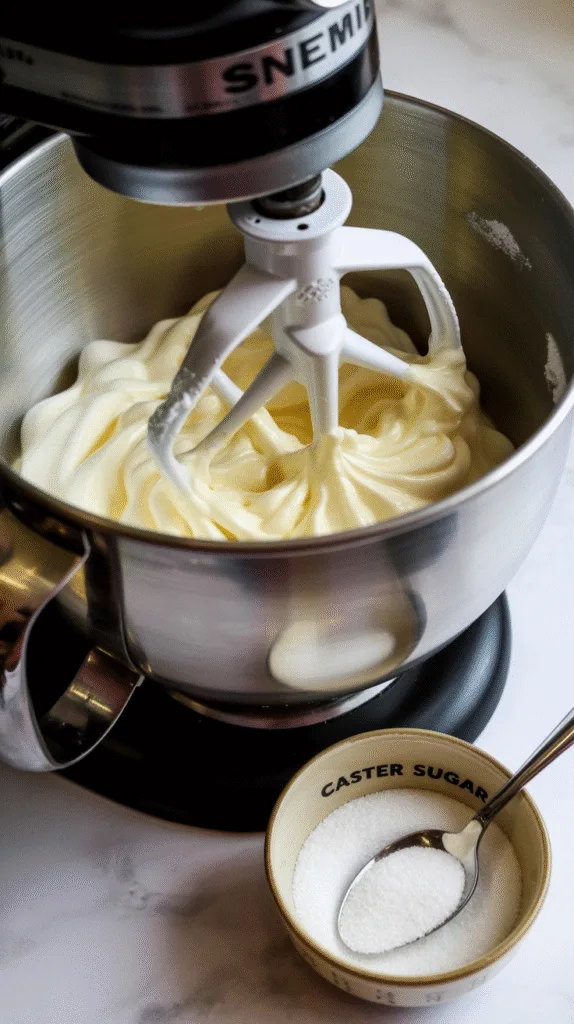
2. Make the Meringue (10–15 min)
- Beat aged room-temp egg whites on medium speed until foamy.
- Gradually add caster sugar (1 tbsp at a time).
- Continue whipping until stiff peaks form. Visual cue: peaks should stand straight with a sharp point, glossy not grainy. If it clumps, you’ve over-whipped.
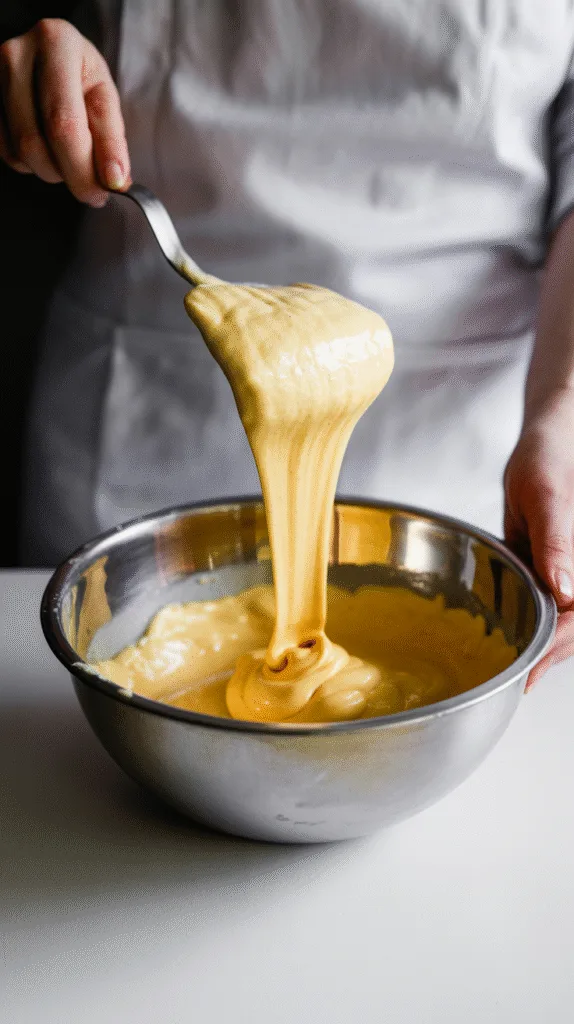
3. Macaronage (Folding) (5–7 min)
- Add half the sifted dry mix to meringue; fold gently with spatula. Add rest.
- Continue folding until batter flows like molten lava.
- Visual cue: When lifted, batter should ribbon back into the bowl and disappear into the surface within 10–12 seconds. Too stiff = cracked shells. Too runny = flat shells.
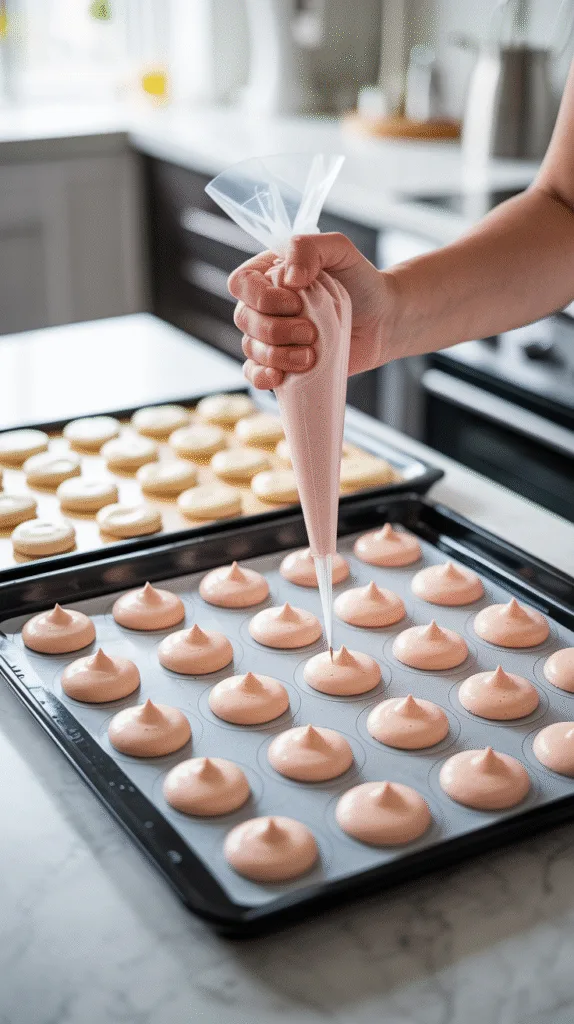
4. Pipe & Rest (20–60 min depending on humidity)
- Transfer batter to piping bag, pipe 3–4 cm circles onto mat.
- Tap tray firmly 3–4 times to pop air bubbles (use toothpick if needed).
- Rest until surfaces are dry and matte. Test by gently touching shell: it shouldn’t stick to your finger.
5. Bake (15–18 min at 150°C / 300°F)
- Preheat oven for 15 min, place tray in center rack.
- Bake one tray at a time. Visual cue: shells should rise with distinct feet by 5–6 min.
- Test doneness: Shell tops shouldn’t wiggle when nudged.

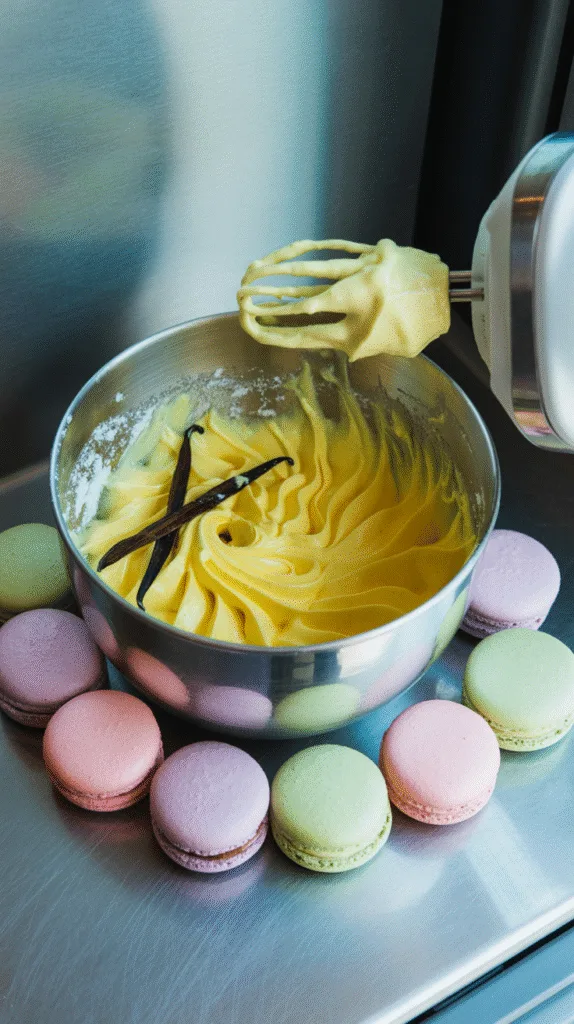
6. Fill & Mature (20 min + optional 12h rest)
- Make buttercream: beat butter + icing sugar until fluffy, add vanilla.
- Pipe filling onto flat side of shell, sandwich with another.
- Best eaten after “maturing” in fridge 12–24h (texture blends, shells soften slightly).
Troubleshooting: Common Failures and Fixes
- Cracked tops: Under-rested shells, too hot oven → Rest longer, lower oven temp by 10°C.
- Hollow shells: Over-mixed meringue or too high heat → Reduce whipping or bake at 140°C.
- No feet: Batter too wet/thin → Check macaronage; avoid liquid color/flavorings.
- Flat shells: Under-beaten meringue, or over-folded batter. Aim for glossy stiff peaks next time.
- Brown tops: Oven too hot or tray too high → Move rack lower, cover with foil last 5 min.
- Sticky bottoms: Underbaked → Add 1–2 extra minutes; cool before removing.
Substitutions & Variations
- Egg-free (aquafaba macarons): Reduce chickpea water to 70 g by simmering, whip with cream of tartar + sugar. Texture is softer but works.
- Almond-free: Swap 50% almond flour with finely sifted sunflower seed flour — flavor slightly nuttier.
- Gluten-free: Already naturally gluten-free.
- Dairy-free filling: Use margarine or vegetable shortening in buttercream.
- Flavor swaps:
- Add 1 tsp cocoa powder (replace equal almond flour).
- Orange/lemon zest in buttercream.
- Fill with ganache or salted caramel.
Storage, Make-Ahead & Freezing
- Room temp: Shells only, airtight container for 2 days.
- Fridge (filled): Up to 5 days; bring to room temp before serving.
- Freezer: Shells (unfilled) freeze up to 2 months. To thaw: place still sealed at room temperature 15 min. Don’t freeze filled macarons with jam (gets soggy).
- Refreshing shells: If shells soften in fridge, bake at 120°C for 2–3 min to crisp back.
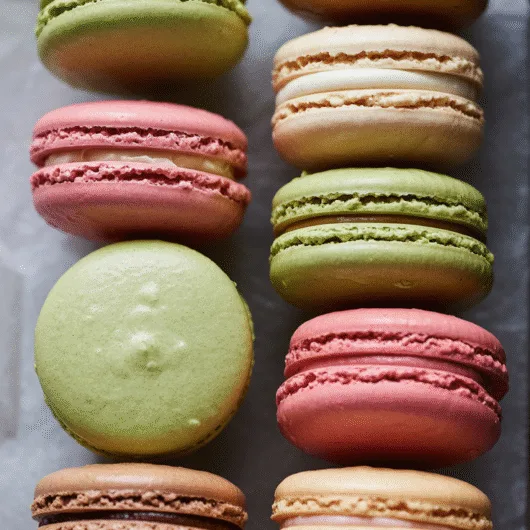
Serving & Pairing Ideas
Pair these macarons with espresso coffee or tangy lemon curd to balance sweetness. For festive platters, combine colors — pistachio green, raspberry pink, cocoa brown — each paired with matching filling.
FAQs
1. Can I replace almond flour with regular flour?
No — structure depends on nut oils/proteins. Try sunflower seed flour as a tested swap.
2. Why are my macarons hollow?
Likely from overbeaten meringue or too hot oven. Bake at 140–145°C in OTG.
3. Can I halve or double the recipe?
Yes, scale ingredients exactly with a digital scale. Only bake one tray per time.
4. What food coloring works best?
Gel or powder. Liquid dilutes batter and ruins texture.
5. Can I bake macarons in an OTG or air fryer?
Yes, in an OTG with thermometer. Air fryer works only at 140°C with baking tray insert — test with small batch first.
Notes from My Kitchen
- Batch 1: Used store-brand almond flour (grainy). Tops cracked. Learned: must sift twice.
- Batch 2: Overmixed during macaronage; shells spread too much. Adjustment: stop mixing earlier, test ribbon.
- Batch 3: Humid monsoon afternoon in Mumbai. Resting took 80 min! Feet appeared perfectly though.
- Final method: Aging egg whites overnight + controlling oven with thermometer led to the most reliable results. Chewy centers every time.
Nutrition & Disclaimer
Approx. per macaron (with buttercream): 110 kcal, 12 g carbs, 5 g fat, 2 g protein.
Values are estimates. Nutrition varies by brand. Always follow food-safety best practices: don’t store filled macarons at room temperature beyond 12 hours.
How to Make Perfect French Macarons: Step-by-Step Guide
Course: DessertCuisine: FrenchDifficulty: Intermediate20
servings30
minutes18
minutes110
kcal1
hour30
minutesDelicate, crisp-yet-chewy French macarons with smooth shells and ruffled feet. Beginner-friendly, with tested tips for perfect results in a regular kitchen or OTG oven.
Ingredients
Macaron Shells
Almond flour — 100 g (1 cup lightly packed), sifted twice
Powdered sugar — 100 g (¾ cup)
Egg whites, aged, room temp — 70 g (from 2 large eggs)
Castor sugar (superfine) — 65 g (⅓ cup)
Gel or powder food coloring — optional, small amount
- Buttercream Filling
Unsalted butter — 80 g (⅓ cup), softened
Powdered sugar — 120 g (1 cup)
Vanilla extract — ½ tsp
Directions
- Prep (10 min):
Wipe bowls with vinegar to remove grease. Sift almond flour + icing sugar twice until fine - Whip Meringue (10–12 min):
Beat egg whites until foamy, then add sugar gradually. Whip to stiff glossy peaks — peaks should stand upright, not curve. - Fold (Macaronage) (5–7 min):
Add sifted dry mix in two additions. Fold gently until the batter flows like lava. Visual cue: ribbons melt into the bowl in 10–12 seconds. - Pipe & Rest (30–60 min):
Pipe 3–4 cm circles. Tap tray 3–4 times. Rest until shells are matte and dry to the touch. - Bake (15–18 min at 150°C / 300°F):
Preheat oven 15 min. Bake one tray in center rack. Doneness: shells have risen feet, tops don’t wobble. Cool fully before filling. - Buttercream (10 min):
Beat butter + powdered sugar until fluffy; add vanilla. Pipe onto shell bottoms and sandwich. - Mature & Serve:
Refrigerate 12–24h for best texture (shells absorb filling). Bring to room temp before serving.
Notes
- Storage & Make Ahead
Shells (unfilled): Room temp up to 2 days; freezer up to 2 months.
Filled macarons: Refrigerate up to 5 days in airtight box.
Refresh softened shells: Bake briefly at 120°C for 2–3 min to re‑crisp. - Notes
Avoid liquid food colors (too wet for batter).
Rest longer on humid days — up to 80 min in monsoon kitchens.
Hollows = over-whipped meringue or too hot oven. Adjust next batch at 140–145°C.