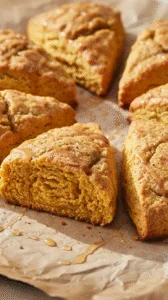
Biscuits are one of those recipes that look simple but can quietly go wrong if the small details are missed. Too much mixing? Tough. Warm butter? Flat. Too much flour? Dry and crumbly. That’s exactly why I developed this homemade biscuit recipe specifically for home bakers who want reliable, fluffy results without fancy equipment or complicated steps.
At Bake My Sweet, I’ve tested this recipe multiple times in a regular home oven and an OTG to make sure it works in real kitchens, not just ideal ones. The goal here is clear: tall, soft-centered biscuits with delicate flaky layers and lightly golden tops — on your first try. No stand mixer, no confusing techniques, just smart method and visual cues you can trust.
What makes this version different is the combination of cold butter layering, gentle folding, and a short dough rest that improves texture without making the process complicated. Instead of guessing, you’ll know exactly what the dough should look and feel like at each stage.
If you follow the texture checkpoints (especially the shaggy dough stage and cold butter rule), you’ll end up with biscuits that are tender inside, crisp on the edges, and sturdy enough to split without crumbling — the kind of homemade biscuits that actually feel worth baking.
Why This Recipe Works (Baking Science)
Biscuits rely on a delicate balance of fat, flour, and leavening. When cold butter melts in the oven, it creates steam pockets that form layers — that’s where the flakiness comes from. Warm butter blends into the flour instead of layering, which leads to dense biscuits.
Another key factor is hydration. This recipe uses a slightly higher liquid ratio than traditional Southern biscuits, which helps beginner bakers avoid dry, crumbly dough. The dough should look slightly shaggy, not smooth.
Science-backed points:
- Cold fat = steam lift: Butter releases steam during baking, separating dough layers.
- Minimal gluten development: Overmixing activates gluten, making biscuits tough instead of tender.
- Balanced leavening: Baking powder gives immediate lift; proper measurement prevents bitterness or collapse.
Did you know? Resting the dough for just 10 minutes hydrates the flour evenly, improving rise and texture.
Ingredients with Weights and Purpose
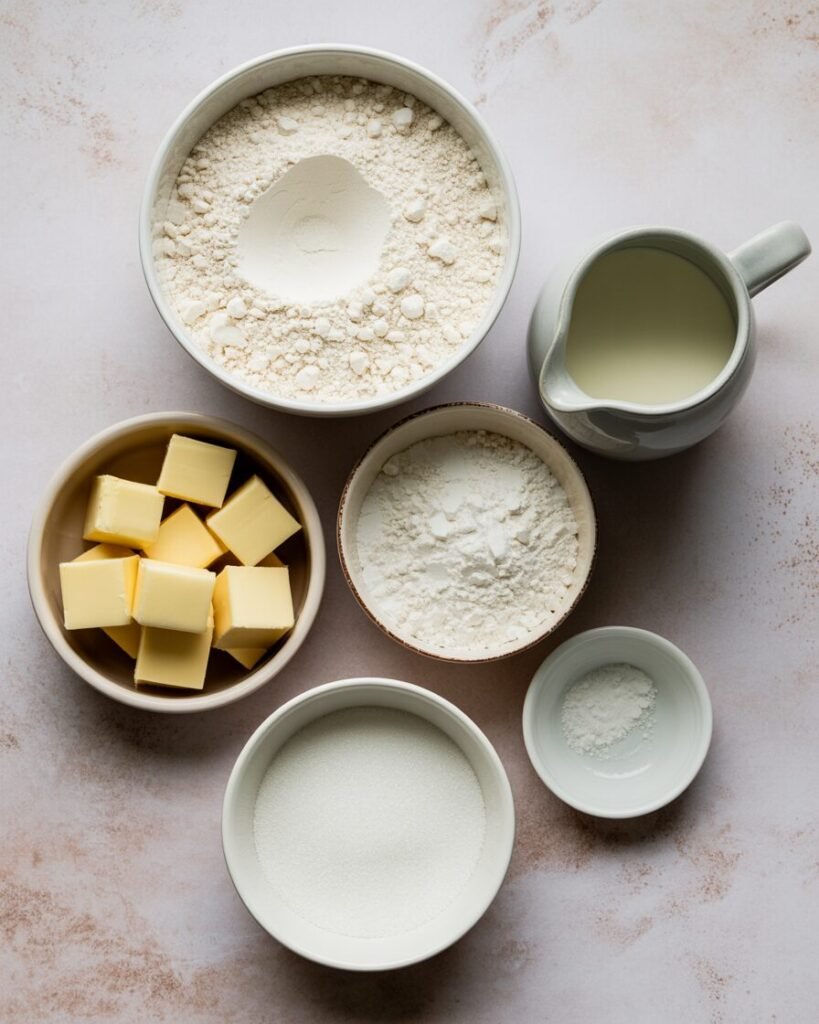
- All-purpose flour — 240g — 2 cups — Structure and crumb
- Baking powder (aluminum-free recommended) — 12g — 1 tbsp — Leavening for rise
- Fine salt — 4g — ¾ tsp — Flavor balance
- Granulated sugar — 12g — 1 tbsp — Light sweetness and browning
- Unsalted butter (very cold, cubed) — 113g — ½ cup — Flaky layers and richness
- Cold milk (full-fat preferred) — 180ml — ¾ cup — Hydration and tenderness
Ingredient note: European-style butter (higher fat) produces slightly taller biscuits due to better steam release.
Equipment
Required:
- Mixing bowl
- Pastry cutter or fork
- Baking tray (30 x 40 cm / 12 x 16 inch)
- Oven or OTG (preheated)
- Kitchen scale (strongly recommended)
- Biscuit cutter (6 cm / 2.5 inch)
Nice-to-have:
- Bench scraper
- Parchment paper
- Digital thermometer
Step-by-Step Instructions
Step 1: Preheat and Prepare (10 minutes)
Preheat oven to 220°C (425°F). Place rack in the middle position. Line baking tray with parchment.
Visual cue: Oven fully preheated before baking = better rise.
Step 2: Mix Dry Ingredients (2 minutes)
In a large bowl, whisk flour, baking powder, salt, and sugar.
Visual cue: Mixture should look evenly pale with no clumps.
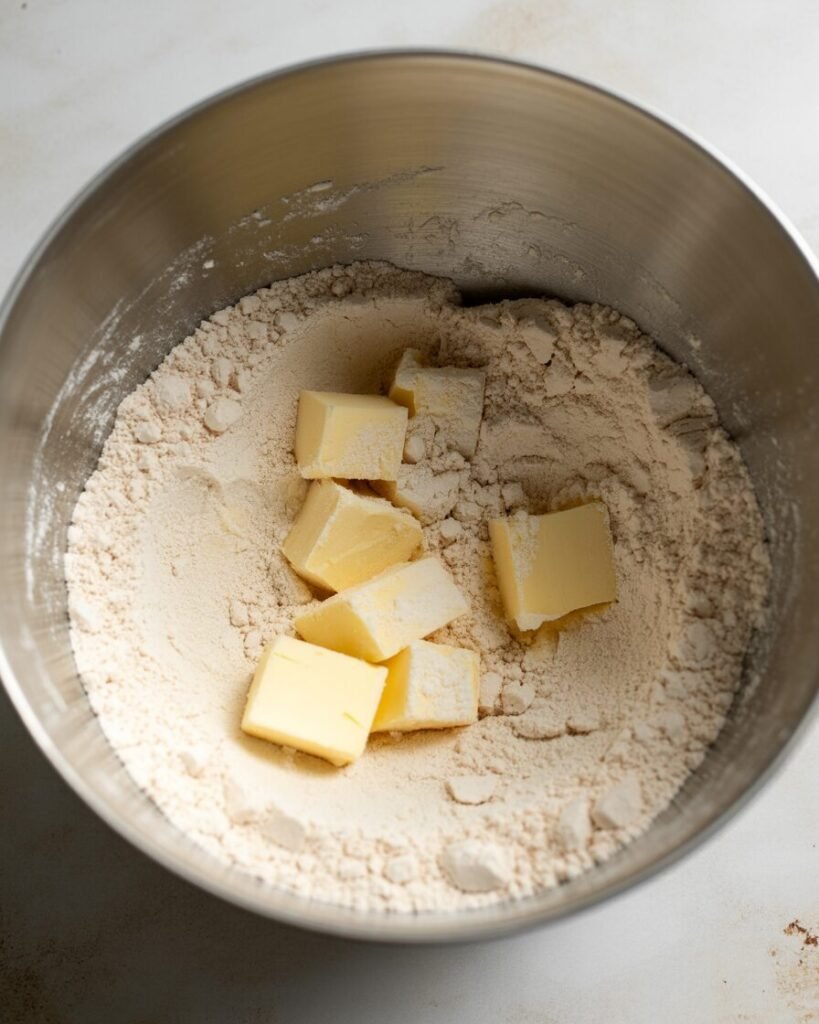
Step 3: Cut in Cold Butter (4–5 minutes)
Add cold butter cubes. Use a pastry cutter or fork to cut butter into flour until it resembles coarse crumbs with pea-sized pieces.
Checkpoint: When squeezed, the mixture should hold briefly then crumble.
Avoid this: Fully blending butter into flour — you’ll lose flakiness.
Step 4: Add Milk and Form Dough (1–2 minutes)
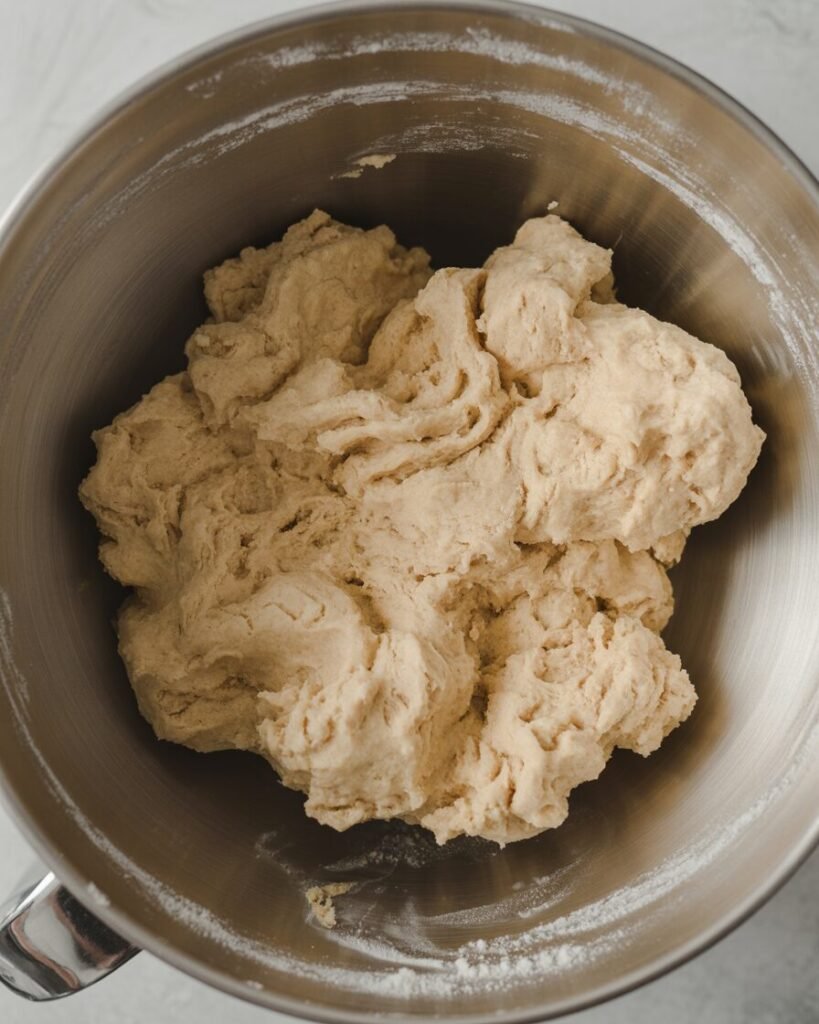
Pour in cold milk and gently mix using a spatula until a shaggy dough forms.
Visual cue: Dough should look rough and slightly sticky, not smooth.
Smell cue: Light buttery aroma, not greasy.
Step 5: Gentle Folding for Layers (2 minutes)
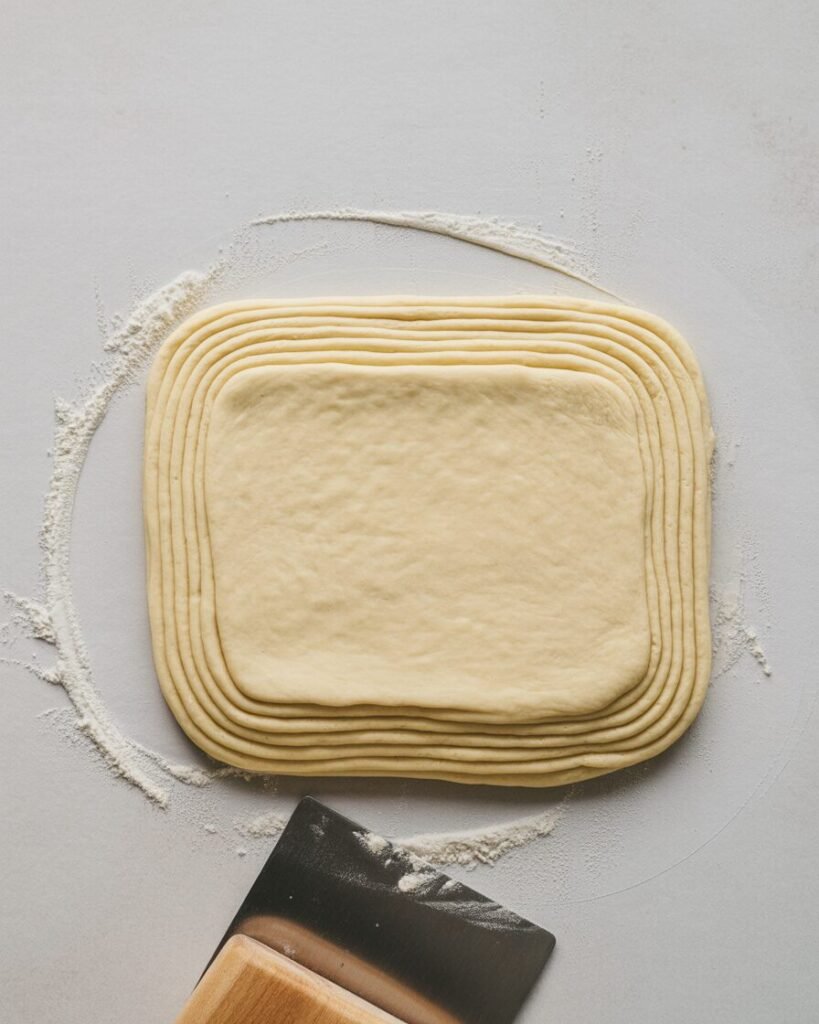
Turn dough onto a lightly floured surface. Pat into a 2 cm (¾ inch) thick rectangle. Fold into thirds (like a letter), rotate, and repeat twice.
Checkpoint: Dough becomes smoother but still soft.
This folding creates visible layers and improves rise.
Step 6: Cut the Biscuits (3 minutes)
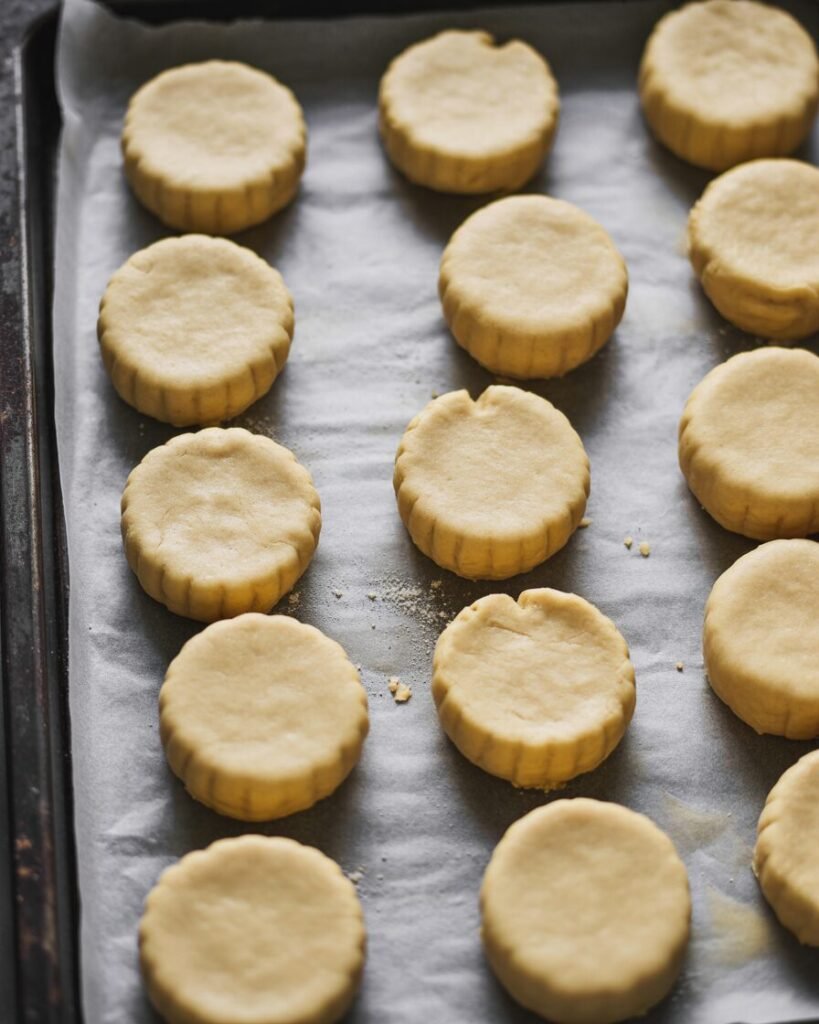
Pat dough to 2.5 cm (1 inch) thickness. Cut straight down using a biscuit cutter (do not twist).
Visual cue: Clean edges = better rise. Twisted edges seal layers and reduce height.
Step 7: Bake (12–15 minutes)
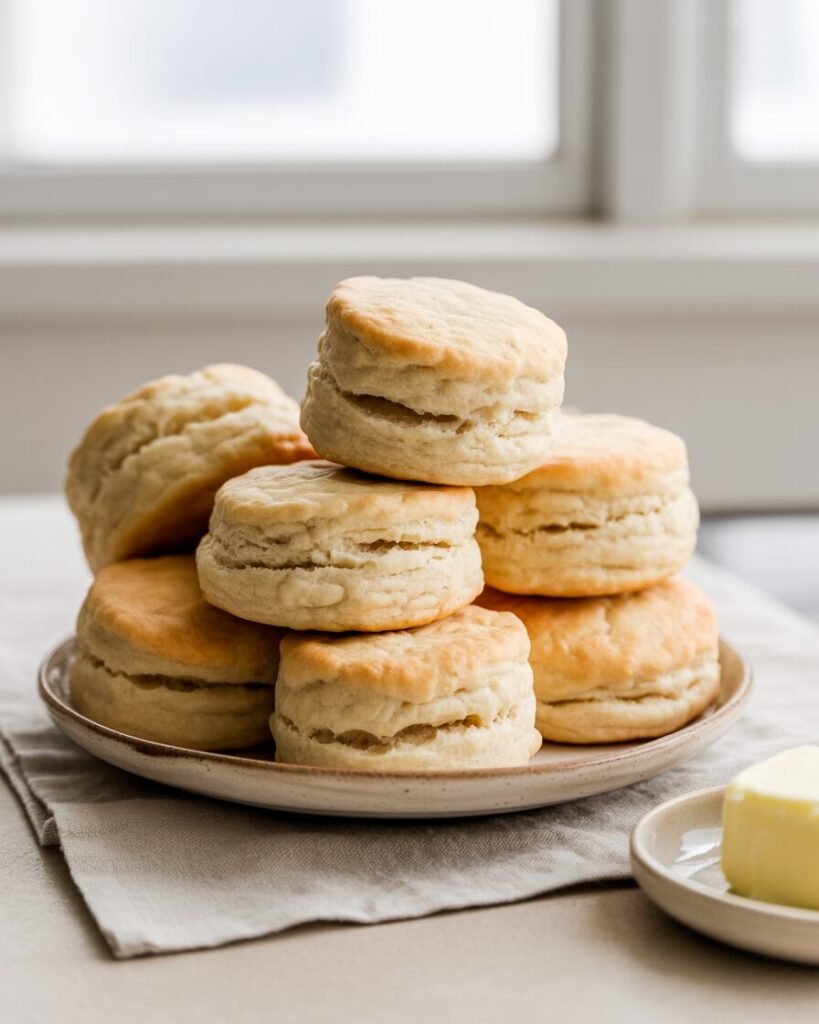
Place biscuits touching slightly on tray (this helps them rise upward). Bake at 220°C (425°F) for 12–15 minutes.
Doneness test:
- Tops golden brown
- Internal temp ~96–98°C (205–208°F)
- Bottom lightly crisp
Cool for 5 minutes before serving.
Troubleshooting: Common Failures and Fixes
Problem: Biscuits are dense
Likely causes: Warm butter, overmixing
Fix next time: Chill dough for 15 minutes before baking
Problem: Flat biscuits
Likely causes: Old baking powder or thin dough
Fix: Use fresh baking powder and keep dough 2.5 cm thick
Problem: Dry texture
Likely causes: Too much flour or overbaking
Fix: Measure flour by weight (240g) and bake until just golden
Problem: Bitter taste
Likely causes: Excess baking powder
Fix: Use exact 12g and aluminum-free brand
Problem: Uneven rise
Likely causes: Twisting cutter
Fix: Press straight down and lift cleanly
Problem: Gummy center
Likely causes: Underbaking
Fix: Bake until internal temp reaches 96°C
Substitutions and Variations
Egg-Free
This recipe is naturally egg-free — no changes needed.
Dairy-Free
Replace butter with 113g cold vegan butter and milk with 180ml cold plant milk (oat works best).
Caveat: Slightly less browning and softer layers.
Gluten-Free
Use 1:1 gluten-free baking flour (240g). Add 1 tsp xanthan gum if blend lacks it.
Texture will be slightly more crumbly but still tender.
Flavor Variations
- Cheddar biscuits: Add 80g shredded cheese
- Herb biscuits: Mix in 1 tbsp dried herbs
- Sweet biscuits: Increase sugar to 40g
Scaling Guide
| Yield | Flour | Butter | Milk |
|---|---|---|---|
| 6 biscuits | 160g | 75g | 120ml |
| 12 biscuits (standard) | 240g | 113g | 180ml |
| 18 biscuits | 360g | 170g | 270ml |
Storage, Make-Ahead, and Freezing
Counter: Store in airtight container for 2 days.
Fridge: Up to 5 days; reheat at 180°C (350°F) for 5–7 minutes.
Freezer: Freeze baked biscuits up to 2 months.
To thaw:
Room temp for 1 hour, then reheat 5 minutes at 180°C.
Make-ahead tip:
Cut raw biscuits and freeze unbaked. Bake straight from frozen at 220°C for 16–18 minutes.
What not to freeze: Fully mixed dough ball — it loses structure and rise.
Serving Suggestions and Pairing Ideas
These biscuits pair beautifully with salted butter, honey, or fruit jam for a classic balance of sweet and rich. For savory options, serve with scrambled eggs, sausage gravy, or soup. Their mild flavor also complements citrus curd and whipped cream without overpowering them.
FAQs
Can I replace butter with oil?
Not recommended. Oil lacks solid fat structure, so biscuits will be soft but not flaky.
How do I prevent tough biscuits?
Handle dough gently and stop mixing as soon as it comes together.
Can I double the recipe?
Yes. Double all ingredients by weight and bake in two trays to avoid overcrowding.
Best flour type and why?
All-purpose flour works best. Bread flour creates too much gluten, making biscuits chewy.
Can I bake this in an OTG or air fryer?
Yes.
- OTG: Same temp 220°C, middle rack
- Air fryer: 200°C (392°F) for 10–12 minutes
Notes from My Kitchen (First-Hand Testing Log)
Batch 1: Used room-temp butter — biscuits spread and became dense.
Adjustment: Switched to frozen cubed butter.
Batch 2: Overmixed dough — tough texture.
Change: Mixed until just shaggy.
Batch 3: Skipped folding — less layered rise.
Learning: Folding twice significantly improves height.
Batch 4: Baked at 200°C — pale tops and low rise.
Fix: Increased to 220°C for better oven spring.
Batch 5 (Final): Cold butter + 2 folds + high heat produced tall, flaky, soft-centered biscuits with crisp edges. This method gave the most consistent results across three ovens (including OTG).
Nutrition and Disclaimer (Per Biscuit, Approx.)
- Calories: ~180
- Carbs: 20g
- Fat: 10g
- Protein: 3g
Values are estimates and vary by brand and portion size. Always follow proper food-safety practices and bake biscuits to a safe internal temperature before consumption.
Conclusion
Homemade biscuits don’t need to be intimidating — they just need the right technique and a little patience. By keeping your butter cold, handling the dough gently, and baking at high heat, you’re setting yourself up for bakery-style results right at home, even with basic equipment.
From my experience testing multiple batches, the biggest transformation came from respecting the texture cues rather than strictly relying on time. Once you learn how the dough should look and feel, biscuit-making becomes almost effortless.