There’s something about lemon bars that feels both nostalgic and risky, like they should be simple, but one wrong move and you’re left with a weepy, cracked mess or a crust that crumbles like chalk. I’ve been there. Over the years, I’ve tried every shortcut, from bottled juice to skipping the pre-bake, and each failure taught me something. This version? It’s the one that finally got it right: bright without being mouth-puckering, firm enough to slice cleanly, and with a crust that stays crisp even after a day in the fridge.
It’s not magic, though it can feel like it. It’s more about paying attention to a few quiet details most recipes gloss over. For one, the crust really does need that quick pre-bake just 18 to 20 minutes so it doesn’t soak up the filling like a sponge. I used to skip it, thinking, “How much difference could it make?” A lot, as it turns out. Without it, even a perfectly set curd can’t save a soggy bottom.
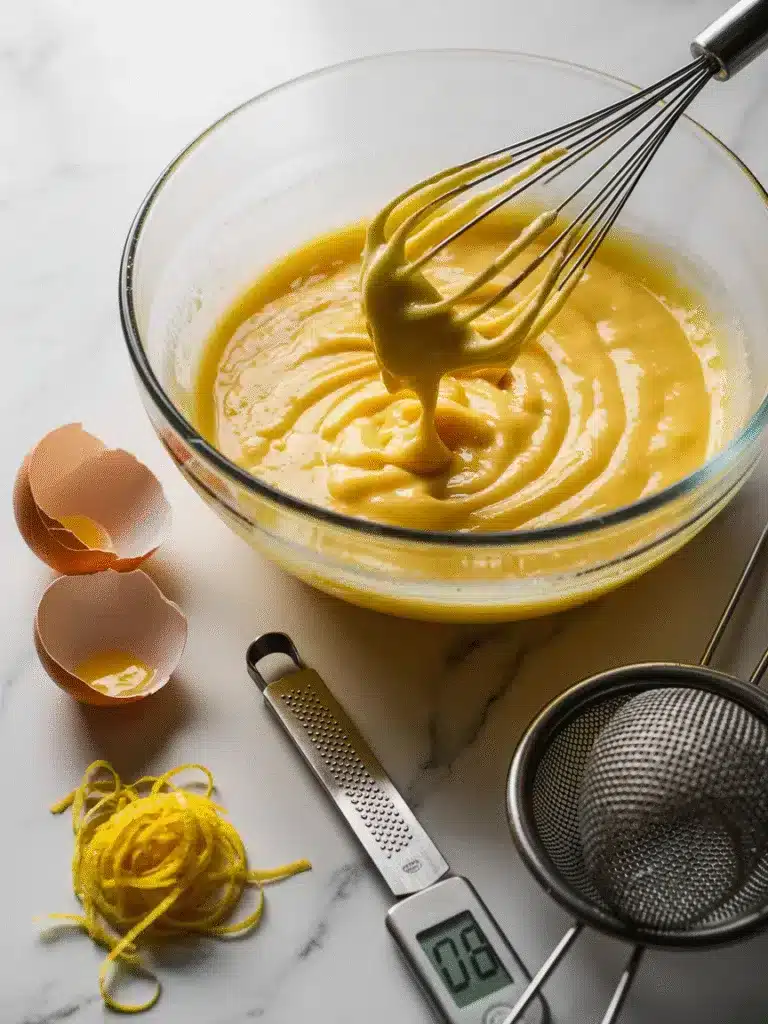
Then there’s the filling. Getting it smooth and glossy isn’t just about whisking hard—it’s about balance. Two large eggs seem to be the sweet spot. I once added an extra yolk for richness and ended up with something that tasted more like scrambled lemon than a bar. Too many eggs, or baking too long, and the proteins tighten up, turning the center rubbery. You want it just set at the edges, with a tiny wobble in the middle—like Jell-O that’s not quite firm. That’s when you pull it out.
Sugar does more than sweeten. It softens the tartness, yes, but it also keeps the texture smooth by slowing down how tightly the egg proteins bond. Cut it too much, and you risk not just sharpness but brittleness. I tried reducing it by 25% once, thinking I could get away with it. The bars set, barely, but cracked the second I sliced them. Lesson learned: this isn’t the place to skimp.
And about the lemon juice, please, for the love of all things citrus, use fresh. I know it’s tempting to grab the bottle, especially when you’re short on time, but it makes a difference you can taste. Bottled juice lacks the bright, floral notes that come from the oils in the peel, and it can leave a flat, almost metallic aftertaste when baked. I tested it side by side once: same recipe, same oven, same pan just one with fresh, one with bottled. The fresh one tasted like sunshine. The other? Like a memory of lemon.
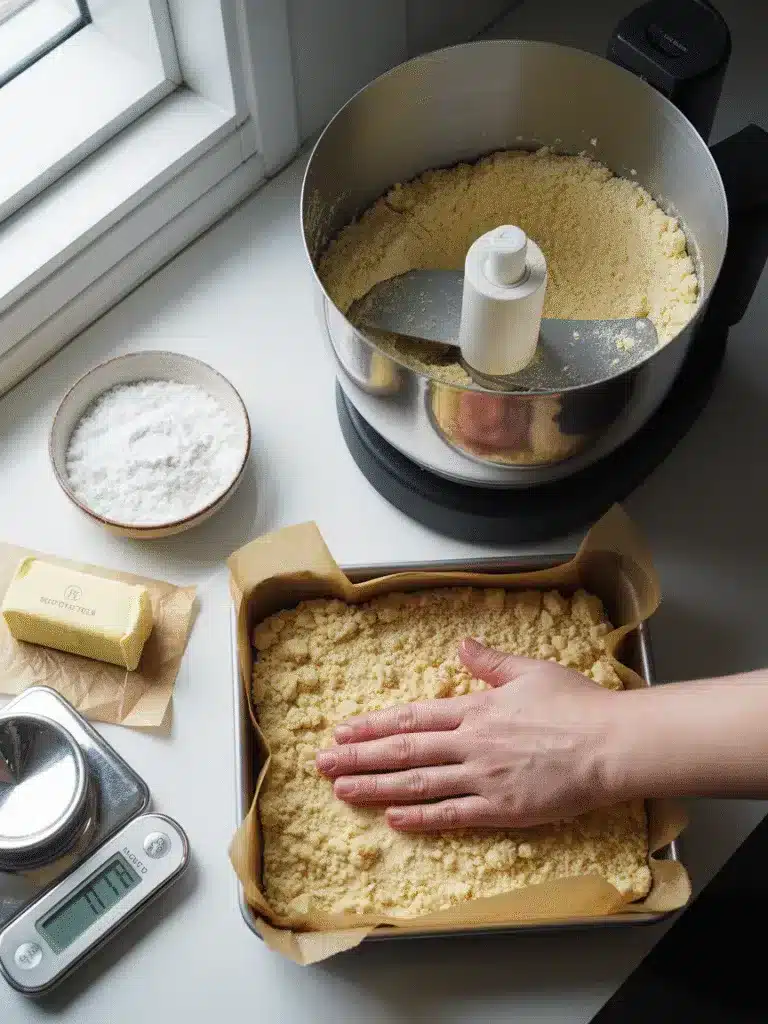
The crust is straightforward butter, powdered sugar, flour, a pinch of salt but the quality of the butter matters. I’ve used European-style (higher fat) when I have it, and it does make the crust a bit more tender, almost flaky. But regular unsalted works just fine. The key is keeping everything cold and not overworking the dough. A food processor makes this easy, but you can do it by hand with a pastry cutter or even two forks. Just stop when it looks like coarse sand.
Why This Recipe Works (And Why Others Don’t)
Most lemon bar recipes assume you’ll just follow the steps and everything will work out. But baking isn’t that forgiving. This one accounts for the little things that go wrong—weeping, cracking, sogginess—because I’ve lived them.
The pre-bake is non-negotiable. Eighteen to twenty minutes at 350°F gives the crust enough structure to hold up. I press the dough in firmly, making sure there are no thin spots, and line the pan with parchment with overhangs so I can lift the whole thing out later. It’s saved me more than once when the first cut didn’t go smoothly.
The filling ratio is tight: 120ml of fresh juice, 200g of sugar, 30g of flour, and two eggs. Any more liquid, and it takes longer to set. Any less sugar, and the eggs coagulate too fast. I whisk the sugar into the eggs first, letting it dissolve a bit before adding the lemon. That helps avoid graininess. And I always strain the mixture—just once, through a fine sieve—because even if it looks smooth, there’s often a bit of zest or undissolved flour that can affect the texture.
Ingredients That Matter
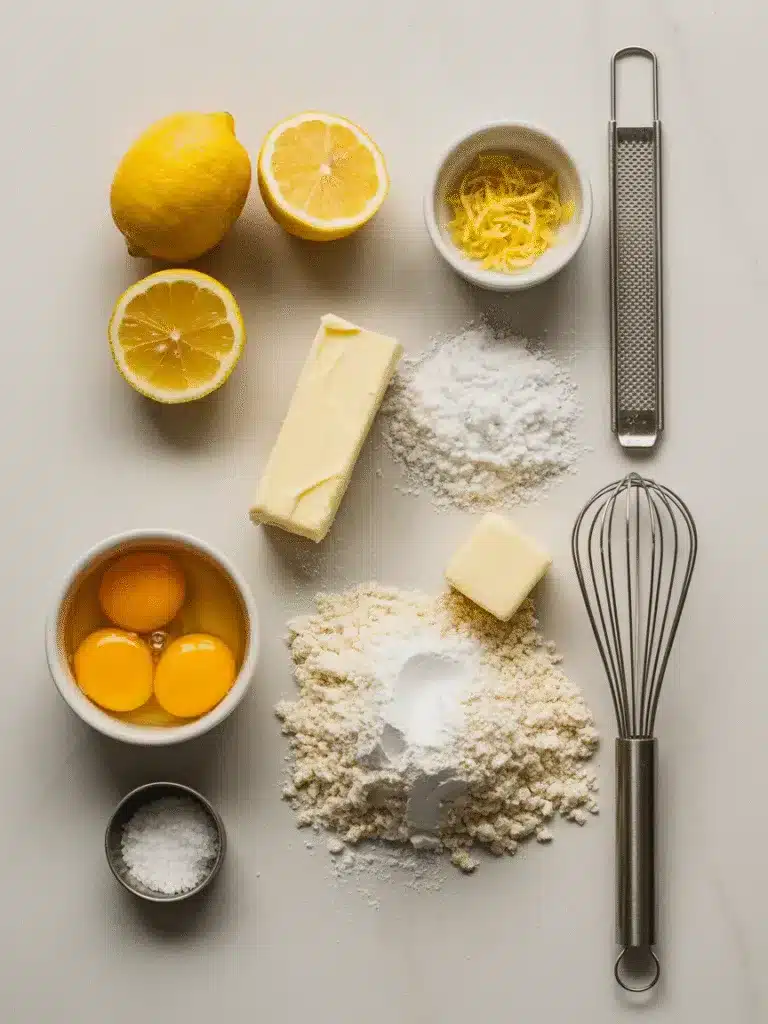
- Unsalted butter, 113g (½ cup) – Cold, cubed. I use real butter, not margarine. It adds richness and helps the crust brown just right.
- Powdered sugar, 60g (½ cup) – Blends in smoothly, no grit. Regular granulated can work, but you might feel tiny crystals in the crust.
- All-purpose flour, 150g (1¼ cups, spooned & leveled) – Spoon it in, don’t scoop. Scooping packs it down and you end up with too much.
- Pinch of salt, about 1g – Balances the sweetness. Don’t skip it.
- Large eggs, 2 – Room temperature. Cold eggs can cause the butter in the crust to seize when poured on, but mostly, they mix in more evenly.
- Granulated sugar, 200g (1 cup) – Fine white sugar. I’ve tried raw sugar once—looked nice, but didn’t dissolve fully.
- Freshly squeezed lemon juice, 120ml (½ cup) – From 4–5 medium lemons. Roll them on the counter before juicing to get more out.
- Lemon zest, 2 tsp – Use a microplane. It pulls out the oils without the bitter white pith.
- All-purpose flour, 30g (¼ cup) – Thickens the filling slightly. Not too much, or it turns pasty.
- Confectioners’ sugar, for dusting – Adds a soft sweetness and looks pretty. I dust it right before serving so it doesn’t melt.
Equipment You’ll Actually Use
You don’t need much, but a few things make it easier:
- 8×8-inch metal baking pan (not glass or ceramic—they conduct heat differently)
- Parchment paper, cut to fit with overhangs
- Food processor or pastry cutter
- Whisk
- Digital scale (I know, it’s extra, but weight measurements are more accurate than cups)
- Citrus juicer and microplane
- Fine-mesh sieve
- Oven preheated to 350°F (175°C)
- Instant-read thermometer (optional, but helpful—aim for 175°F in the center)
- Cooling rack
Step-by-Step, Without the Fluff
Step 1: Make the crust
Pulse flour, powdered sugar, and salt in a food processor. Add cold butter and pulse until it looks like coarse crumbs. Press it firmly into the bottom of the parchment-lined pan. It should feel solid, not crumbly.
Step 2: Pre-bake the crust
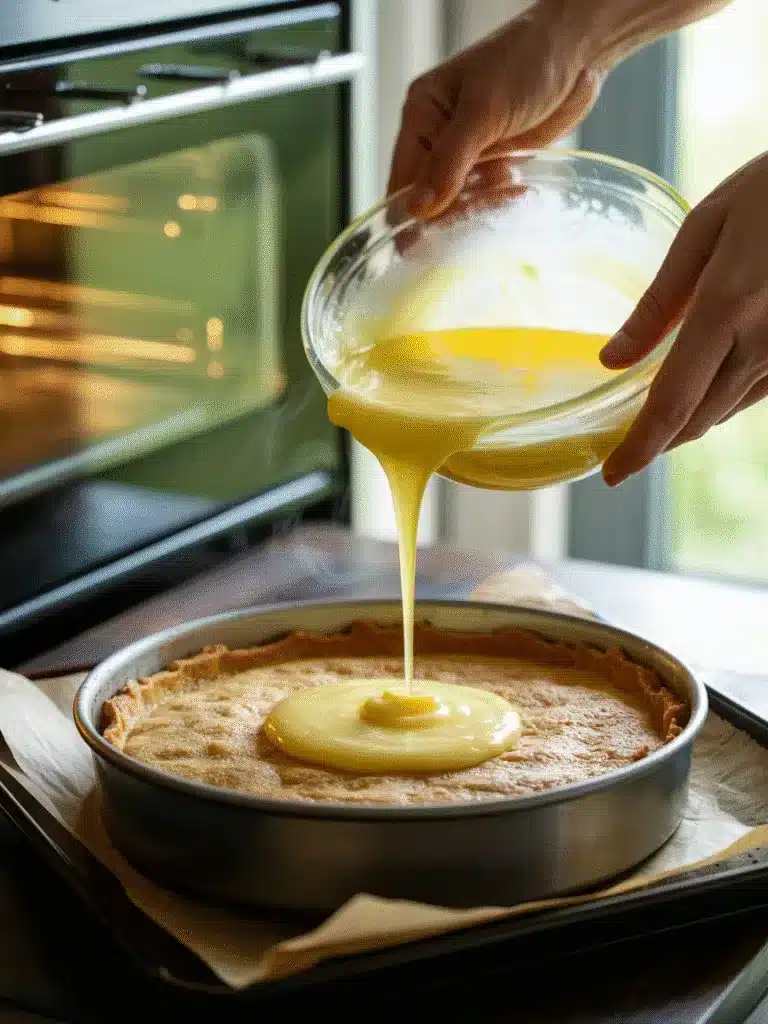
Bake for 18–20 minutes until the edges are lightly golden. The center should feel firm when you press it. Let it cool slightly while you make the filling—this helps prevent cracking.
Step 3: Make the filling
Whisk eggs and granulated sugar until blended. Add lemon juice, zest, and flour. Whisk until smooth and a bit frothy. Strain it through a sieve—trust me, it makes a difference.
Step 4: Pour and bake
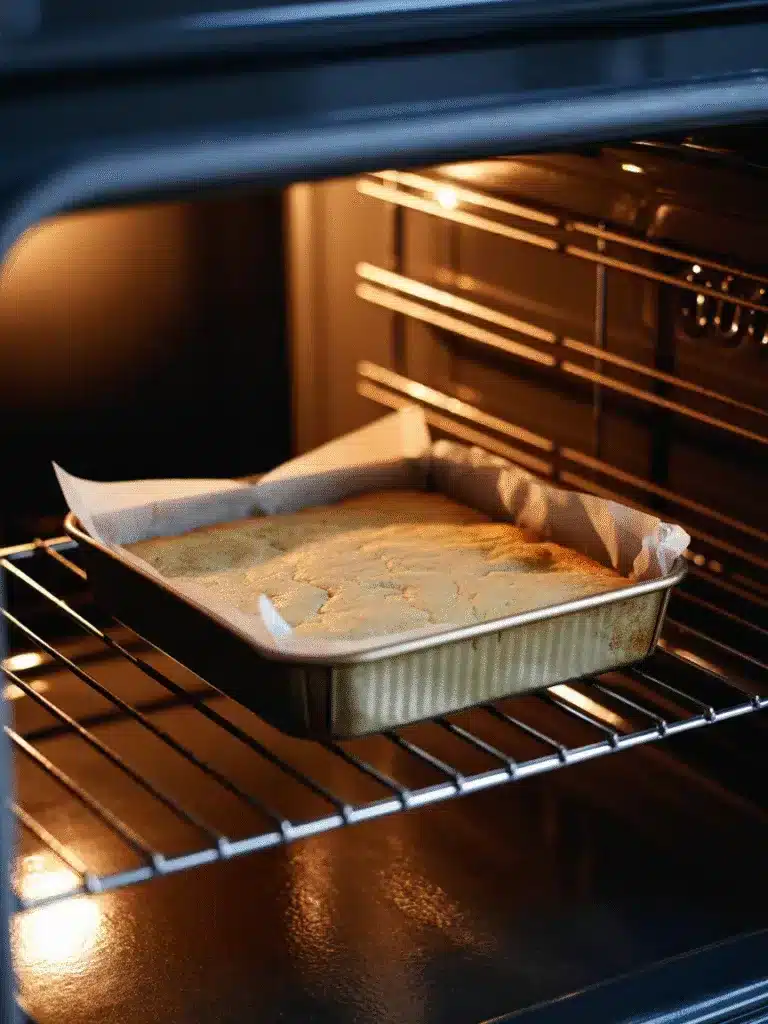
Pour the filling over the warm crust. Bake for 20–23 minutes. The edges should be set, the center just jiggly. If you have a thermometer, check that it hits 175°F.
Step 5: Cool and chill
Let it sit at room temperature for 30 minutes, then refrigerate for at least 2 hours—4 is better. Cutting too soon leads to smearing.

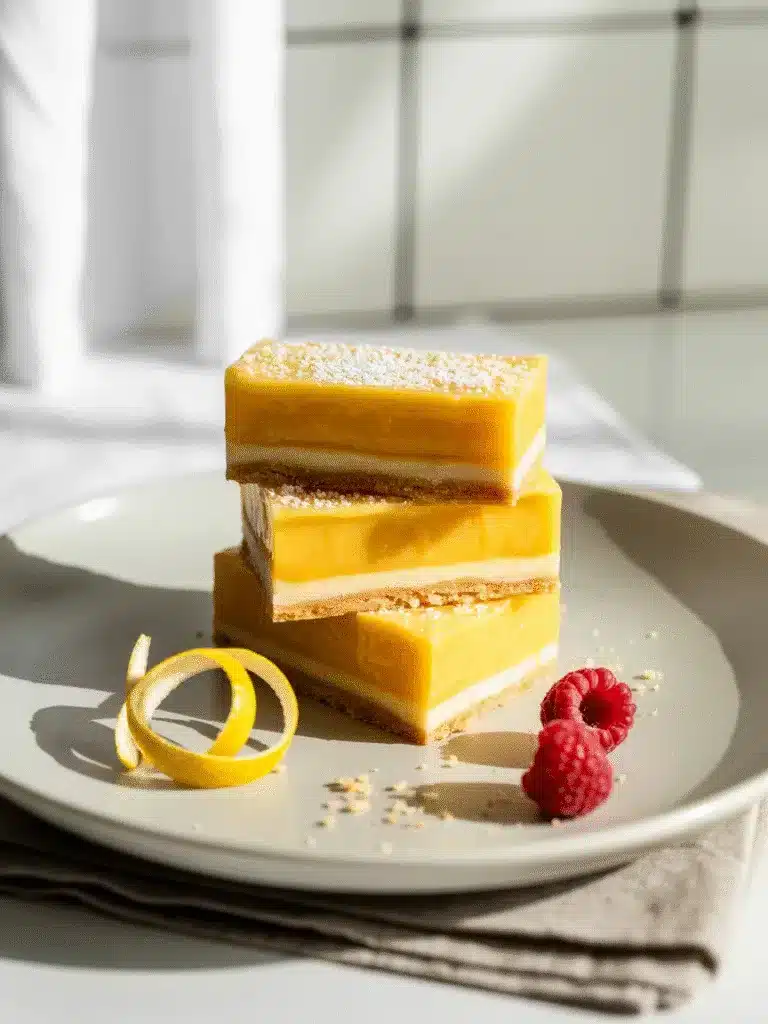
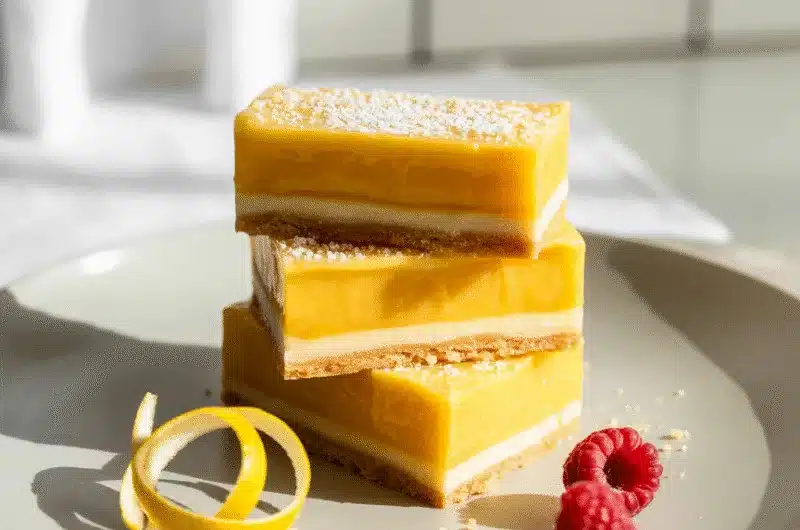
Step 6: Dust and slice
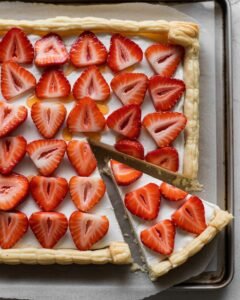
Sift confectioners’ sugar over the top. Use a sharp knife, wipe it between cuts. Run it under hot water and dry it for cleaner slices.
What Can Go Wrong (And How to Fix It)
- Cracked filling? Likely overbaked or cooled too fast. Pull it out when the center still wobbles slightly. Don’t open the oven door during the first 15 minutes.
- Soggy crust? The base wasn’t baked long enough, or you cut before it was fully chilled. Extend the pre-bake by 2–3 minutes next time.
- Too tart? Bottled juice or underripe lemons. Taste your juice before using. If it’s harsh, add 10–15g more sugar.
- Grainy texture? Sugar didn’t dissolve, or the eggs cooked when they hit the hot pan. Whisk longer, and let the crust cool a minute before adding filling.
- Leaking liquid? Underbaked or not chilled enough. Use the thermometer and wait the full 4 hours.
- Crust falls apart? Too little butter or too much flour. Measure butter precisely. Spoon flour into the cup, don’t scoop.
Substitutions That (Mostly) Work
- Dairy-free: Use refined coconut oil (solid) or a vegan butter stick. The crust stays crisp but loses a bit of richness.
- Gluten-free: Swap flour 1:1 with a good GF blend that includes xanthan gum. The crust may be more fragile—handle gently.
- Egg-free: Not really possible. Eggs are the structure here. Flax or chia gels won’t set the same way.
- Flavor tweaks: A half teaspoon of vanilla adds depth. Swap a tablespoon of juice for lime or orange. Add poppy seeds or cardamom to the crust for a twist.
- Scaling: Halve for a 6-inch pan (bake crust 15 min, filling 18–20). Double for 9×13 (crust 20–22 min, filling 25–28).
Make-Ahead, Storage, and Freezing
- Counter: Up to 2 days in a cool kitchen, covered. After that, the crust softens.
- Fridge: Keeps for 5 days. Place parchment between layers if stacking.
- Freezer: Wrap bars tightly in plastic, then in a container. Freeze up to 3 months.
- Thawing: Move to the fridge overnight, then sit at room temp for 30 minutes. Dust with sugar after thawing—otherwise, it gets sticky.
- Don’t refreeze once thawed.
- Don’t freeze fully dusted bars—the sugar absorbs moisture.
Serving Ideas
Serve chilled or cool. They’re great with:
- Lightly sweetened whipped cream
- Fresh raspberries or strawberries
- A cup of green tea or chamomile
- A small scoop of vanilla ice cream—almost like a deconstructed lemon meringue
A twist of lemon peel or a few edible flowers makes them look special for guests.
Notes from My Test Kitchen
- Batch 1: Used bottled juice. Filling set, but tasted flat. Crust was damp. Switched to fresh and extended pre-bake.
- Batch 2: Added extra egg. Cracked and eggy. Went back to two eggs, reduced bake time.
- Batch 3: Tried honey. Too much liquid—curd never set. Stick to granulated sugar.
- Final version: 2 eggs, fresh juice, full sugar, 20-minute bake. Glossy, firm, clean slice. Crust stayed crisp for days.
Nutrition (Per Bar, 1 of 16)
Calories: 140 | Fat: 7g | Carbs: 18g | Sugar: 12g | Protein: 2g | Sodium: 55mg
Estimates based on standard ingredients. Adjust for substitutions.
A Few Final Thoughts
This isn’t a “dump and bake” recipe. It asks for attention—but not perfection. I’ve made it on busy mornings and for last-minute gatherings. The key is respecting the process, not rushing the chill, and using real ingredients. When it works, it’s bright, balanced, and satisfying in that way only a perfect lemon bar can be.
Bright Lemon Bars with a Golden, Crunchy Base
Course: DessertCuisine: AmericanDifficulty: Easy4
servings20
minutes40
minutes140
kcal4
hoursBright, balanced lemon bars with a silky, clean-set curd and a crisp, non-soggy shortbread base. Uses fresh lemon juice, a quick pre-bake, and precise ratios for reliable results.
Ingredients
For the shortbread crust:
Unsalted butter, cold and cubed: 113 g (1/2 cup)
Powdered sugar: 60 g (1/2 cup)
All-purpose flour: 150 g (1 1/4 cups, spooned & leveled)
Fine salt: 1 g (a pinch)
- For the lemon filling:
Large eggs: 2 (about 100 g total), room temperature
Granulated sugar: 200 g (1 cup), fine
Freshly squeezed lemon juice: 120 ml (1/2 cup), from 4–5 medium lemons
Lemon zest: 2 tsp (from 2 lemons), finely grated with a microplane
All-purpose flour: 30 g (1/4 cup)
- For finishing:
Confectioners’ sugar, for dusting
Directions
- Step 1: Make the crust
Pulse flour, powdered sugar, and salt in a food processor to combine.
Add cold, cubed butter and pulse until the mixture resembles coarse sand with no visible butter chunks.
Line the 8×8-inch metal pan with parchment, leaving overhangs. Press the crumb mixture firmly and evenly into the pan. It should feel compact and solid, not loose. - Step 2: Pre-bake the crust
Bake at 350°F (175°C) for 18–20 minutes on the center rack.
The edges should be lightly golden and the surface matte and dry. The center should feel firm when pressed lightly.
Set on a cooling rack and let the crust cool slightly while you make the filling. - Step 3: Make the filling
In a bowl, whisk eggs and granulated sugar until fully combined.
Add lemon juice, lemon zest, and flour; whisk until smooth and lightly frothy.
Strain through a fine-mesh sieve into a measuring jug or bowl for an ultra-smooth texture. - Step 4: Pour and bake
Pour the filling over the warm crust and return to the oven.
Bake 20–23 minutes at the same temperature (350°F / 175°C).
Doneness: edges set with a slight jiggle in the center, similar to soft gelatin. If using a thermometer, the center should read about 175°F (79°C). Avoid overbaking to prevent cracks. - Step 5: Cool and chill
Cool on a rack for 30 minutes at room temperature.
Refrigerate uncovered for at least 2 hours, preferably 4 hours, to fully set for clean slicing. - Step 6: Dust and slice
Just before serving, sift confectioners’ sugar over the top.
Use a long, sharp knife. Rinse in hot water and wipe dry between cuts to get neat squares.
Notes
- Notes and Tips
Use fresh lemon juice only; bottled juice tastes flat and may introduce a metallic note when baked.
Straining the filling removes any zest clumps or undissolved flour for a glassy finish.
A metal pan conducts heat more evenly than glass or ceramic for this recipe.
For cleaner removal, lift the slab out using parchment overhangs before dusting and slicing. - Troubleshooting
Cracked filling: Usually from overbaking or rapid cooling. Pull when the center still has a soft jiggle; avoid opening the oven early.
Soggy crust: Underbaked base or slicing before it’s fully chilled. Extend pre-bake by 2–3 minutes if needed.
Too tart: Taste lemons first; if sharply acidic, add 10–15 g extra sugar.
Grainy filling: Sugar not fully dissolved or filling hit an overly hot pan. Whisk sugar into eggs thoroughly and let crust cool slightly before pouring.
Weeping after slicing: Underbaked center or insufficient chill time. Confirm 175°F internal and chill 4 hours. - Storage and Make-Ahead
Counter: Up to 2 days in a cool kitchen (<75°F / 24°C); crust may soften with time.
Fridge: Up to 5 days; place parchment between layers.
Freezer: Wrap individual bars tightly, then place in an airtight container; up to 3 months.
Thaw: In the fridge overnight; bring to room temp 30 minutes before serving. Dust with sugar after thawing.
Do not refreeze once thawed. Avoid freezing pre-dusted bars (sugar turns sticky).