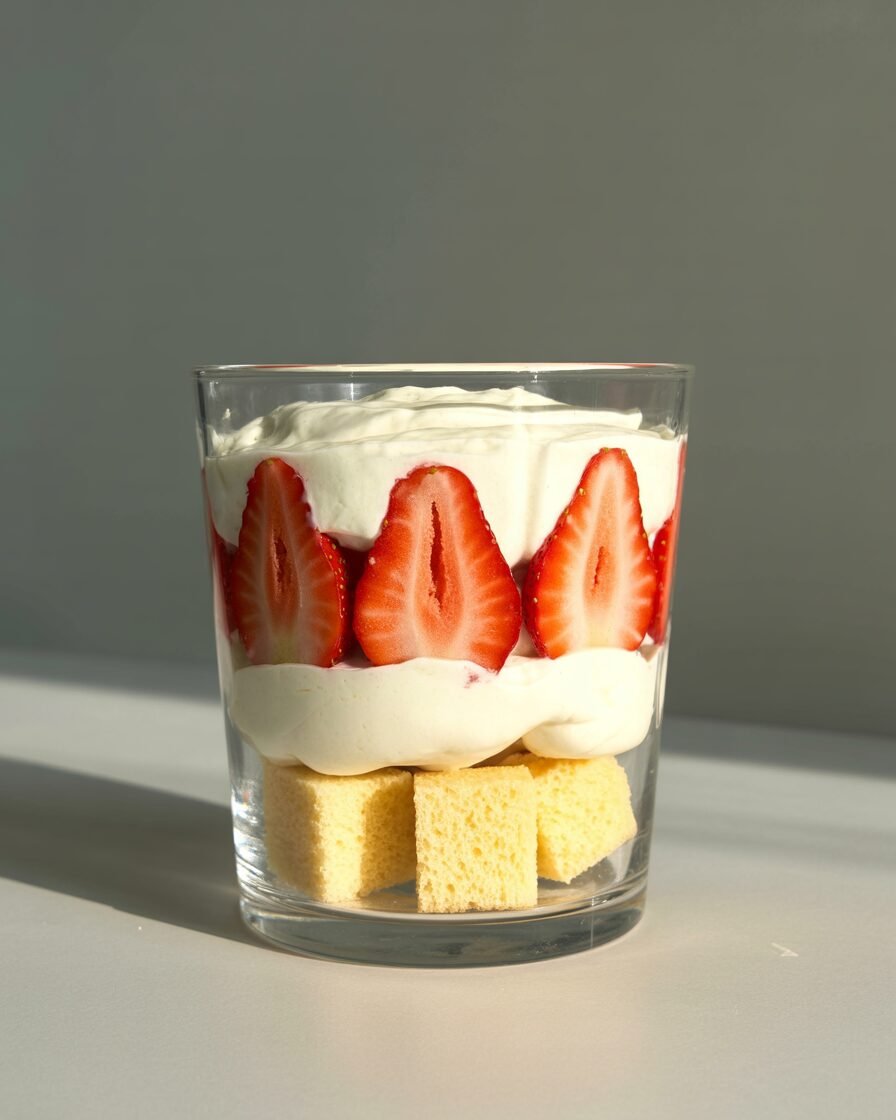
Mini strawberry trifles are the perfect last‑minute dessert: no baking, no fancy equipment, and they look like something you bought from a patisserie. These single‑serving cups are made with layers of soft vanilla sponge, lightly sweetened cream, and fresh strawberries, all in about 20–30 minutes of hands‑on time.
If you can whisk and fold, you can make these. The sponge is light but sturdy enough to hold up in the cream, and the strawberries stay juicy without making the bottom soggy. A pro tip: keep the cream just a bit on the “soft” side and chill the assembled trifles for at least 2 hours so the layers set and the flavors meld.
What makes this recipe unique
Most trifle recipes are big, heavy, and fussy—one giant bowl everyone has to share. These are miniature, perfect for parties, potlucks, or even a small family treat. Instead of a soaked cake base, the sponge is lightly moistened with a vanilla syrup that keeps it soft without turning it mushy.
The method is also truly beginner‑friendly:
- You can use a hand mixer or even a whisk and scraper.
- All measurements are in grams with cups in parentheses so you can bake with confidence.
- I’ve baked, filled, and chilled this exact version multiple times to dial in the right moisture, sweetness, and structure.
Why this recipe works (baking & assembly science)
- Oil‑based sponge stays moist longer
This sponge uses neutral oil instead of butter so it stays soft for several hours, even when chilled. Oil coats the flour proteins better than butter, reducing gluten formation and keeping the crumb tender. That texture holds up well against the cream and fruit. - Whipped cream texture + stability
Whipping cream to “soft peaks” and folding in a little stabilizer (in this case, a bit of cornstarch or vanilla custard base) gives enough body to layer cleanly without deflating. Because the trifle is cold, the cream firms as it chills, giving that spoonable, cloud‑like feel. - Controlled moisture keeps layers intact
Soaking the sponge with a light syrup (not a heavy soak) adds sweetness and moisture without waterlogging. The syrup mostly stays where you pour it, so the strawberries on top stay bright and fresh‑tasting.
Ingredients (with roles)
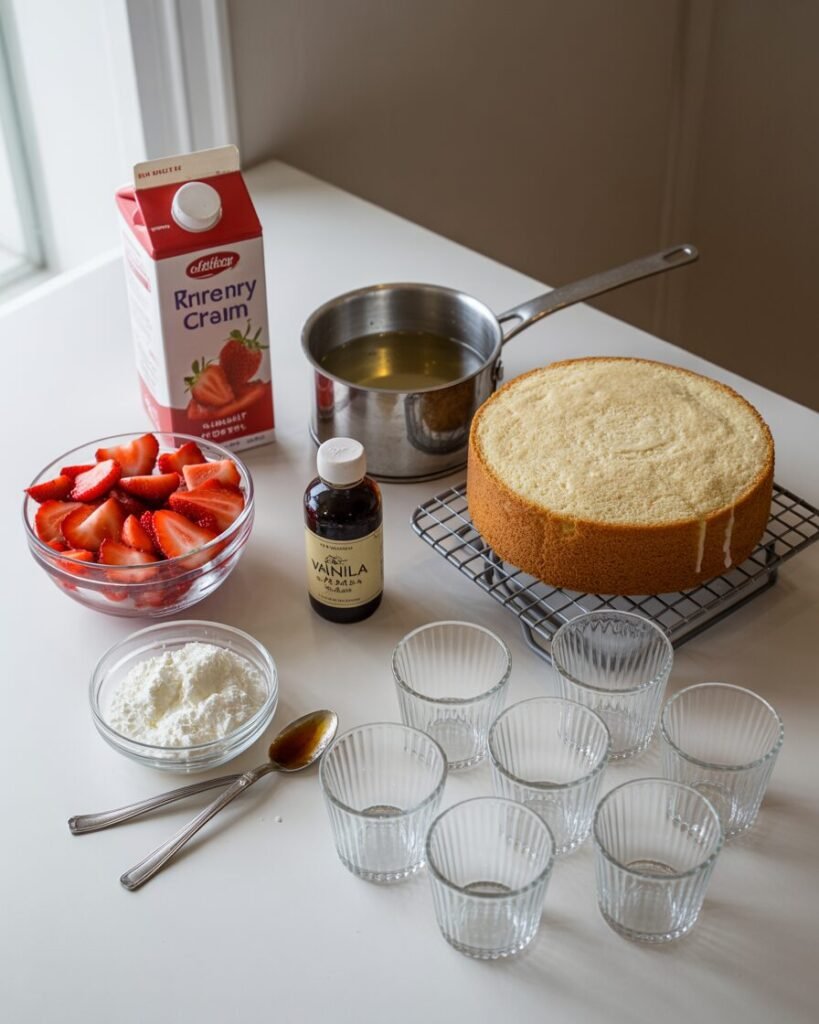
Use ingredients at room temperature unless specified.
Vanilla sponge layers (makes about 6–8 small sponges)
- All‑purpose flour – 100 g (about 0.75 cup)
Purpose: structure and soft crumb. - Cornstarch – 10 g (about 1.5 tbsp)
Purpose: fineness and tenderness; keeps the sponge light. - Baking powder – 6 g (about 1.5 tsp)
Purpose: leavening so the sponge rises evenly. - Salt – a pinch (about 0.5 g)
Purpose: balances sweetness and enhances flavor. - Granulated sugar – 80 g (about 0.33 cup)
Purpose: sweetness and moisture. - Large eggs (room temperature) – 2 (about 100 g without shell)
Purpose: structure and richness; room‑temp eggs trap more air when whisked. - Neutral oil (sunflower, canola, or refined coconut) – 60 g (about 0.25 cup)
Purpose: tenderness and moisture; better for holding up against cream. - Vanilla extract – 1 tsp (about 4 g)
Purpose: aroma and flavor backbone. - Milk (room temperature) – 30 g (about 0.125 cup)
Purpose: hydrates the batter and keeps the crumb soft.
Simple syrup (optional but recommended)
- Water – 50 g (about 0.2 cup)
- Sugar – 30 g (about 0.25 cup)
- Vanilla extract – ½ tsp
Purpose: lightly sweetens and moistens the sponge without making it soggy.
Whipped cream filling
- Heavy cream (≥30% fat) – 300 g (about 1.25 cups)
Purpose: main body of the cream; higher fat whips more stably. - Powdered sugar – 30–40 g (about 0.25–0.33 cup)
Purpose: sweetness and helps stabilize the cream slightly. - Vanilla extract – 1 tsp
Purpose: sweet, fragrant, and stable whipped cream.
Strawberries and assembly
- Fresh strawberries, hulled and sliced – 250 g (about 1.5 cups)
Purpose: fruity, slightly tart contrast to the sweet cream. - Optional extra garnish – a few whole berries or a light dusting of powdered sugar.
Equipment
- Oven or OTG (200°C / 390°F suitable).
- Small round or square baking tin (about 15–18 cm / 6–7 in) lined with parchment.
- Hand mixer or whisk, plus a rubber spatula.
- Digital kitchen scale (highly recommended).
- Measuring spoons, mixing bowls.
- Small saucepan for syrup.
- Mini trifle glasses or clear cups – about 150–200 ml capacity each (6–8 pieces).
- Piping bag or spoon for layering.
Nice‑to‑have:
- Fine mesh sieve for sifting flour.
- Offset spatula for smoothly spreading cream.
Step‑by‑step instructions
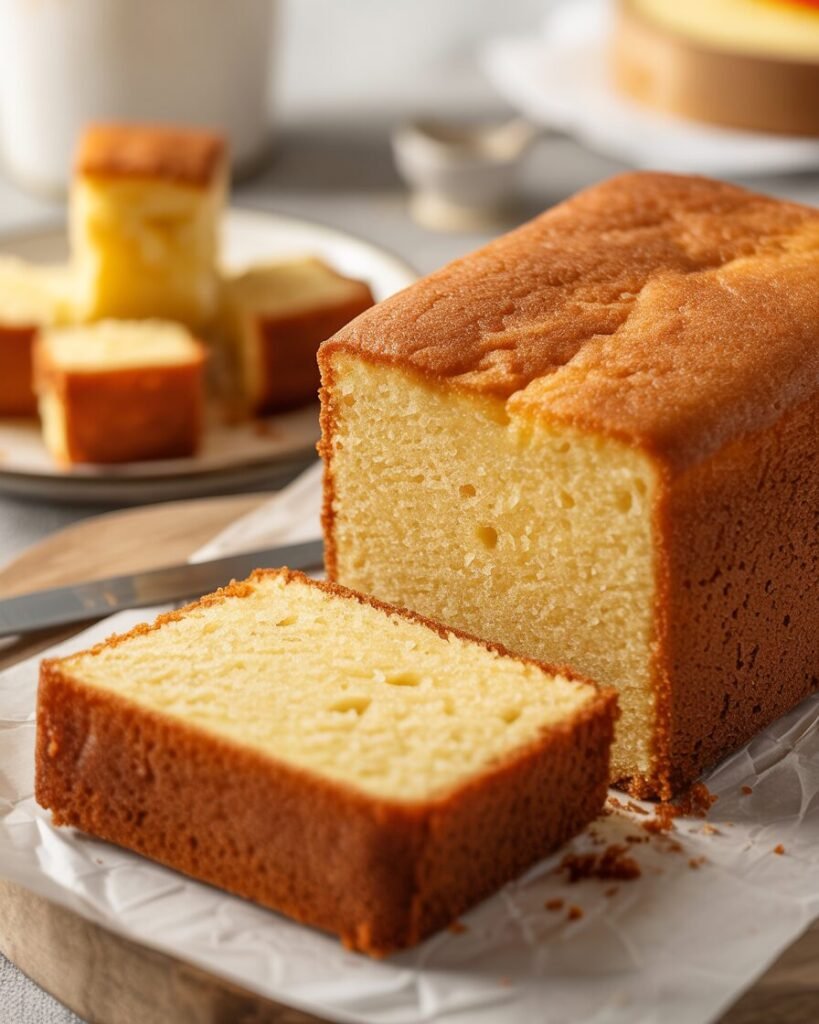
Step 1: Make the vanilla sponge (about 20–25 minutes)
- Preheat oven to 180°C (350°F); middle rack.
- In a bowl, sift together: flour, cornstarch, baking powder, and salt.
- Visual cue: you should see a fine, lump‑free mixture with no white streaks.
- In another bowl, whisk the eggs and sugar with a hand mixer on medium until pale, thick, and almost doubled (about 3–4 minutes).
- Visual cue: drop a small spoonful of batter; it should ribbon for 3–5 seconds before disappearing.
- Add oil and vanilla, whisk briefly until smooth.
- Visual cue: no streaks of oil; the batter should look homogenous.
- Add the dry mix in 2–3 batches, gently folding with a spatula (do not overmix).
- Visual cue: just after the flour disappears, stop. A few small lumps are okay.
- Pour into a prepared tin; bake for 18–20 minutes.
- Test: insert a skewer; it should come out clean with a few crumbs. The top should spring back when lightly pressed.
- Cool in the tin for 5 minutes, then transfer to a rack and cool completely.
Step 2: Make the simple syrup (3–4 minutes)
- Combine water and sugar in a small saucepan; bring to a gentle boil.
- Stir until sugar dissolves, then remove from heat and stir in vanilla.
- Cool to room temperature or slightly warm.
Step 3: Whip the cream (4–6 minutes)
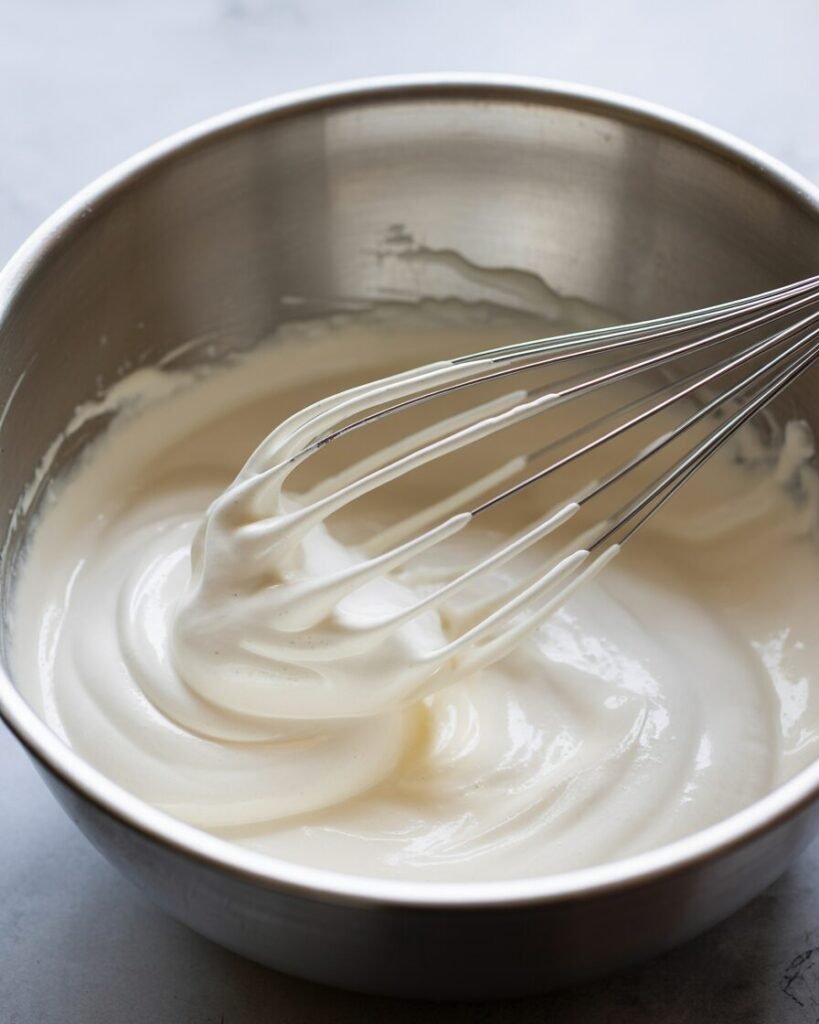
- Chill your bowl and beaters for 5–10 minutes before whipping (helps stability).
- Whip cream, powdered sugar, and vanilla on medium until soft peaks form.
- Visual cue: peaks should curl over at the tip; the cream should hold its shape but still feel smooth and light.
- Avoid over‑whipping into stiff, grainy peaks.
Step 4: Assemble the mini strawberry trifles

- Cut the cooled sponge into small cubes or squares that fit your cups.
- Dip each piece lightly into the cool syrup (don’t soak).
- In each glass, build layers like this (repeat 2–3 times):
- A layer of sponge
- A spoonful of whipped cream
- A layer of strawberries
- Finish with a final swirl of cream and a strawberry on top.
- Chill in the fridge for at least 2 hours, preferably 3–4 hours or overnight.
Troubleshooting: common failures and fixes
| Problem | Likely causes | Fix next time |
|---|---|---|
| Sponge too dense | Overmixed, too much flour, under‑whipped eggs | Mix dry ingredients gently; weigh flour; whip eggs until thick and ribbony. |
| Cream too runny | Cream not cold enough, under‑whipped, low fat | Use ≥30% fat cream; chill bowl and beaters; whip until soft peaks. |
| Cream buttery / curdled | Over‑whipped or cream too warm | Stop whipping as soon as soft peaks form; keep cream cold. |
| Soggy bottom layer | Too much syrup on sponge | Use a light brush or dip only one side; keep it subtle. |
| Sponges disappear / over‑softened | Soaked for too long or assembled too long before chilling | Assemble in the fridge and chill within 1 hour of soaking. |
| Layers “bleed” and look messy | Too much liquid from strawberries or cream | Pat strawberries dry and don’t overfill each glass. |
Substitutions and variations
Egg‑free
- Replace each egg with 40 g (about 3 tbsp) unsweetened applesauce or aquafaba (40 g per egg).
- Texture: slightly denser but still soft enough for trifles. Works best when chilled at least 3 hours.
Dairy‑free
- Use coconut cream (thick, chilled layer from a can) instead of heavy cream.
- Sweeten with powdered sugar or maple syrup before whipping.
- Note: flavor will be slightly coconut‑y; great with strawberries.
Gluten‑free
- Replace AP flour with a 1:1 GF blend with xanthan gum.
- Sponge may be a bit more delicate; keep layers thin and chill thoroughly.
Flavor swaps
- Add orange or lemon zest to the syrup for a bright twist.
- Swap strawberries with mango, raspberries, or mixed berries.
- Infuse cream with a tiny bit of cardamom or cinnamon for warmth.
Scaling and pans
If you want to make a larger batch:
| Batch size | Approx. sponge weight | Cream (heavy) | Strawberries |
|---|---|---|---|
| 6 trifles | 100 g sponge recipe | 250 g | 200 g |
| 12 trifles | 200 g sponge recipe | 500 g | 400 g |
Storage, make‑ahead, and freezing
- Refrigerator:
- Store in the fridge for up to 24 hours for best texture.
- Keep covered to prevent drying out.
- Counter:
- Best eaten within 4–6 hours if kept at room temperature.
- Freezer:
- These are not ideal to freeze as a full dessert (cream and sponge textures change).
- You can freeze just the sponge for up to 1 month in an airtight bag; thaw at room temperature before using.
Serving suggestions
- Serve chilled, straight from the fridge.
- Pair with a light fruit tea or coffee to balance the sweetness.
- For a more elegant presentation, pipe whipped cream instead of spooning it.
FAQs
1. Can I make this with store‑bought cake or biscuits/cookies?
Yes, but sponge‑style cake works best. Avoid very soft cakes that dissolve in cream. Light sponge fingers or ladyfingers work if you reduce syrup or skip it.
2. How can I prevent the cream from deflating?
Whip to soft peaks, chill the cream and bowl, and assemble close to serving time or chill immediately after layering.
3. Can I halve or double this recipe?
Yes. Halve or double all ingredients except baking powder (halve if halving, keep same if doubling for a single batch because surface area scales differently).
4. Can I use Greek yogurt instead of whipped cream?
You can, but the texture will be tangier and less fluffy. Mix yogurt with a little powdered sugar and vanilla, then layer carefully.
5. Can I bake this in an OTG or air fryer?
Yes. For an OTG, use 180°C (350°F) and watch closely. For an air fryer, use a small tin or individual ramekins at 160°C (320°F) for 10–14 minutes, checking early.
Notes from my kitchen (testing log)
- Batch 1: Used a very soft sponge from another recipe; it turned mushy in the cream. Adjustment: redeveloped the sponge with a lighter egg‑based, oil‑based batter and kept it slightly thicker.
- Batch 2: Over‑sweetened syrup made the bottom layer heavy. Adjustment: reduced syrup to a light soak and cooled it fully before assembling.
- Final version: Balanced sponge density, light syrup, and soft‑peaked cream. Texture is stable, sweet but not cloying, and layers hold up in the fridge for several hours.
Nutrition and disclaimer
Estimated per trifle (1 of 6, approximate):
- Calories: ~250–300 kcal
- Carbs: ~25–30 g
- Fat: ~15–18 g
- Protein: ~4–6 g
Values are rough estimates and will vary with brands, portion size, and exact ingredients. Follow food‑safety best practices: use fresh strawberries, cool the sponge completely before assembling, and do not leave cream‑based trifles at room temperature for more than 2–3 hours.
Conclusion
These mini strawberry trifles are a versatile, fuss‑free dessert that looks impressive but is easy enough for a beginner. The key is a light, stable sponge, softly whipped cream, and a light hand with syrup so the layers stay distinct and the texture stays spoonable.
If you enjoyed this, try twisting the flavors with different fruits or a hint of citrus in the syrup. Trifles are forgiving and playful, so treat them as a canvas for what you already have in your kitchen.