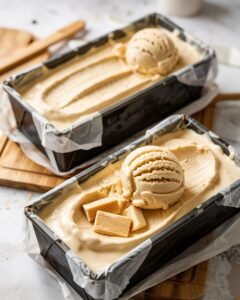
If you’ve ever wanted a tropical ice cream that tastes like vacation but doesn’t require fancy equipment, this Pineapple Coconut Ice Cream is it. It’s creamy, bright, slightly tangy, and loaded with real pineapple flavor — not artificial syrupy sweetness.
What makes this recipe special? We reduce fresh pineapple to remove excess water (so you don’t get icy texture), and we balance coconut milk fat with just enough dairy for scoopable smoothness.
Pro tip: Cook the pineapple briefly before adding it to the base. Raw pineapple contains enzymes and too much water — both can mess with texture.
This recipe is perfect for beginner to intermediate home bakers with just a whisk, saucepan, freezer-safe pan, and either an ice cream maker or a hand mixer for no-churn style.
Why This Recipe Works (The Science Behind It)
Ice cream texture is all about fat, sugar, and water balance.
- Coconut milk (full-fat) provides stable fat molecules that trap air during churning. Fat = creaminess.
- Sugar lowers the freezing point. Too little sugar = hard, icy block. Too much = slushy.
- Reducing pineapple evaporates excess water. Pineapple is ~86% water — if added raw, it creates ice crystals.
- A small amount of dairy cream (even with coconut milk) improves scoopability because dairy fat melts slightly lower than coconut fat.
Did you know? Coconut fat hardens faster than dairy fat. That’s why fully coconut-based ice creams can feel waxy straight from the freezer. The hybrid approach fixes that.
Ingredients (with purpose)
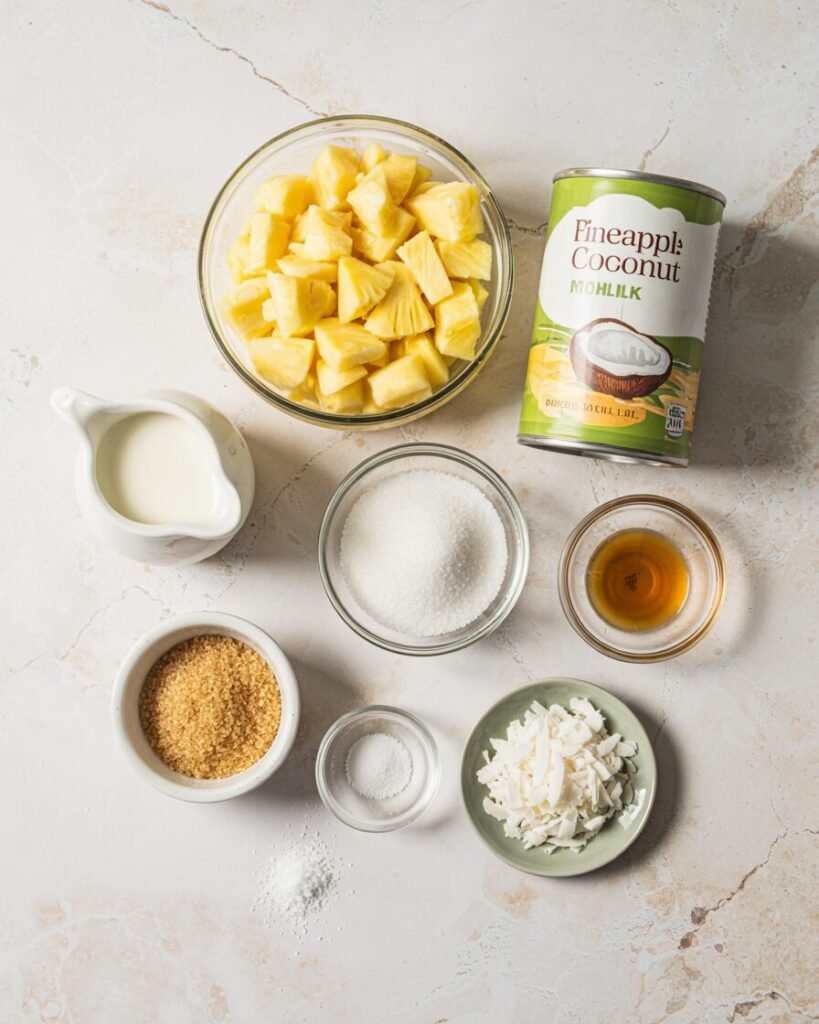
- 300g fresh pineapple (about 2 cups chopped) — flavor base; reduced to concentrate
- 80g granulated sugar (⅓ cup) — sweetness + controls freezing
- 240g full-fat coconut milk (1 cup) — fat + coconut flavor
- 240g heavy cream (1 cup) — smooth texture, prevents waxiness
- 30g light brown sugar (2 tbsp) — subtle caramel depth
- 5ml vanilla extract (1 tsp) — rounds flavor
- 1g fine salt (¼ tsp) — balances sweetness
- 10g toasted coconut flakes (2 tbsp, optional) — texture
Ingredient note: Use canned full-fat coconut milk (minimum 17% fat). Avoid “lite” versions.
Equipment
Required:
- Medium saucepan
- Whisk
- Blender or immersion blender
- Ice cream maker or hand mixer
- 8×4-inch (20×10 cm) loaf pan or freezer-safe container
- Thermometer (optional but helpful)
Nice-to-have:
- Silicone spatula
- Fine mesh sieve
Step-by-Step Instructions
[Process photo: Pineapple cooking in saucepan.]
Step 1: Reduce the Pineapple
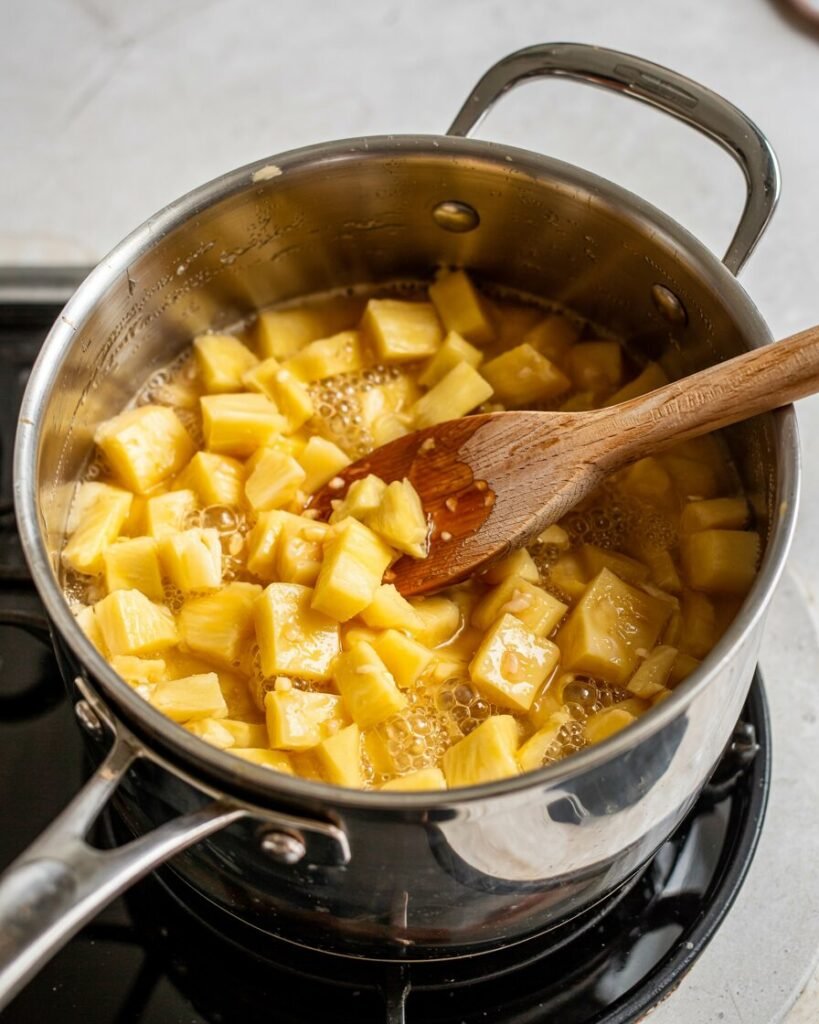
Cook 300g chopped pineapple with 40g sugar over medium heat for 8–10 minutes.
Stir occasionally. It should bubble and thicken slightly.
Visual cue: The mixture should look glossy and slightly jammy, not watery. If liquid pools separately, cook 2–3 more minutes.
Cool completely (about 20 minutes), then blend smooth.
[Process photo: Whisking cream and coconut mixture.]
Step 2: Make the Base
In a bowl, whisk:
- Coconut milk
- Heavy cream
- Remaining 40g sugar
- Brown sugar
- Salt
- Vanilla
Whisk until sugar dissolves (1–2 minutes).
Visual cue: No visible sugar granules when rubbed between fingers.
Step 3: Combine
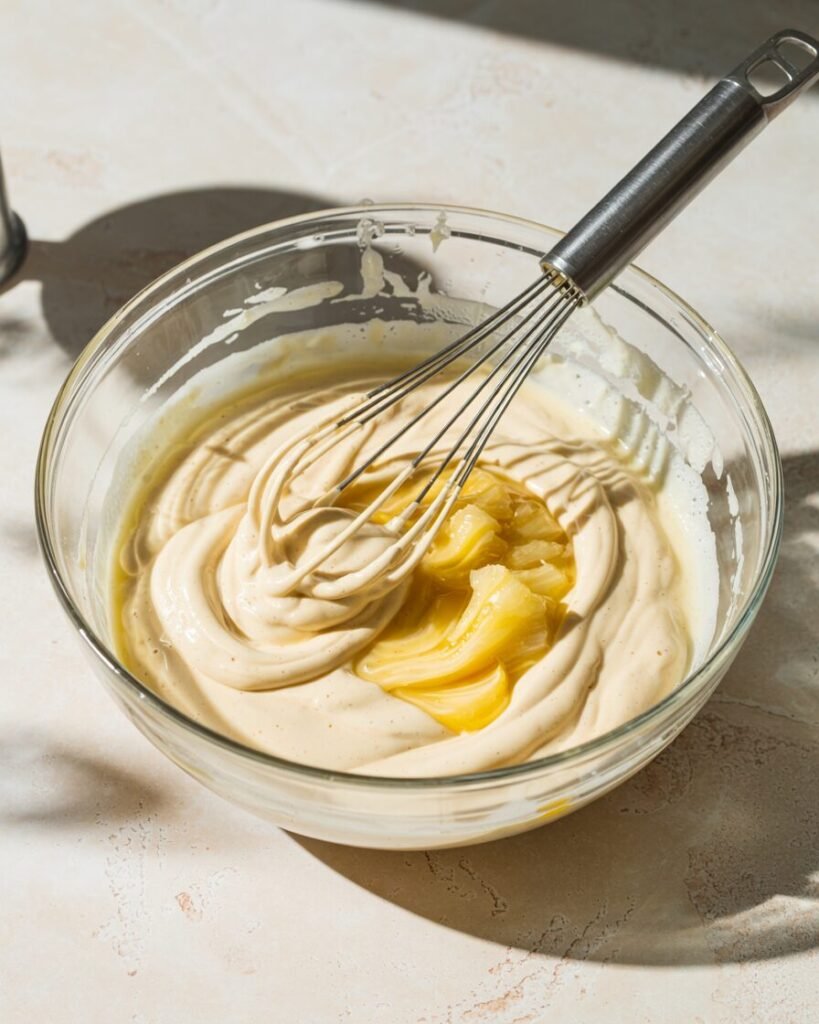
Stir pineapple purée into cream mixture.
Optional: Strain for ultra-smooth texture.
Chill in fridge for 1 hour (or until below 10°C / 50°F).
Checkpoint: Cold base churns faster and traps more air.
Step 4A: Churn (Ice Cream Maker Method)
Churn according to manufacturer instructions (usually 18–22 minutes).
Visual cue: Soft-serve consistency; forms soft peaks that slowly slump.
Fold in toasted coconut.
Transfer to container and freeze 3–4 hours until firm.
Step 4B: No-Churn Method
Pour mixture into loaf pan. Freeze 45 minutes.
Remove and beat with hand mixer 1–2 minutes.
Repeat every 30–45 minutes for 3–4 rounds.
This breaks ice crystals.
Freeze final 4 hours until firm.
[Process photo: Soft serve stage in ice cream maker.]
Final Freeze

Freeze at least 4 hours or until internal temp reaches about -12°C to -15°C (10–5°F).
Let sit at room temp 5–8 minutes before scooping.
Troubleshooting (Common Failures)
Problem: Ice cream is icy
Likely cause: Pineapple not reduced enough
Fix next time: Cook until visibly thick; reduce by about 25% volume
Problem: Too hard to scoop
Likely cause: Too little sugar or too much coconut milk
Fix: Increase sugar by 10g or add 1 tbsp glucose/corn syrup
Problem: Waxy mouthfeel
Cause: 100% coconut fat
Fix: Keep dairy cream ratio as written
Problem: Grainy texture
Cause: Sugar not dissolved
Fix: Warm mixture slightly to dissolve sugar before chilling
Problem: Sour taste
Cause: Under-ripe pineapple
Fix: Add 1 tbsp honey or use riper fruit
Substitutions & Variations
Dairy-Free Version
Replace heavy cream with 240g additional full-fat coconut milk.
Add 15g corn syrup to improve softness.
Vegan Version
Use dairy-free whipping cream alternative.
Ensure sugar is vegan-certified if needed.
Lower Sugar
Reduce sugar to 60g total.
Texture will freeze firmer.
Flavor Variations
- Add 1 tbsp lime zest for brightness
- Swirl in 50g mango purée
- Add 20g white rum (reduces freezing hardness slightly)
Scaling Guide
| Pan Size | Ingredient Multiplier |
|---|---|
| 6-inch batch (small) | x0.75 |
| 8-inch loaf (standard) | Full recipe |
| Double batch | x2 (use 2 loaf pans) |
Churning time remains similar; freezing time increases slightly for larger volume.
Storage, Make-Ahead & Freezing
Freezer: Store tightly covered up to 2 months.
Press parchment directly on surface to prevent ice crystals.
Do not refreeze once fully melted — texture degrades.
Make-ahead tip: Base can be refrigerated 24 hours before churning.
Avoid storing near freezer door (temperature fluctuation causes ice crystals).
Serving Suggestions
Serve with:
- Toasted coconut flakes
- Fresh pineapple cubes
- Coconut caramel drizzle
- Between two sugar cookies for ice cream sandwiches
The flavor is bright and tropical, so pair with slightly salty or buttery elements.
FAQs
Can I use canned pineapple?
Yes, but drain well and reduce longer. Syrup-packed versions may taste overly sweet.
Can I skip cooking pineapple?
Not recommended. Raw pineapple adds excess water and can create icy texture.
How do I double the recipe?
Double all ingredients. Use wider container to maintain even freezing.
Can I make this in an OTG freezer compartment?
Yes, but expect longer freezing time (6–8 hours). Stir halfway if possible.
Best sugar type?
Granulated works best for clean sweetness. Brown sugar adds depth but don’t exceed 30g.
Notes From My Kitchen (Testing Log)
Batch 1: Used raw pineapple. Result: icy texture, separated layers.
Batch 2: Reduced pineapple 5 minutes. Still slightly icy.
Batch 3: Reduced 10 minutes — perfect thickness.
Batch 4: Tried full coconut milk (no cream). Too waxy when frozen.
Batch 5: Added cream back — improved scoopability.
Batch 6: Reduced sugar to 60g — froze too firm.
Final Version: 80g total sugar + hybrid fat = best balance of creamy, scoopable, and tropical flavor.
This method gave the smoothest texture without commercial stabilizers.
Nutrition (Approximate, per ½ cup serving)
- Calories: ~240
- Fat: 18g
- Carbs: 20g
- Sugar: 17g
- Protein: 2g
Values are estimates and vary by brand and portion size. Follow proper food-safety practices and keep frozen below -12°C (10°F).
Conclusion
This Pineapple Coconut Ice Cream delivers real fruit flavor, creamy texture, and reliable results — even without fancy tools. The key is simple: reduce the pineapple, balance the fats, and chill properly before freezing.
It’s tropical, refreshing, and surprisingly easy once you understand the science behind it.