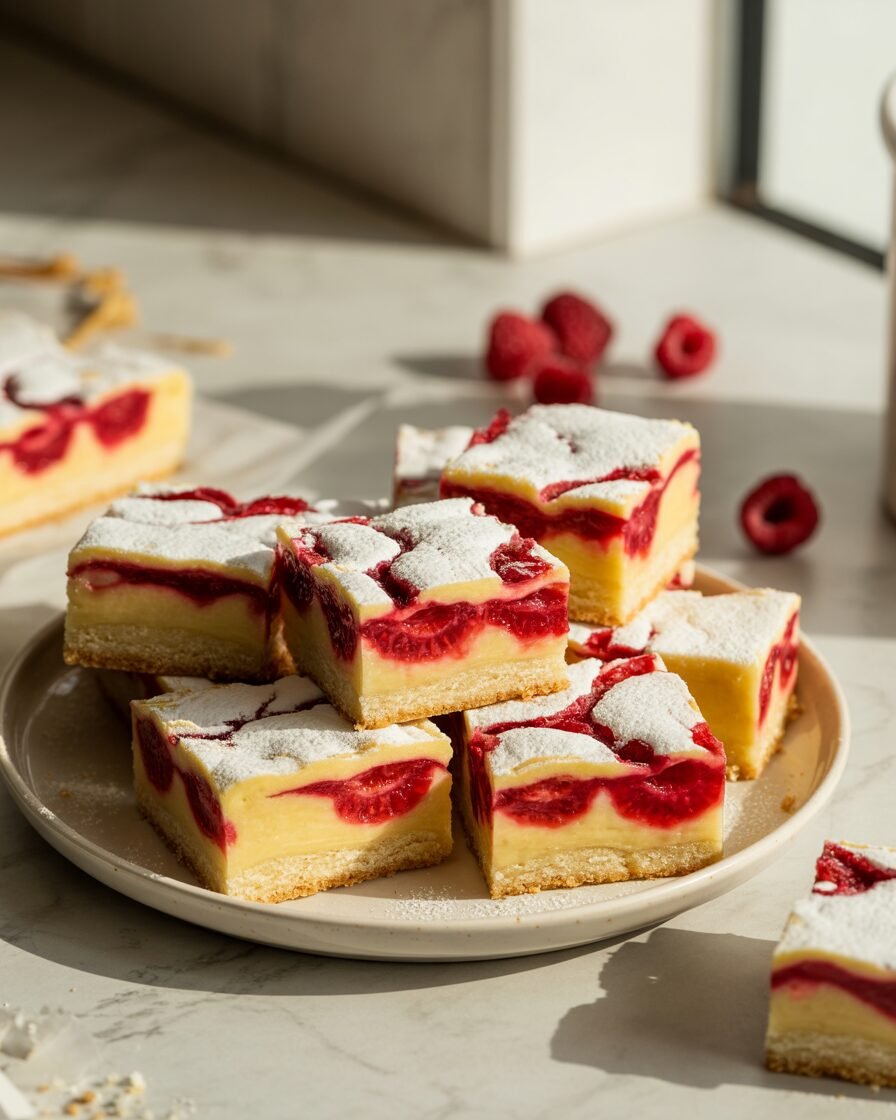
Some desserts shout for attention. These Raspberry Lemon Bars don’t — they quietly win you over with sharp citrus, buttery shortbread, and little pockets of ruby raspberry that cut through the sweetness in the best way.
I created this version after testing multiple batches to solve two common problems: lemon bars that won’t set properly and crusts that turn soft underneath. This recipe gives you a firm yet creamy lemon layer, defined raspberry swirls (not a pink blur), and a base that stays crisp even after chilling.
Pro tip: Don’t rely on color alone — bake until the center reaches about 93–95°C (200–203°F). That small detail is what guarantees clean, confident slices every time.
Best for beginner to intermediate home bakers using a standard OTG or conventional oven. No stand mixer needed.
Why This Recipe Works (The Baking Science)
Lemon bars are essentially a custard baked over shortbread. Understanding the science makes all the difference.
- Eggs provide structure. As they heat, proteins coagulate and thicken the filling. Undercook them, and you get a loose center. Overcook, and the top cracks.
- Acid balance matters. Lemon juice lowers pH, which slightly weakens egg proteins. That’s why a small amount of cornstarch (10g) helps stabilize the custard and prevents curdling.
- Pre-baking the crust prevents sogginess. Moist filling poured over an underbaked crust leads to absorption. A golden, fully set crust creates a moisture barrier.
- Raspberry purée adds water. Cooking it briefly reduces excess moisture so it swirls beautifully without thinning the custard.
Did you know? Sugar not only sweetens but also delays egg coagulation, giving you a smoother texture instead of scrambled-egg curd.
Ingredients

Shortbread Crust
- All-purpose flour — 150g (1¼ cups) — Structure
- Unsalted butter, cold & cubed — 113g (½ cup) — Richness & binding
- Powdered sugar — 40g (⅓ cup) — Tender texture
- Salt — 2g (¼ tsp) — Balances sweetness
Raspberry Swirl
- Fresh or frozen raspberries — 100g (¾ cup) — Flavor
- Sugar — 15g (1 tbsp) — Sweetens
- Lemon juice — 5g (1 tsp) — Brightness
Lemon Filling
- Eggs, room temp — 3 large (150g without shells) — Structure
- Granulated sugar — 200g (1 cup) — Sweetness & texture
- Fresh lemon juice — 120g (½ cup) — Flavor
- Lemon zest — 1 tbsp (from 2 lemons) — Aroma
- All-purpose flour — 15g (2 tbsp) — Thickening
- Cornstarch — 10g (1 tbsp) — Stabilizer
- Salt — 1g (pinch) — Flavor balance
Equipment
Required
- 8×8 inch (20×20 cm) square metal pan
- Parchment paper sling
- Mixing bowls
- Whisk
- Digital scale (recommended)
- OTG or oven
- Thermometer (optional but helpful)
Nice-to-have
- Fine sieve (for smooth purée)
- Offset spatula
- Microplane for zest
Step-by-Step Instructions
(Insert 6–10 process photos at texture change stages)
Step 1: Prep
Preheat oven to 175°C (350°F) for 15 minutes.
Place rack in center position.
Line pan with parchment sling.
Step 2: Make the Crust (10 minutes prep)
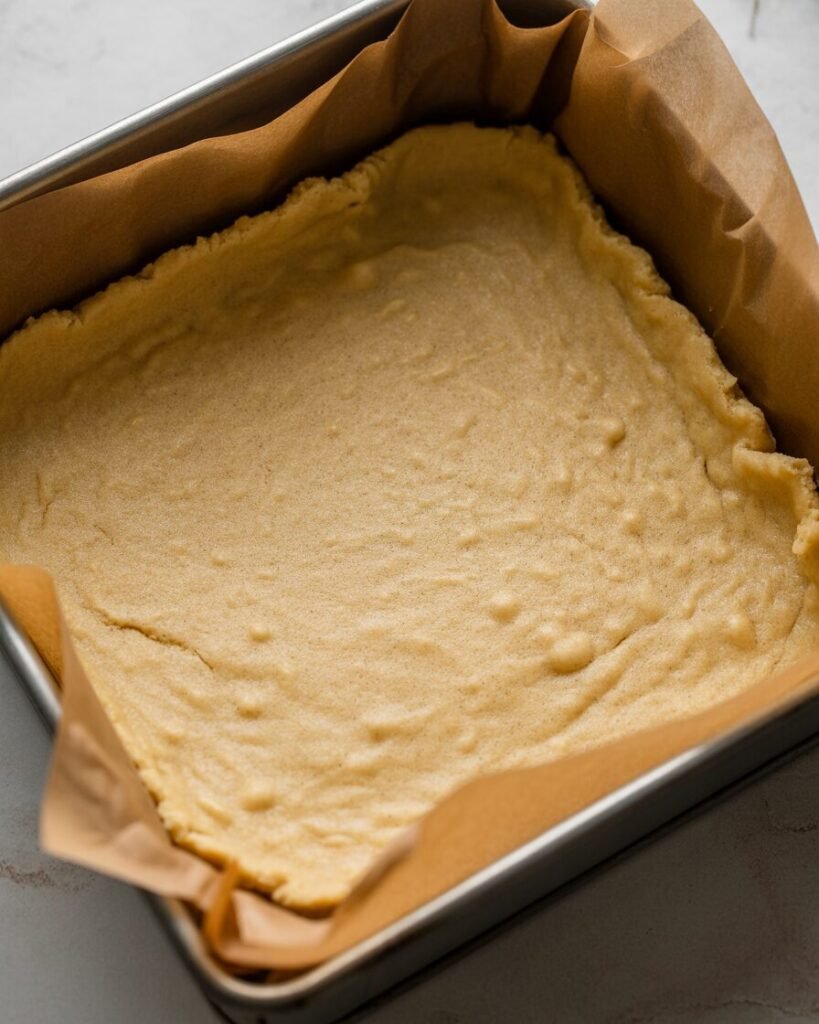
Mix flour, powdered sugar, and salt.
Rub in cold butter with fingertips until mixture resembles damp sand.
Press firmly into pan.
Bake 18–22 minutes until lightly golden.
Visual cue: Edges golden, center matte (not shiny).
Avoid this: Pale crust = soggy bottom later.
Cool 10 minutes.
Step 3: Raspberry Swirl (5 minutes)
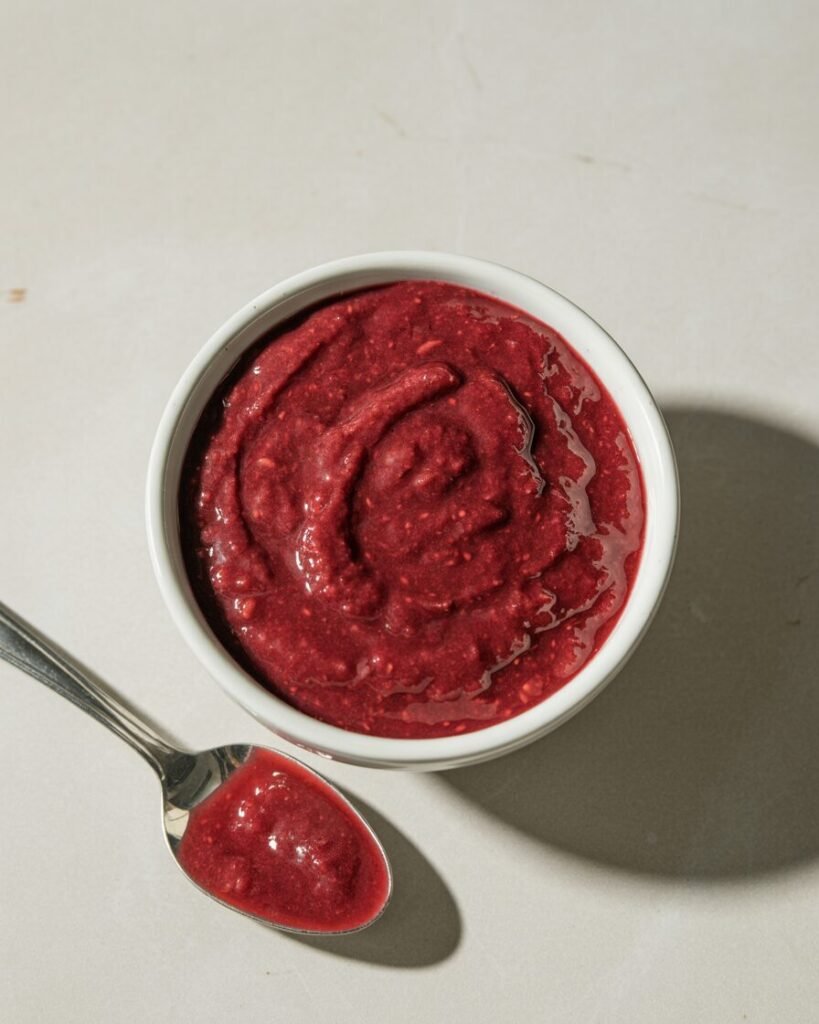
Simmer raspberries, sugar, and lemon juice for 3–4 minutes.
Mash gently.
Strain for smooth purée (optional but recommended).
Cool slightly.
Correct texture: Thick like jam, not watery.
Step 4: Lemon Filling (5–7 minutes)
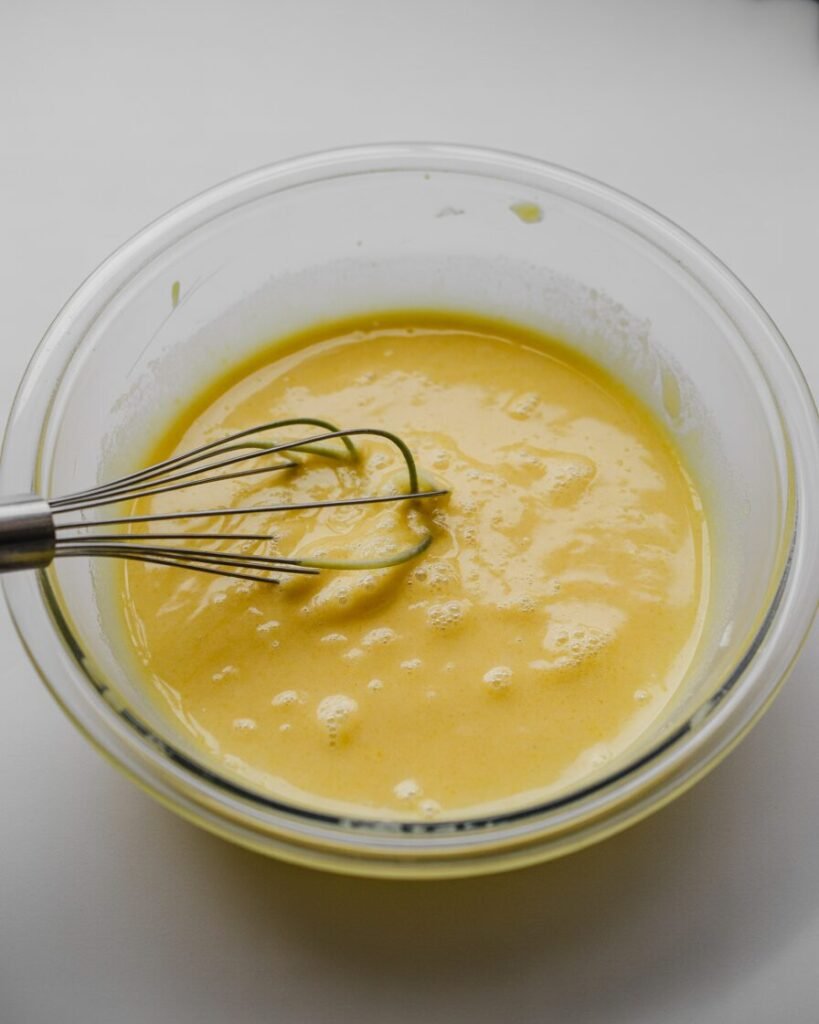
Whisk eggs and sugar until smooth (no foam needed).
Add lemon juice, zest, flour, cornstarch, and salt.
Whisk until fully smooth.
Checkpoint: Mixture should be thin but slightly opaque, no lumps.
Step 5: Assemble
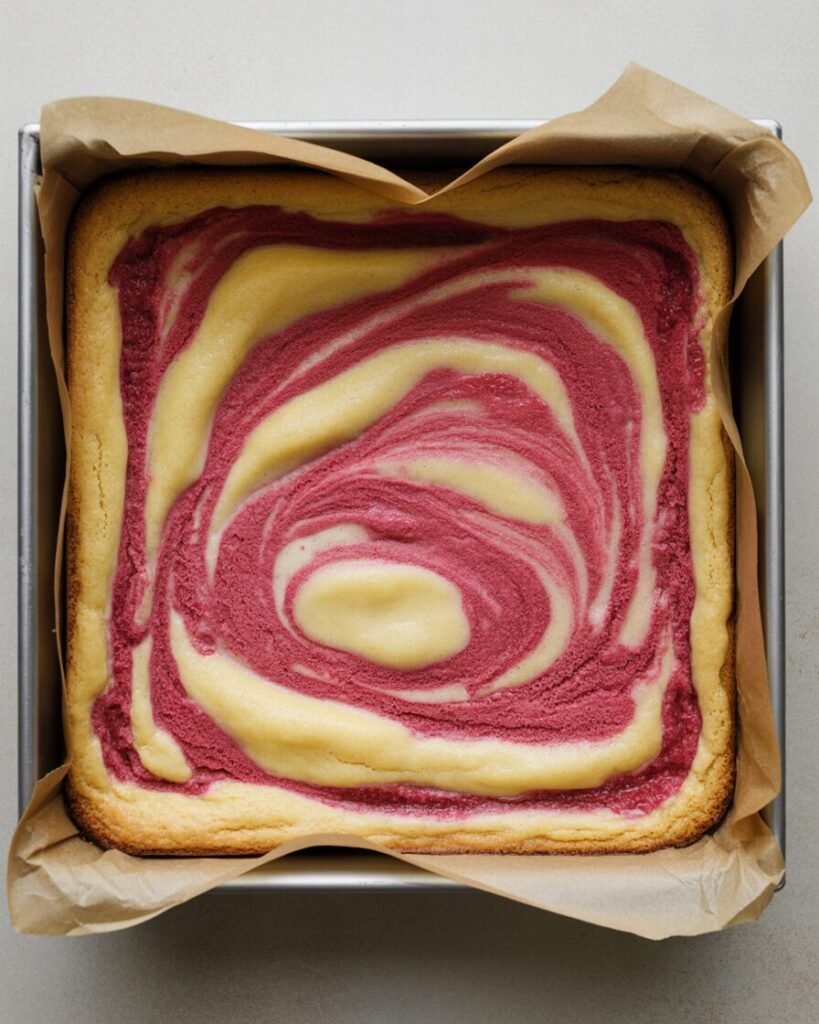
Pour filling over warm crust.
Drop spoonfuls of raspberry purée.
Use toothpick to swirl gently.
Avoid over-swirling or colors will blend.
Step 6: Bake
Bake at 170°C (338°F) for 22–28 minutes.
Visual cue:
Edges set; center jiggles slightly like gelatin.
Internal temp: 93–95°C (200–203°F).
Avoid opening oven before 20 minutes.
Step 7: Cool & Chill

Cool at room temp 1 hour.
Refrigerate 2–3 hours minimum.
Chilling completes custard setting.
Lift using parchment. Slice with warm knife.
Troubleshooting Common Problems
Problem: Soggy crust
Likely cause: Underbaked base.
Fix: Bake crust until visibly golden.
Problem: Filling cracks
Cause: Overbaked (above 96°C).
Fix: Reduce bake time by 3–5 minutes.
Problem: Runny center
Cause: Underbaked.
Fix: Bake until center jiggles slightly but edges firm.
Problem: Bitter taste
Cause: Too much zest (white pith).
Fix: Zest lightly; avoid white layer.
Problem: Pink filling instead of swirl
Cause: Overmixing purée.
Fix: Swirl only 3–4 strokes.
Problem: Gummy layer between crust and filling
Cause: Filling poured on raw crust.
Fix: Always pre-bake crust.
Substitutions & Variations
Egg-Free Version (Tested)
Replace eggs with:
- 180g sweetened condensed milk
- Reduce sugar to 120g
Texture will be softer and slightly fudgier.
Dairy-Free
Use vegan block butter (not spread).
Results nearly identical.
Gluten-Free
Replace flour with 1:1 GF blend (150g crust, 15g filling).
Crust slightly more delicate.
Flavor Swaps
- Blueberry instead of raspberry (reduce to thick purée first).
- Add ¼ tsp cardamom for warmth.
- Use Meyer lemons for milder acidity.
Scaling Guide
| Pan Size | Multiply Recipe | Bake Time |
|---|---|---|
| 6-inch round | 0.75x | 20–24 min |
| 8×8 inch | 1x | 22–28 min |
| 9×13 inch | 2x | 30–35 min |
Storage, Make-Ahead & Freezing
Counter: 1 day (cool climate, airtight).
Fridge: 4–5 days, airtight container.
Bring to room temp 20 minutes before serving.
Freezer: Up to 2 months.
Freeze slices individually wrapped.
Thaw overnight in fridge.
Do not freeze dusted with sugar — it melts.
To refresh crust: 5 minutes in 160°C oven (uncovered).
Serving Suggestions
Serve with:
- Lightly sweetened whipped cream
- Vanilla ice cream
- Fresh berries
- Mint leaves
The sweet-tart balance pairs beautifully with tea or black coffee.
FAQs
Can I use bottled lemon juice?
Fresh is best. Bottled lacks brightness and can taste dull.
How do I know it’s done without thermometer?
Edges firm; center jiggles slightly like set jelly.
Can I halve the recipe?
Yes, bake in 6×6 pan; reduce bake time by 5 minutes.
Why did my bars sink?
Likely underbaked center. Always chill fully before slicing.
Can I bake this in an OTG?
Yes. Use middle rack, no top heating rod during bake.
Notes From My Kitchen (Testing Log)
Batch 1: No cornstarch. Result: Slight weeping after chilling.
Batch 2: Added 10g cornstarch. Texture improved significantly.
Batch 3: Reduced crust bake time — base turned soft.
Batch 4: Cooked raspberry purée longer — swirl held better shape.
Batch 5: Tested vegan butter — slightly softer crust but acceptable.
Final version: Pre-baked crust 20 minutes + stabilized filling = cleanest slices.
After testing 5 variations, this version gave the best balance of tartness, firmness, and sliceability.
Nutrition & Disclaimer
Approximate per serving (1 of 16 bars):
Calories: 210
Fat: 9g
Carbs: 30g
Protein: 3g
Values are estimates and vary by brand and portion size.
Store properly and refrigerate within 2 hours. Always follow food-safety best practices.
Conclusion
These Raspberry Lemon Bars are bright, balanced, and structured enough to slice cleanly every single time. The shortbread stays crisp, the lemon layer sets beautifully, and the raspberry swirl adds just enough fruity contrast without overpowering the citrus.
If you’ve struggled with soggy crusts or runny centers before, this method fixes those problems with simple adjustments — nothing fancy, just thoughtful baking science.
Bake once, and you’ll understand why this is now my go-to lemon bar formula at Bake My Sweet.