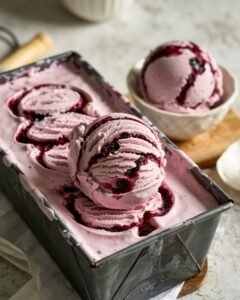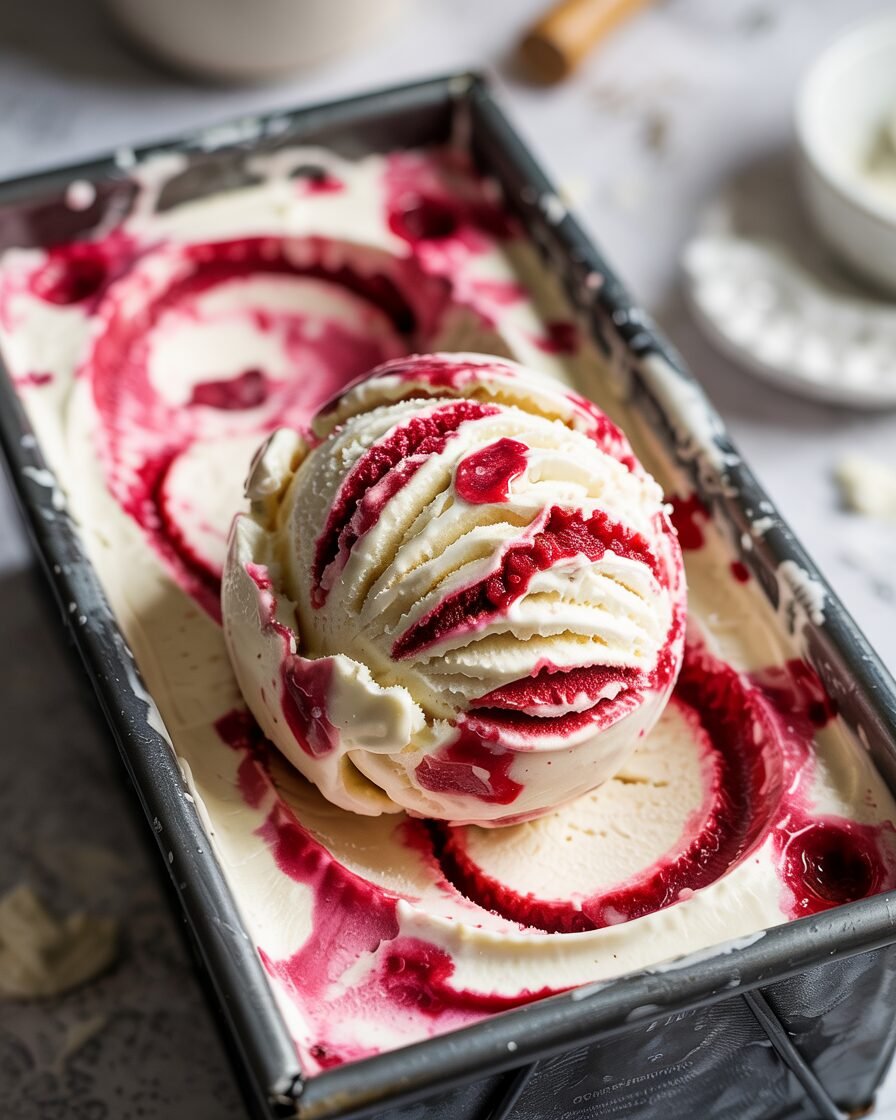
There’s something nostalgic about raspberry ripple ice cream — creamy vanilla base streaked with vibrant ribbons of tart raspberry. This version is designed for home bakers who may not own an ice cream maker. You can make it with a whisk and freezer-safe loaf pan, and I’ll show you exactly how to avoid icy texture and muddy swirls.
What makes this recipe special? We cook down fresh raspberries into a thick, jammy ripple that stays bright and bold — not diluted or frozen solid. The result: ultra-creamy vanilla ice cream with distinct, glossy raspberry ribbons in every scoop.
Pro tip: Chill the base fully (at least 4 hours) before freezing — cold base = smaller ice crystals and smoother texture.
Why This Recipe Works
Ice cream is simple science. Here’s what’s happening behind the scenes:
- Fat prevents iciness. We use full-fat cream (35%+) because fat coats water molecules, slowing ice crystal formation. That’s why low-fat versions taste icy.
- Sugar lowers freezing point. The right sugar balance keeps the ice cream scoopable straight from the freezer. Too little sugar = rock solid.
- Reduced raspberry sauce prevents bleeding. By cooking raspberries until thick and jammy (104–105°C / 219–221°F), excess water evaporates. This keeps your ripple defined instead of blending pink throughout.
I tested this with both churned and no-churn methods. The no-churn version relies on whipped cream to introduce air — that’s your structure.
Ingredients (with purpose)
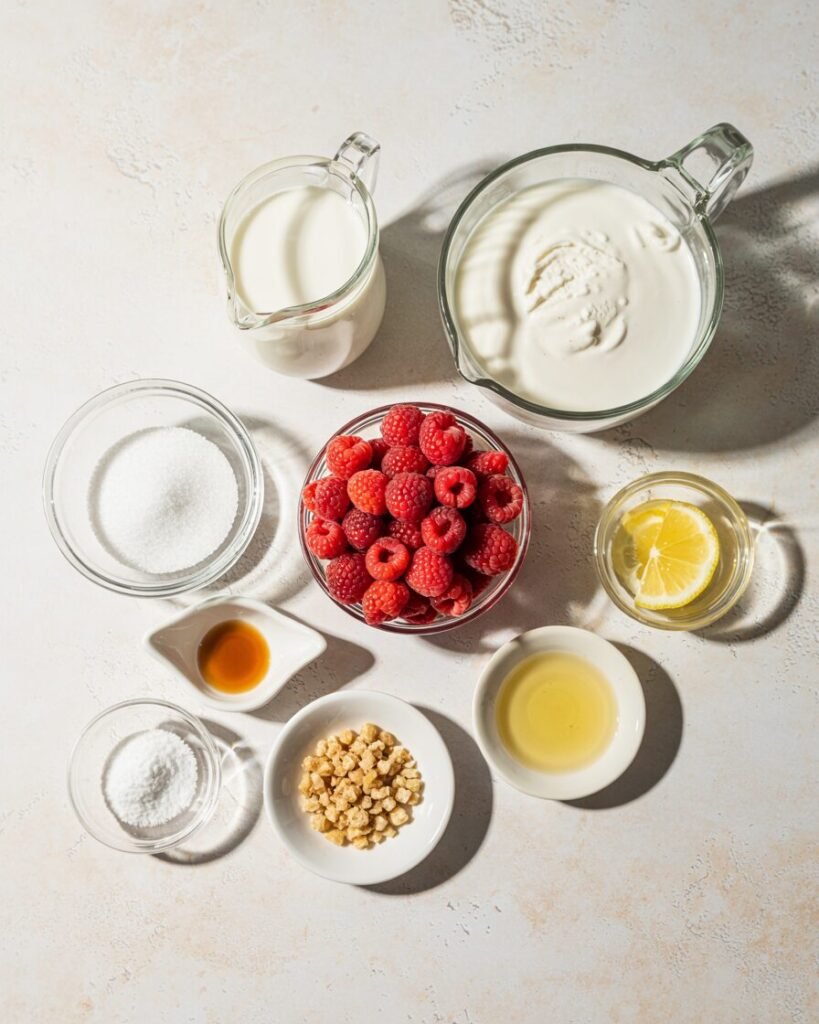
Vanilla Ice Cream Base
- 500 g heavy cream (2 cups) — provides fat and structure
- 200 g sweetened condensed milk (½ cup + 2 tbsp) — sweetness + prevents iciness
- 5 g pure vanilla extract (1 tsp) — flavor depth
- 1 g fine salt (¼ tsp) — enhances sweetness
Raspberry Ripple
- 250 g fresh or frozen raspberries (2 cups) — fruit base
- 60 g granulated sugar (¼ cup) — sweetness + thickening
- 10 g lemon juice (2 tsp) — brightens flavor
- 5 g cornstarch (1 tsp, optional) — stabilizes sauce if berries are watery
Ingredient note: Frozen raspberries work well; thaw and include juices.
Equipment
Required
- Digital kitchen scale
- Medium saucepan
- Whisk or hand mixer (no stand mixer required)
- 20 x 10 cm (8 x 4 inch) loaf pan
- Freezer-safe container with lid
- Thermometer (helpful but optional)
Nice to have
- Silicone spatula
- Fine sieve (if you prefer seedless ripple)
- Offset spatula
Step-by-Step Instructions
(Process image placeholder: cooking raspberries in saucepan)
Step 1: Make the Raspberry Ripple (10–12 minutes)
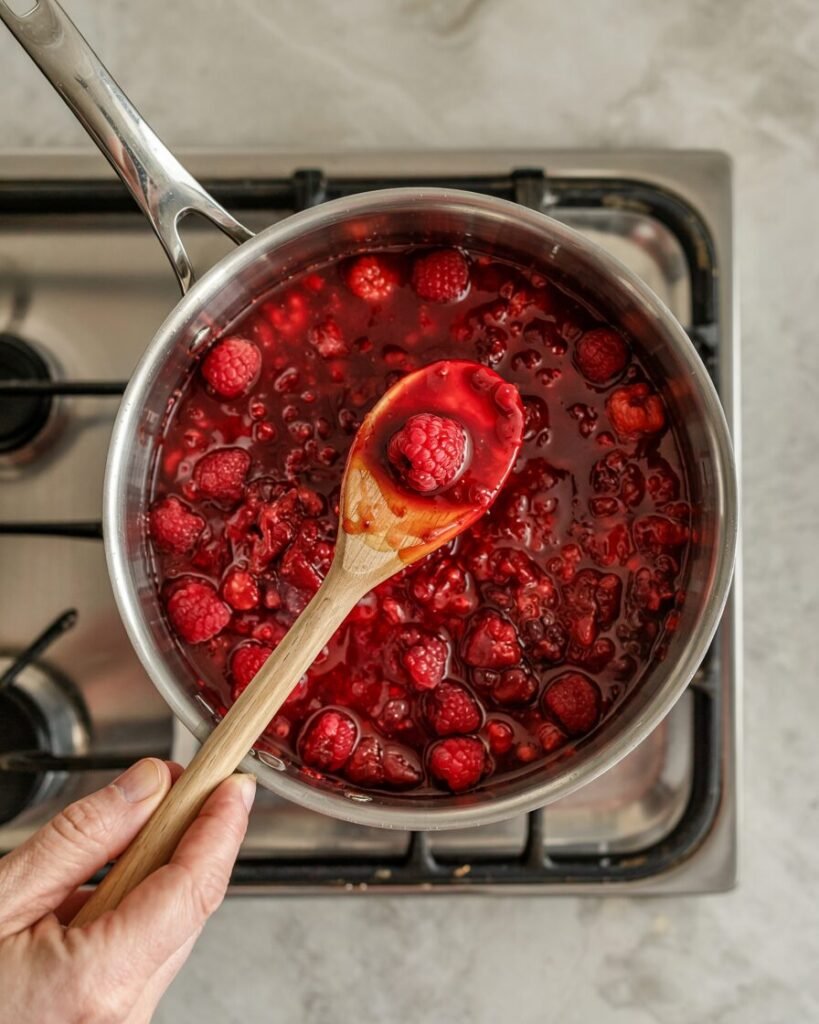
Combine raspberries, sugar, and lemon juice in a saucepan over medium heat. Stir and cook 6–8 minutes until berries break down.
If using cornstarch, mix it with 1 tbsp water and stir in now.
Cook until thick and glossy.
Visual cue: When you drag a spoon across the pan, the line should stay visible for 2 seconds. Temperature should reach 104–105°C (219–221°F).
Cool completely. Chill 30–45 minutes.
Avoid this: Swirling warm sauce into ice cream — it melts the base and ruins texture.
Step 2: Whip the Cream (3–4 minutes)
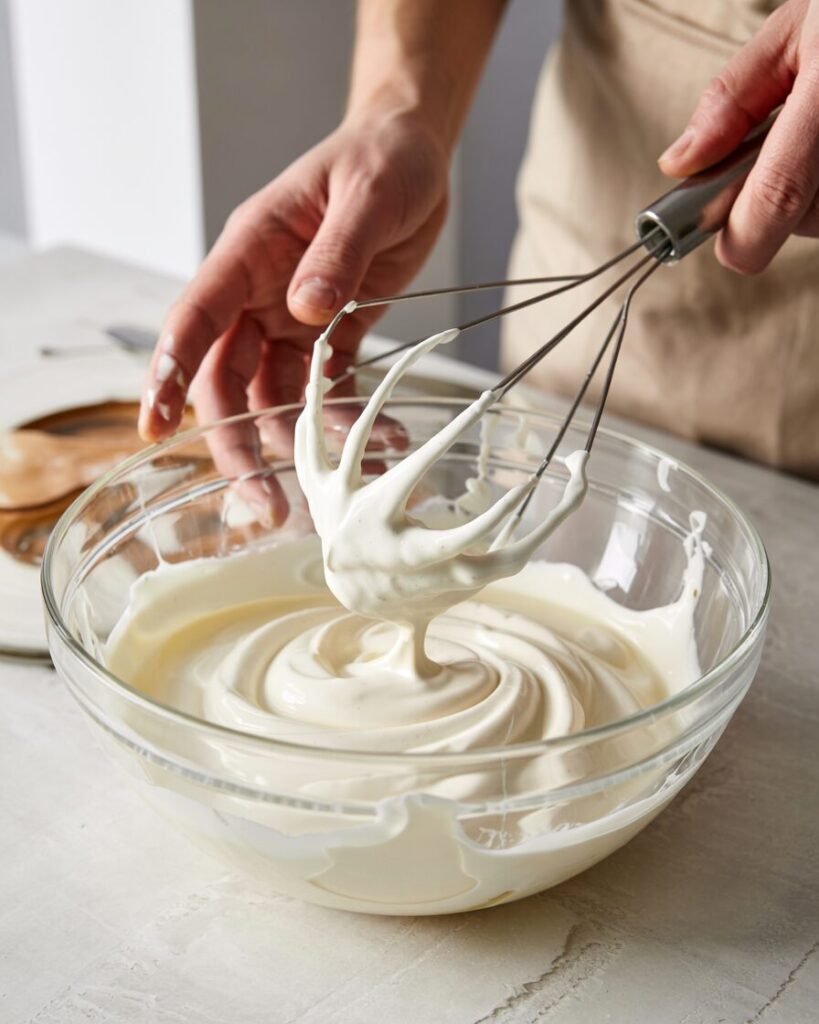
In a cold bowl, whip 500 g cream to soft peaks.
Visual cue: Lift whisk — peak bends like a hook. It should look fluffy, not grainy.
Do not whip to stiff peaks; overwhipping leads to buttery texture.
Step 3: Fold Base Together (2–3 minutes)
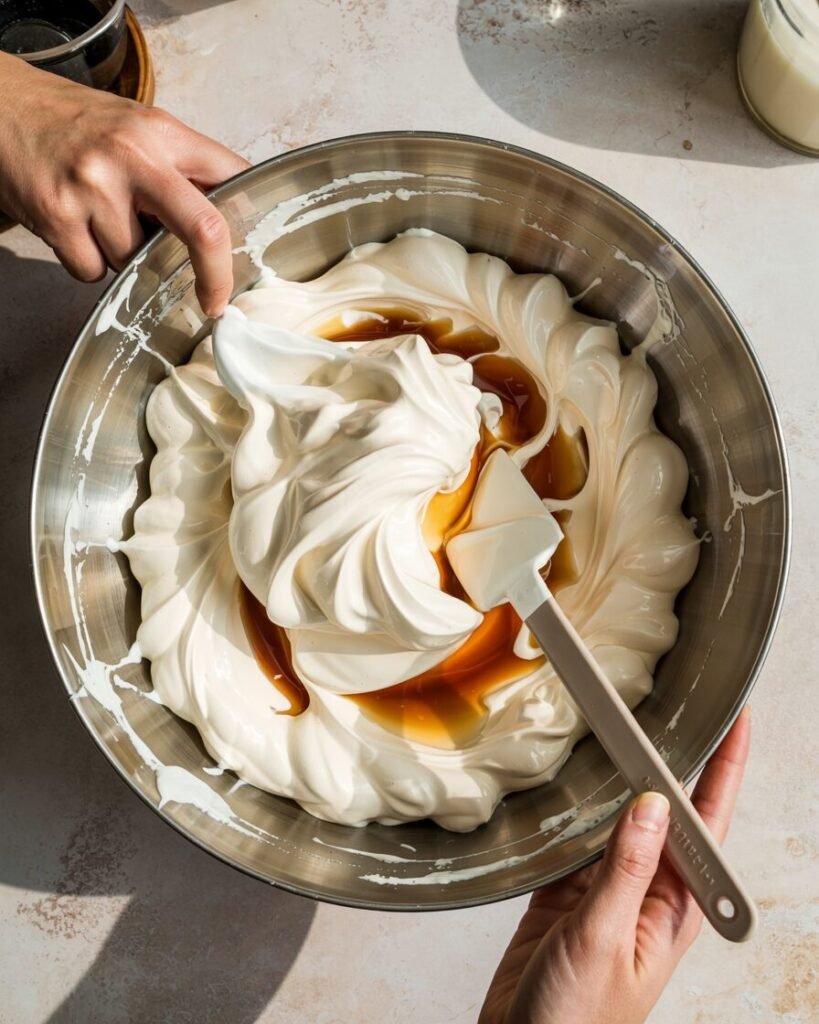
Stir condensed milk, vanilla, and salt together.
Gently fold into whipped cream in 2 additions.
Checkpoint: Mixture should look smooth and airy. If streaky, fold 3–4 more times — don’t deflate.
Step 4: Layer and Swirl (5 minutes)

Spread one-third ice cream base into loaf pan. Add spoonfuls of raspberry sauce. Repeat layers.
Use a knife to gently swirl in figure-eight motions.
Visual cue: Swirls should stay distinct — avoid overmixing or you’ll get pink ice cream instead of ripples.
Step 5: Freeze (6–8 hours)

Cover tightly with cling wrap touching surface.
Freeze on middle shelf (not freezer door).
Minimum 6 hours; best overnight.
Doneness: Firm but scoopable with slight pressure.
Troubleshooting Guide
Problem: Ice cream is icy
Likely causes: Under-whipped cream, too much fruit water, insufficient fat.
Fix next time: Cook ripple thicker; whip cream to soft peaks; use 35%+ cream.
Problem: Ripple bleeds into base
Cause: Sauce too thin or too warm.
Fix: Reduce longer; cool fully before swirling.
Problem: Too sweet
Cause: Very sweet berries + condensed milk.
Fix: Reduce sugar in ripple to 40 g next time.
Problem: Rock hard texture
Cause: Freezer too cold or too little sugar.
Fix: Let sit 5–7 minutes before scooping.
Problem: Grainy texture
Cause: Overwhipped cream.
Fix: Stop at soft peaks.
Problem: Ice cream collapses when scooping
Cause: Under-frozen.
Fix: Freeze minimum 6 hours.
Substitutions and Variations
Egg-Free
This recipe is naturally egg-free.
Dairy-Free
- Replace heavy cream with 500 g cold coconut cream (full fat only).
- Use 200 g sweetened condensed coconut milk.
Texture will be slightly firmer and coconut-flavored.
Refined Sugar-Free
Use 50 g honey in raspberry sauce (reduce slightly longer).
Flavor Variations
- Add ½ tsp almond extract for bakery-style flavor.
- Replace raspberries with strawberries (reduce longer; they contain more water).
Scaling Guide
| Pan Size | Cream | Condensed Milk | Raspberries |
|---|---|---|---|
| 6-inch round | 350 g | 140 g | 180 g |
| 8×4 loaf (standard) | 500 g | 200 g | 250 g |
| Double batch (9×5 loaf) | 1 kg | 400 g | 500 g |
Storage, Make-Ahead & Freezing
Freezer: Up to 2 months in airtight container.
Press parchment against surface to prevent ice crystals.
Do not store in freezer door — temperature fluctuates.
To serve: Let sit at room temp 5 minutes.
Do not microwave — it melts unevenly.
Make-ahead tip: Raspberry ripple can be made 3 days in advance and refrigerated.
Serving Suggestions
- Pair with warm brownies (contrast hot and cold).
- Serve with lemon shortbread for acid balance.
- Spoon over waffles for brunch dessert.
This ice cream balances sweet vanilla with tart raspberry — so it works best with slightly sweet desserts.
FAQs
Can I use store-bought raspberry jam?
Yes, but reduce it in a saucepan for 2–3 minutes to thicken before swirling.
Can I halve the recipe?
Yes — use a 6-inch pan and freeze 5–6 hours.
Why is my ripple icy?
It likely wasn’t reduced enough. It should coat the back of a spoon thickly.
Can I churn this in an ice cream maker?
Yes. Churn base 20–25 minutes, then layer with ripple.
Can I use an OTG?
No baking needed — freezer only!
Notes From My Kitchen (Testing Log)
Batch 1: Used raw raspberry purée. Result: icy ripple and pink ice cream.
Lesson: Must reduce sauce.
Batch 2: Reduced too thick (like candy). Swirl became chewy.
Fix: Stop at 104–105°C.
Batch 3: Overwhipped cream to stiff peaks. Slight buttery mouthfeel.
Fix: Stop at soft peaks.
Batch 4: Tried low-fat cream (25%). Texture icy.
Conclusion: Full-fat only.
Final version: Soft peaks, thick ripple, overnight freeze. Perfect scoopable texture with defined swirls.
I also tested with frozen berries — no noticeable difference after reduction.
Nutrition (Approximate)
Per serving (1/8 loaf):
~280–320 kcal
Fat: 20 g
Carbs: 25 g
Protein: 4 g
Values are estimates; adjust for brands and portion size. Store safely below −18°C (0°F).
Conclusion
Raspberry ripple ice cream looks fancy but is wonderfully simple. When you understand why we reduce the fruit and whip to soft peaks, success becomes predictable. Follow the texture cues, trust your thermometer, and don’t rush the chilling time.
If you try this recipe, I’d love to hear how your swirls turned out. Did you keep them bold and dramatic? That’s the goal.