![You are currently viewing Red White and Blue Ice Cream Recipe [4th July Special]](https://bakemysweet.com/wp-content/uploads/2026/03/0001_1_close-up-angled-shot-of-fully-frozen-red_uciO-e1RQxW29Ufq26s0Hw_97QdGtljQbelxjZiOfrirw_cover.jpg)
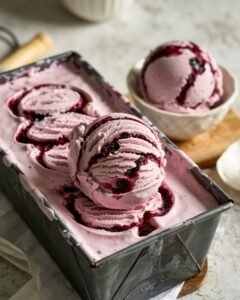
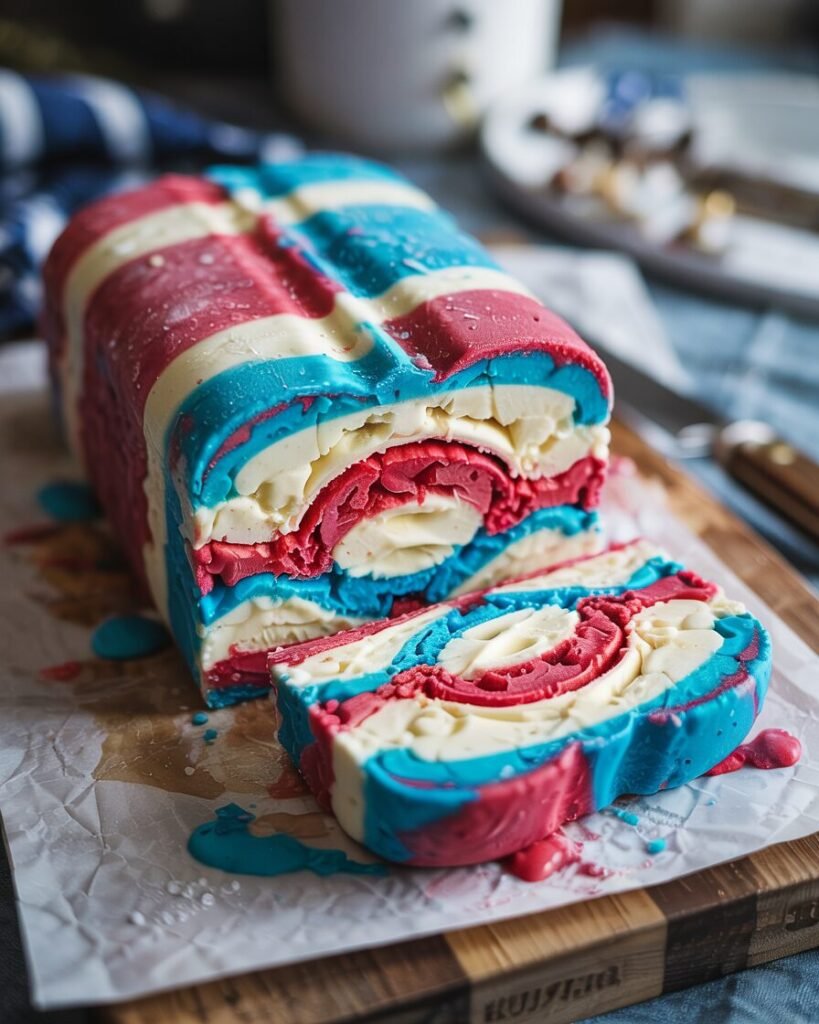
There’s something joyful about slicing into a loaf of homemade Red White and Blue Ice Cream and seeing clean, vibrant stripes. This version is creamy (not icy), sliceable straight from the freezer, and stable enough to hold its layers without bleeding together. It’s beginner-friendly and requires no ice cream machine — just a whisk, a loaf pan, and a freezer.
What makes this recipe unique? I stabilize the whipped cream properly and pre-chill each layer just enough so the colors stay defined. Pro tip: freeze each layer for 20–25 minutes before adding the next — it prevents muddy swirls and keeps those bold stripes crisp.
Perfect for 4th of July parties, summer birthdays, or anytime you want a freezer dessert that looks impressive but is secretly easy.
Why This Recipe Works
This is a no-churn ice cream, meaning we skip the machine and rely on structure from whipped cream and sweetened condensed milk.
- Whipped cream = air + structure. When you whip cold heavy cream (35–40% fat), fat globules partially solidify and trap air. That air gives the ice cream its scoopable texture instead of freezing solid like milk would.
- Sweetened condensed milk lowers the freezing point. The high sugar concentration keeps the mixture soft at freezer temperatures. Less sugar = rock-hard ice cream.
- Layer pre-chilling prevents color bleeding. Semi-frozen layers create a barrier so red and blue stay vibrant instead of turning purple.
Did you know? Ice cream freezes solid around −18°C (0°F). Higher fat and sugar content keep it creamy at that temperature.
Ingredients (with Purpose)
Yield: 8–10 servings
Pan: 20 × 10 cm (8 × 4 inch) loaf pan
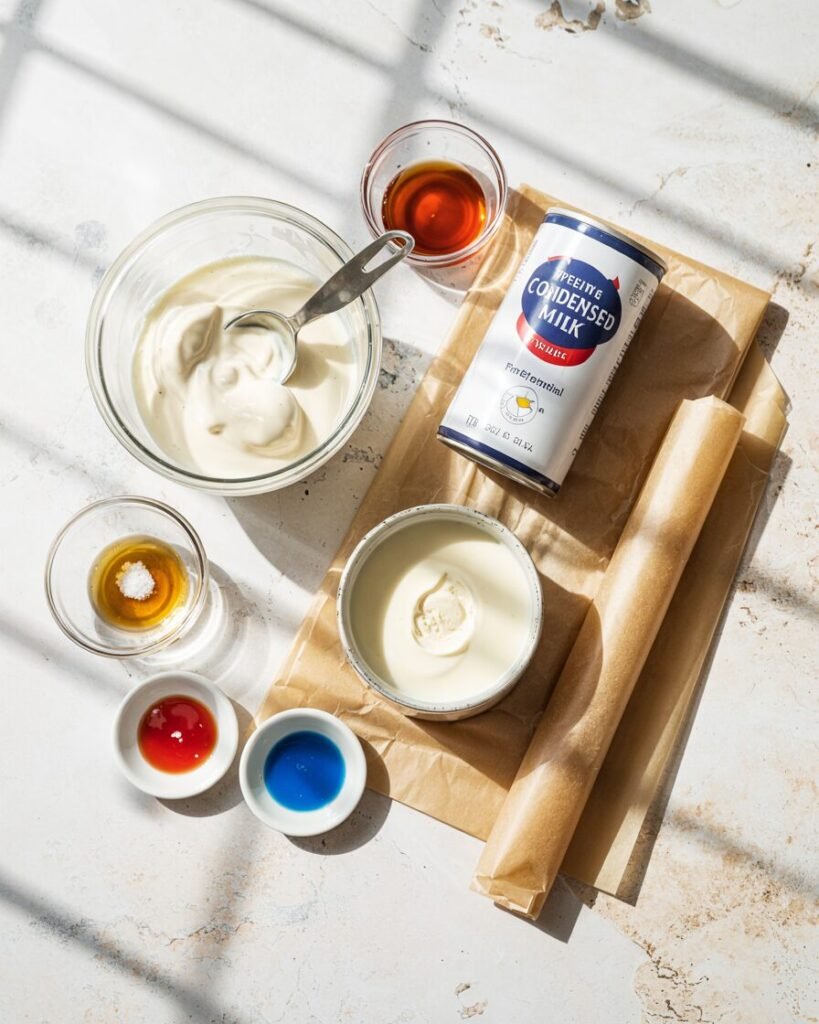
- Heavy cream — 480 g (2 cups) — Whips into stable structure; use 35–40% fat
- Sweetened condensed milk — 395 g (1 standard 14 oz can) — Sweetness + softness
- Pure vanilla extract — 10 g (2 tsp) — Flavor base
- Red gel food coloring — few drops — Strong color without thinning
- Blue gel food coloring — few drops — Same reason as above
- Fine salt — 1 g (¼ tsp) — Enhances sweetness
Optional natural color swaps:
- Freeze-dried strawberry powder (10 g) for red
- Butterfly pea powder (2–3 g) for blue (gives lavender tone)
Equipment
Required
- 8 × 4 inch (20 × 10 cm) loaf pan
- Electric hand mixer or sturdy whisk
- Digital kitchen scale
- Freezer (−18°C / 0°F)
- Spatula
Nice-to-Have
- Offset spatula
- Parchment sling for easy lifting
- Instant-read thermometer
Step-by-Step Instructions (with Visual Cues)
Oven not needed. Freezer dessert!
Step 1: Chill Equipment (10 minutes)
Place your mixing bowl and beaters in the freezer for 10 minutes.
Visual cue: Bowl should feel cold to the touch but not frosty.
Step 2: Whip the Cream (3–5 minutes)
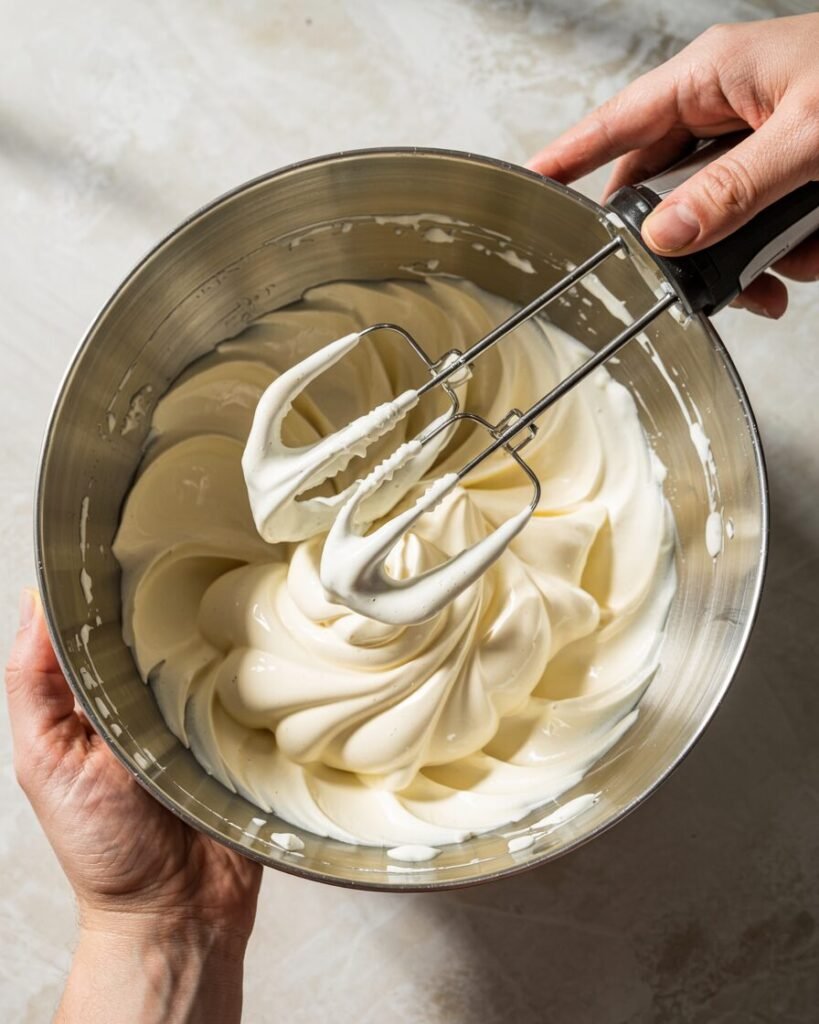
Pour 480 g cold heavy cream into the chilled bowl. Beat on medium speed until medium-stiff peaks form.
Visual cue: Lift the beater — peaks should stand upright but tip slightly like a soft hook.
Avoid this: Over-whipping until grainy — that means you’re close to butter.
Step 3: Add Condensed Milk
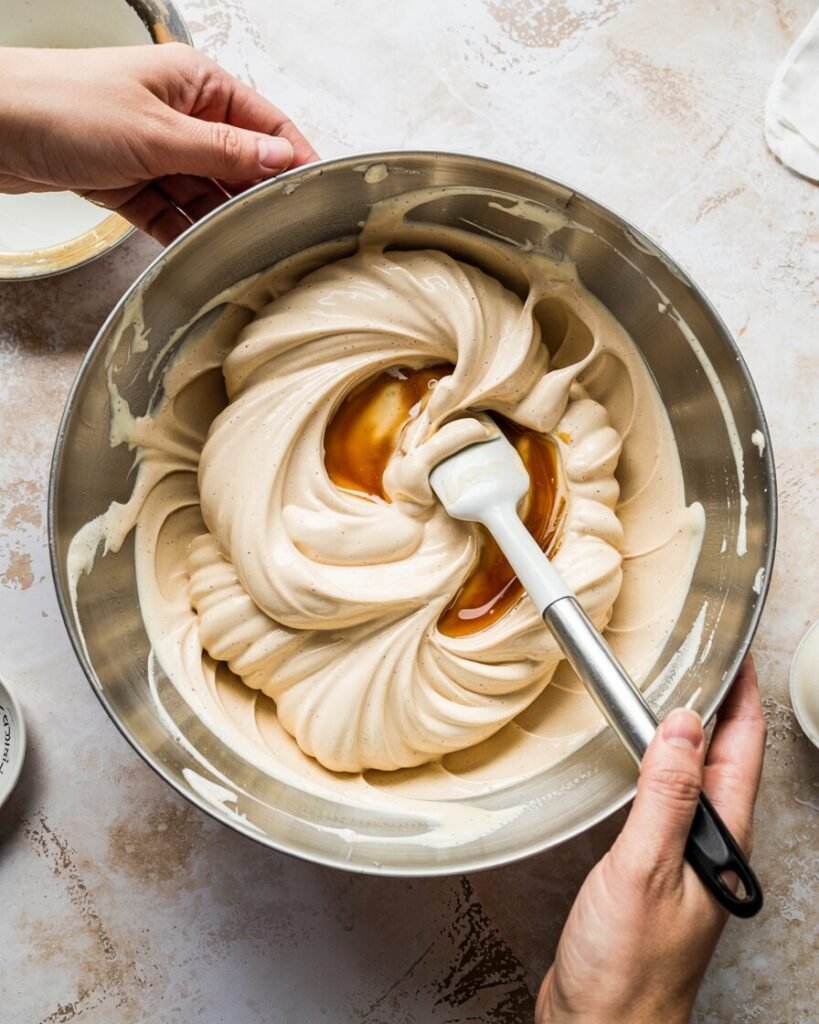
In a separate bowl, mix condensed milk, vanilla, and salt. Gently fold into whipped cream in 2 additions.
Checkpoint: Mixture should be thick and mousse-like.
If it looks runny, your cream wasn’t whipped enough.
Step 4: Divide and Color
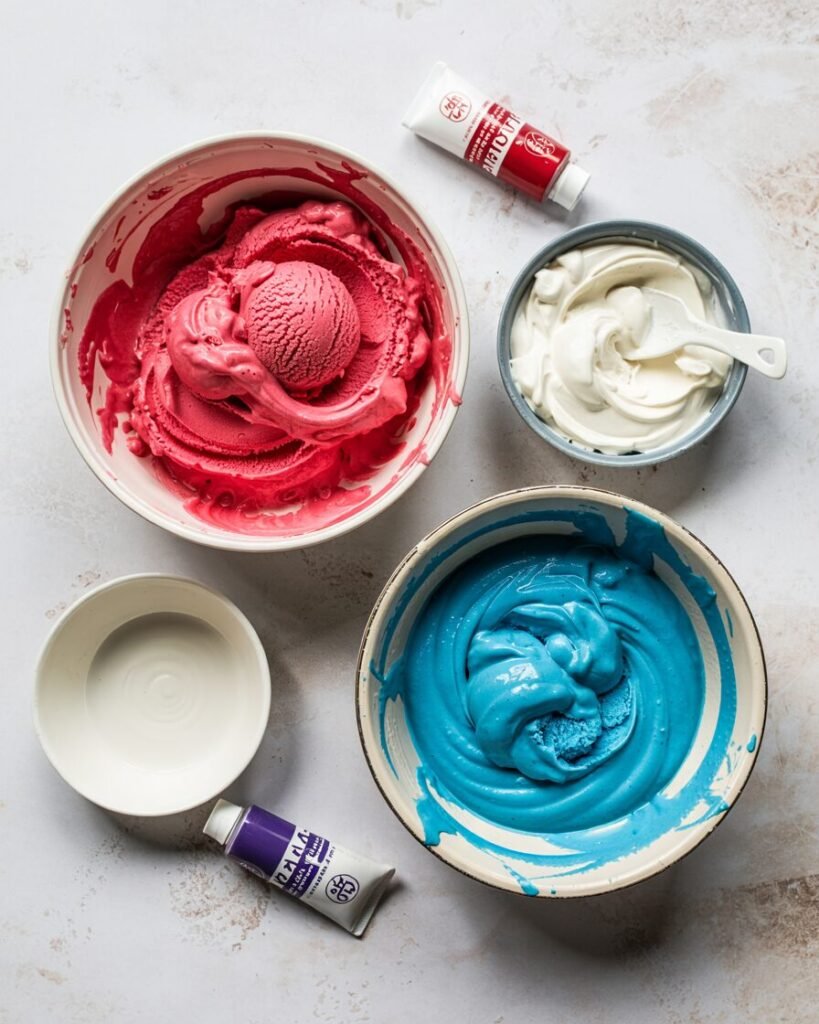
Weigh mixture and divide into 3 equal portions (~290 g each).
- Leave one white.
- Tint one red.
- Tint one blue.
Use gel colors sparingly — start with a toothpick tip.
Visual cue: Colors should be vibrant but not streaky.
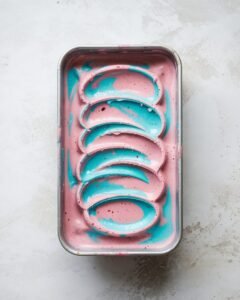
Step 5: Layering (Critical Step)
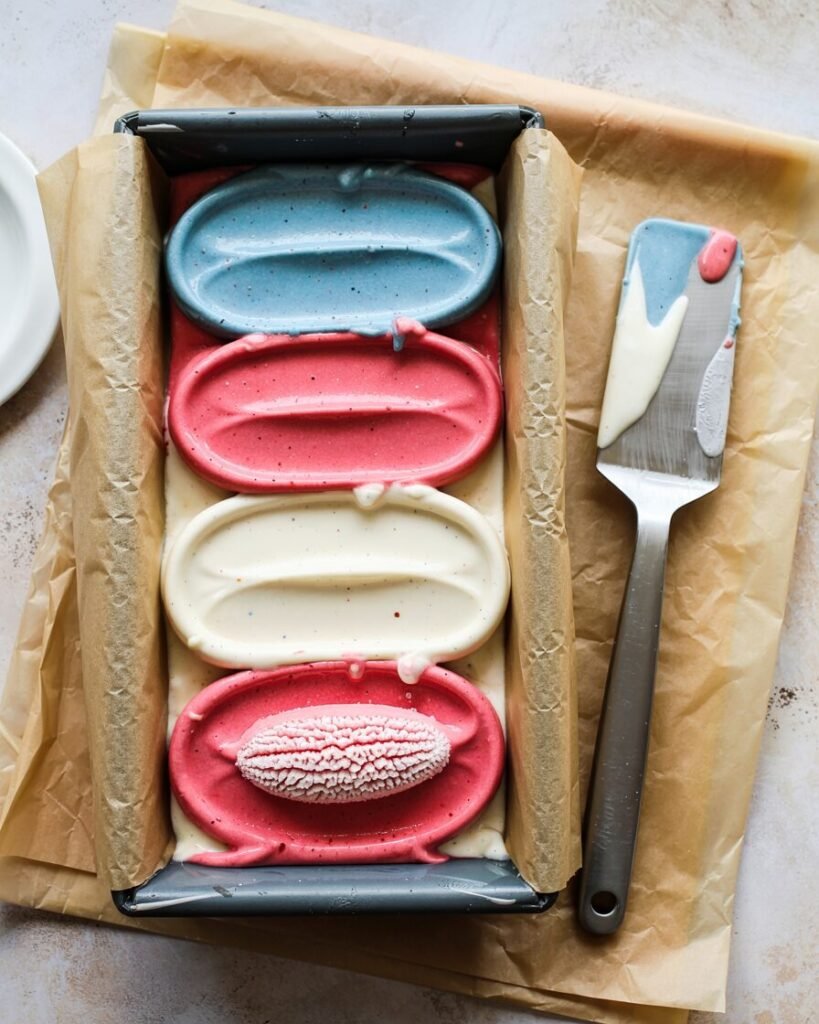
Line loaf pan with parchment.
- Spread red layer evenly. Freeze 20–25 minutes.
- Add white layer gently. Freeze again 20 minutes.
- Add blue layer and smooth top.
Tap pan lightly to remove air pockets.
Visual cue: Layers should look flat and distinct, not swirled.
Step 6: Final Freeze
Cover tightly and freeze at least 6 hours, preferably overnight.
Internal texture cue: Firm but sliceable. If rock-hard, rest at room temp 5–7 minutes before slicing.
Troubleshooting (Real Kitchen Fixes)
Problem: Ice cream freezes too hard
Likely causes: Low sugar, low fat cream.
Fix: Use full-fat cream; do not reduce condensed milk.
Problem: Colors bleed together
Cause: Didn’t pre-freeze layers.
Fix: Freeze each layer 20–25 minutes.
Problem: Texture icy
Cause: Over-mixing or watery colorings.
Fix: Use gel colors; fold gently.
Problem: Grainy texture
Cause: Over-whipped cream.
Fix: Stop at medium-stiff peaks.
Problem: Layers collapse
Cause: Cream under-whipped.
Fix: Whip to stronger peaks.
Problem: Too sweet
Cause: Condensed milk brand variation.
Fix: Add ½ tsp lemon juice next batch to balance.
Substitutions & Variations
Egg-Free
Already egg-free.
Dairy-Free (Tested Version)
- Coconut cream (chilled, solids only) — 480 g
- Sweetened condensed coconut milk — 395 g
Texture slightly softer; freeze 8 hours.
Lower-Sugar Option
Replace 50 g condensed milk with 50 g mascarpone. Slightly firmer texture.
Flavor Variations
- Lemon zest in white layer
- Almond extract in red
- Blueberry swirl in blue (reduce purée to thick jam first)
Scaling Guide
| Pan Size | Cream | Condensed Milk |
|---|---|---|
| 6-inch round | 360 g | 300 g |
| 8 × 8 inch pan | 720 g | 600 g |
Freeze times remain similar but depth affects firmness.
Storage, Make-Ahead & Freezing
Freezer:
Store tightly wrapped up to 1 month for best texture.
After 1 month: Ice crystals increase.
To serve:
Rest 5–7 minutes at room temperature before slicing.
Do not refreeze once fully melted — texture becomes icy.
Serving Suggestions
- Serve with fresh strawberries and blueberries.
- Add white chocolate drizzle.
- Sandwich between sugar cookies.
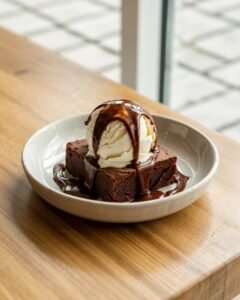
- Pair with warm brownies for contrast.
Balance note: The sweetness pairs well with tart berries or a squeeze of lemon juice.
FAQs
Can I use liquid food coloring?
Not recommended. It thins the mixture and causes bleeding.
Can I halve the recipe?
Yes. Use a 6-inch loaf tin and reduce freeze time slightly.
Best cream brand?
Use cream labeled 35–40% fat. Lower fat won’t whip properly.
Can I use an OTG?
No baking required — freezer only.
How do I get sharper layers?
Freeze each layer until slightly firm to touch before adding next.
Notes From My Kitchen (Testing Log)
Batch 1: Skipped layer freezing. Result: Purple streaks. Lesson — patience matters.
Batch 2: Used liquid color. Result: Slight iciness. Gel is better.
Batch 3: Over-whipped cream. Texture slightly buttery. Stop earlier.
Batch 4: Tried strawberry purée without reducing. Too icy. Must cook purée down first.
Batch 5 (Final): Medium-stiff peaks + 20-minute layer freeze produced clean stripes and creamy slice.
I also tested 3 cream brands — 40% fat gave the richest texture and cleanest cuts.
Nutrition (Approximate Per Serving)
- Calories: ~320
- Fat: 24 g
- Carbohydrates: 26 g
- Sugar: 24 g
- Protein: 4 g
Values are estimates and vary by brand and portion size.
Food safety note: Keep frozen at −18°C (0°F). Do not leave at room temperature longer than 20 minutes.
Conclusion
This Red White and Blue Ice Cream is proof that you don’t need an ice cream machine to make something festive, creamy, and slice-worthy. With proper whipping and layer chilling, you’ll get bold stripes and smooth texture every time.