If you’re craving a dessert that looks like it came straight out of a boutique chocolatier but takes less than 20 minutes to make, this Silver Sprinkle White Chocolate Bark is your new go-to. Think smooth, creamy white chocolate topped with shimmery silver sprinkles — elegant enough for gifting, easy enough for beginners. This bark breaks cleanly, melts beautifully on the tongue, and stays glossy thanks to one tiny trick: gentle heat control. Whether you’re prepping treats for birthdays, holidays, bridal showers, or last-minute cravings, this recipe guarantees perfectly crisp, snappable bark every single time.
Why This Recipe Works
White chocolate is more temperamental than dark or milk chocolate because its only structure-forming fat is cocoa butter, which melts quickly and seizes easily. That’s why two techniques matter most here:
1. Low-and-slow melting protects cocoa butter crystals.
Heating your chocolate too fast destroys the stable crystals that give bark its signature snap. By keeping the heat gentle (microwave in short bursts or use a double boiler), you preserve those structures and maintain gloss.
2. A little oil prevents chalkiness.
Because white chocolate contains milk solids, it can thicken unpredictably. A teaspoon of neutral oil helps keep the mixture fluid without affecting setting.
3. Cooling at the right speed keeps the bark from becoming streaky.
Letting the tray rest at room temperature (not the fridge) ensures even crystallization so the bark doesn’t develop gray streaks.
These principles make this recipe beginner-friendly — no complicated tempering charts required.
Ingredients (with weights & purpose)
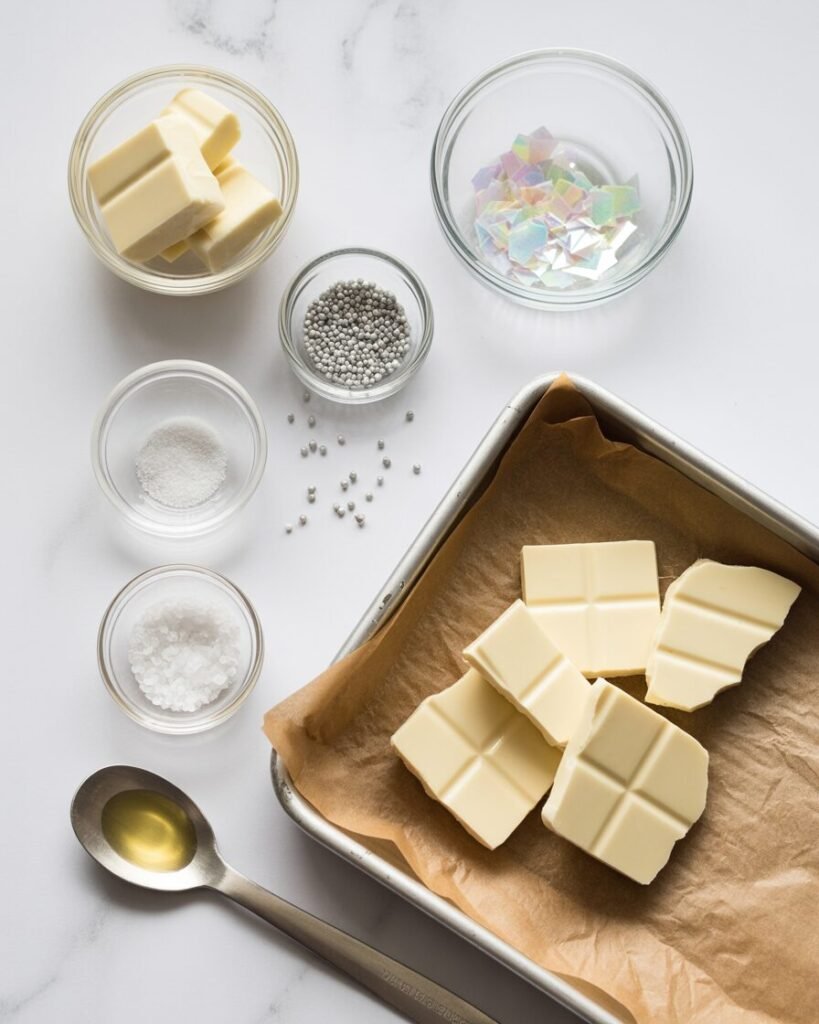
- White chocolate (high-quality) — 300 g (10.5 oz) — base — smoother melting than compound; choose 30%+ cocoa butter.
- Neutral oil (optional) — 5 g (1 tsp) — keeps melted chocolate fluid and prevents chalkiness.
- Fine sea salt — 0.5 g (a pinch) — balances sweetness and enhances flavor.
- Silver sprinkles / silver sugar pearls — 25–40 g — decoration — add crunch and sparkle.
- Silver edible glitter (optional) — 1–2 pinches — extra shine.
Equipment
Required:
- Baking sheet (approx. 9×13 in / 23×33 cm)
- Parchment paper
- Microwave-safe bowl or double-boiler setup
- Rubber spatula
- Kitchen scale
Nice-to-have:
- Offset spatula for spreading
- Instant-read thermometer for temperature accuracy
- Silicone baking mat (reusable alternative to parchment)
Step-by-Step Instructions with Visual Cues
Step 1 — Prep the tray
Line a baking sheet with parchment.
Visual cue: Paper should lie flat without folds — this prevents uneven edges.
Step 2 — Melt the chocolate (5–7 minutes)
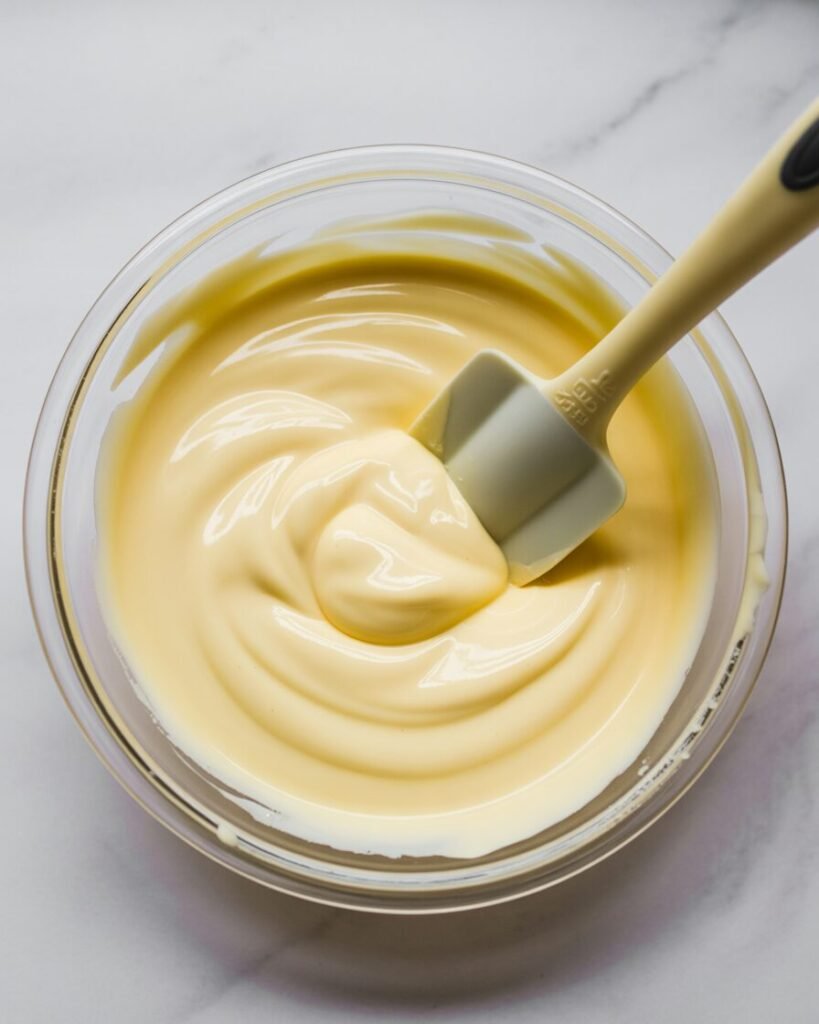
Microwave method: Heat the white chocolate in 20–25 second bursts, stirring between each.
Double boiler method: Place bowl over simmering (not boiling) water; stir constantly.
Target temp: 38–42°C (100–108°F).
Visual cue: Chocolate should look glossy, smooth, and pourable; no lumps.
Step 3 — Add oil + pinch of salt (10 seconds)
Stir gently to incorporate.
Visual cue: Mixture loosens slightly and flows like thick ribbon.
Step 4 — Spread the bark (1–2 minutes)
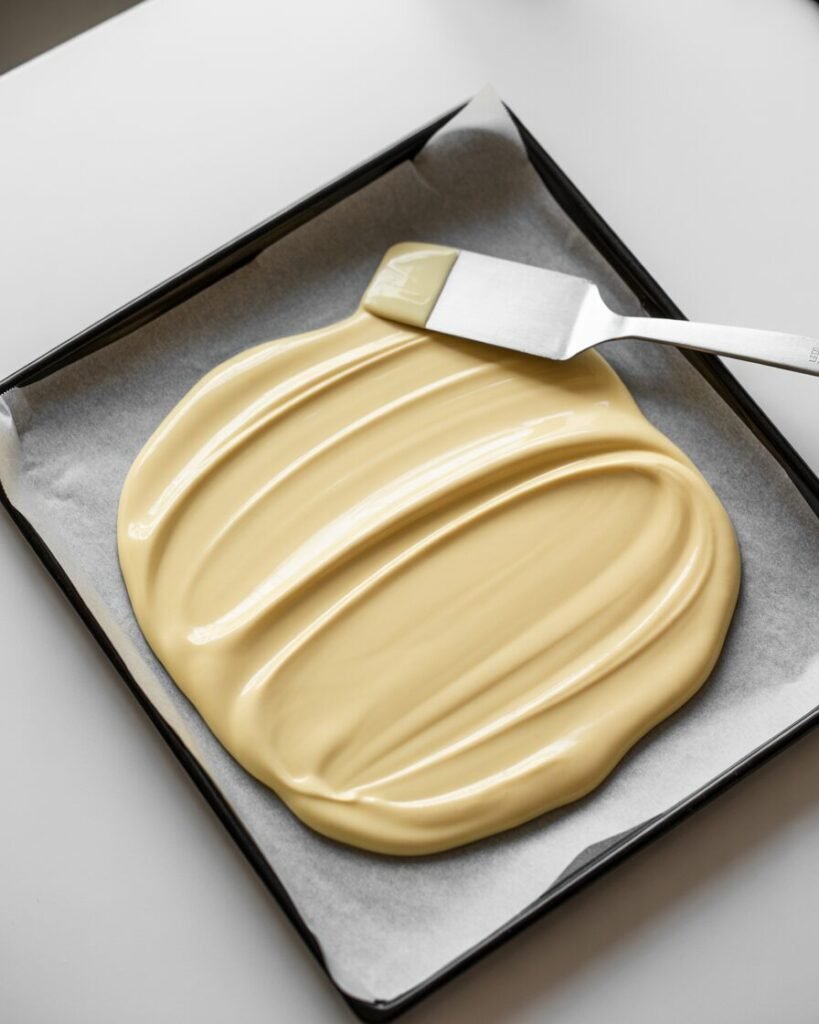
Pour onto the lined tray and spread to about 4–5 mm thickness.
Visual cue: Surface should look smooth; edges should not appear jagged.
Step 5 — Add silver sprinkles (1 minute)
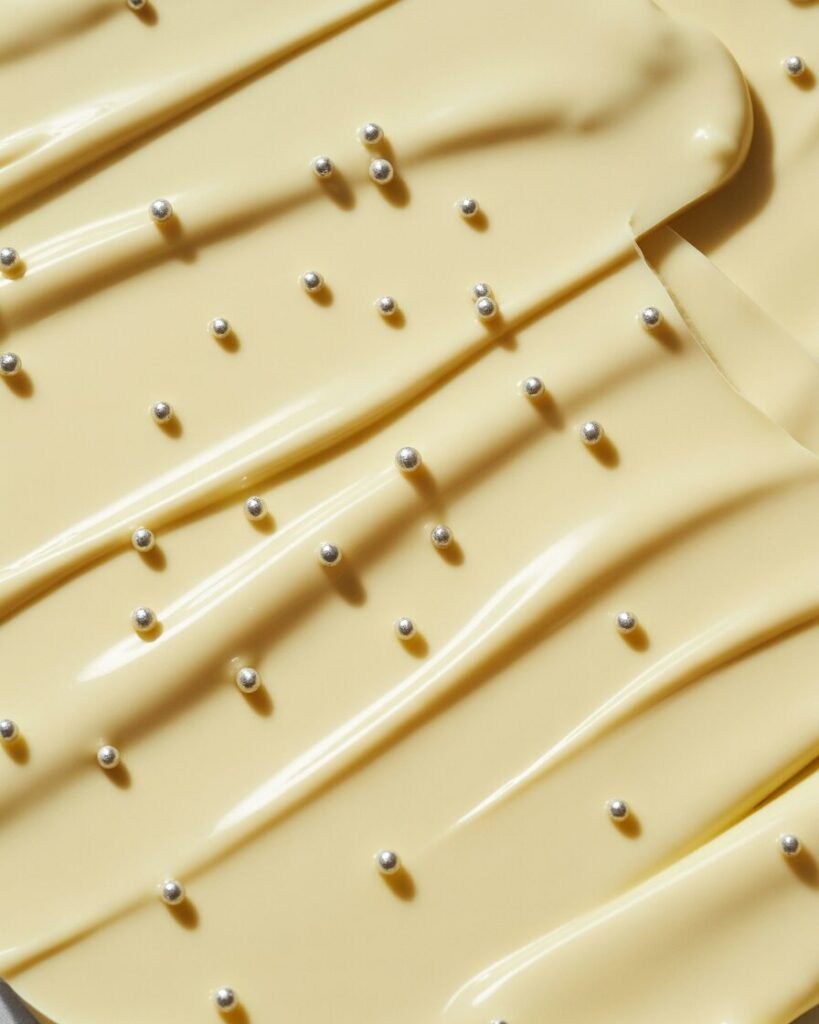
Scatter evenly across the surface; press gently to adhere.
Visual cue: Sprinkles sit flush without sinking.
Step 6 — Cool & set (45–60 minutes)
Let the bark set at room temperature.
Do not refrigerate unless your kitchen is extremely warm.
Visual cue: Bark looks matte and firm; edges lift cleanly from parchment.
Step 7 — Break into pieces
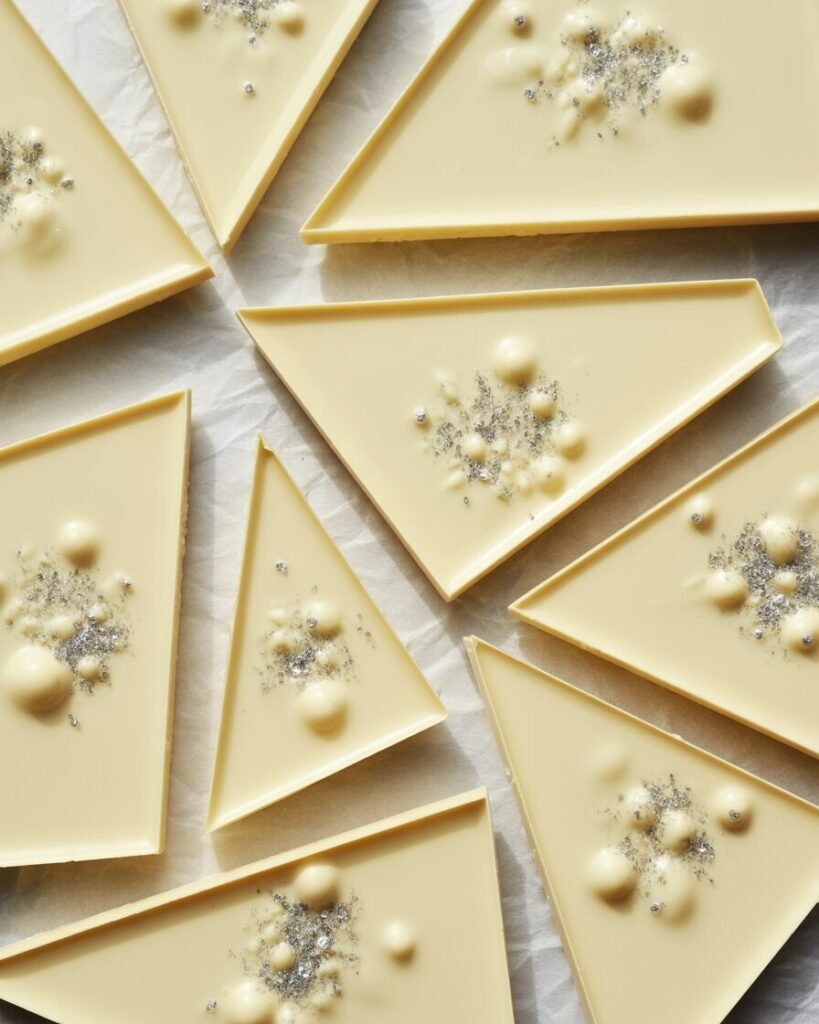
Lift parchment and snap into shards.
Visual cue: Crisp snap with clean edges — no crumbling.
Troubleshooting (Common Failures & Fixes)
Problem: Bark looks streaky or gray.
- Cause: Overheating chocolate.
- Fix: Keep melting temp below 43°C (110°F); melt slower next time.
Problem: Bark softens at room temp.
- Cause: Cheap compound chocolate with low cocoa butter.
- Fix: Use couverture or high-quality brands.
Problem: Chocolate seizes and becomes grainy.
- Cause: Water or steam contact.
- Fix: Keep bowl and utensils completely dry; melt via microwave.
Problem: Sprinkles fall off after setting.
- Cause: Chocolate started setting before decorating.
- Fix: Add sprinkles immediately after spreading.
Problem: Bark breaks unevenly.
- Cause: Uneven thickness.
- Fix: Spread to uniform thickness with an offset spatula.
Substitutions & Variations
Dietary Swaps
- Dairy-free: Use dairy-free white chocolate; note it melts faster — reduce heat slightly.
- Gluten-free: Choose certified gluten-free sprinkles.
- Sugar-free: Use sugar-free white chocolate sweetened with erythritol; bark will set slightly firmer.
Flavor Variations
- Cranberry Pistachio: Add 40 g chopped pistachios + 20 g dried cranberries.
- Peppermint Crunch: Add crushed peppermint candies (20–30 g).
- Marble Bark: Swirl in 50 g dark chocolate for contrast.
- Citrus: Add ½ tsp orange zest (avoid adding liquid juice).
Scaling
- For double batch, use a full sheet pan (18×13 in).
- For half batch, use an 8×8 in pan and reduce thickness slightly.
Storage, Make-Ahead & Freezing Guide
Room Temperature:
- Store in an airtight tin for 10–14 days.
- Keep away from heat and direct sunlight.
Fridge:
- Not recommended (causes condensation + sugar bloom).
- If necessary, store for max 3 days in airtight container.
Freezer:
- Freeze up to 2 months.
- Wrap bark in parchment + airtight bag.
- Thaw at room temp inside the bag to prevent moisture build-up.
Do not freeze: Sprinkles with metallic finish sometimes dull — harmless but aesthetic loss.
Serving Suggestions & Pairings
- Pack in gift boxes for holidays or wedding favors.
- Crumble over ice cream, cheesecake, or mousse.
- Serve alongside berries or sparkling drinks for an elegant dessert board.
FAQs
1. Can I use compound chocolate instead of real white chocolate?
Yes, but the bark will be slightly waxier. Real chocolate delivers better flavor and snap.
2. How do I prevent white chocolate from seizing?
Keep all tools dry and avoid overheating. Even a drop of water causes graininess.
3. Can I add food coloring?
Use oil-based color only. Water-based colors will seize the chocolate.
4. How do I double the recipe?
Simply double all ingredients and spread on a larger tray to maintain thickness.
5. Can I make this in an air fryer or OTG?
No heat source is needed — only melting. Use microwave or double boiler.
Notes From My Kitchen (Testing Log)
Batch 1: Overheated chocolate to 50°C — streaky finish. Lowered heat next time.
Batch 2: Spread too thin — resulted in brittle shards. Settled on 4–5 mm thickness.
Batch 3: Added oil — improved gloss and flow noticeably.
Batch 4: Let set in fridge — condensation dulled surface. Room-temp setting works best.
Final method: Gentle melting + room-temp set gave the most stable, glossy bark with smooth snap.
Nutrition & Disclaimer
Approx. per 25 g piece: 130 kcal, 7 g fat, 15 g carbs, 1 g protein.
Values are estimates; actual numbers vary by brand. Follow standard food-safety practices.
Conclusion / Final Thoughts
This Silver Sprinkle White Chocolate Bark proves that elegant sweets don’t require complicated techniques, expensive tools, or hours in the kitchen. With just a few ingredients and a little attention to melting temperature, you can create glossy, beautifully snappable bark that feels special every single time. Whether you’re gifting, entertaining, or simply treating yourself, this recipe is endlessly adaptable and reliably delicious. To conclude: take your time with the melt, spread evenly, let it set naturally — and enjoy every shiny silver bite.