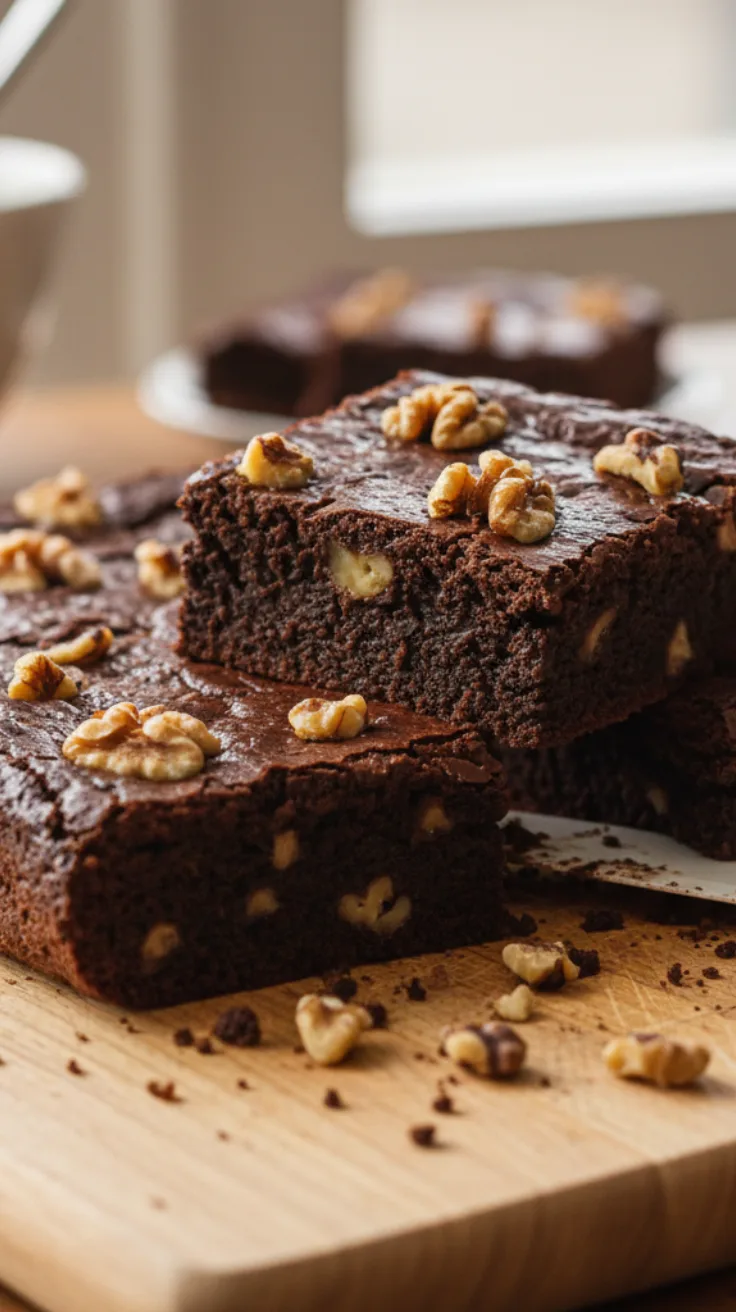
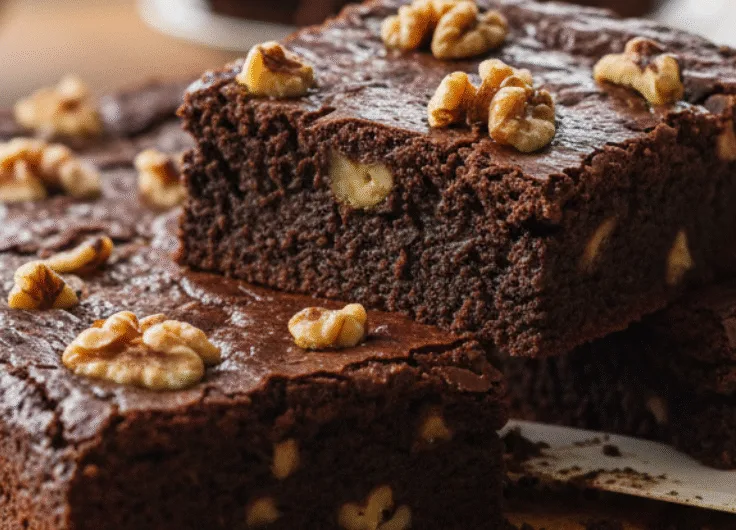
These walnut brownies are the kind of fudgy that clings to the knife, with a paper-thin, shiny crust on top and a toasted walnut crunch that cuts through the richness in every bite. The chocolate flavor runs deep, not too sweet, with a center that stays moist and just barely holds its shape. The edges? Chewy, but not cakey, there’s a difference, and it matters.
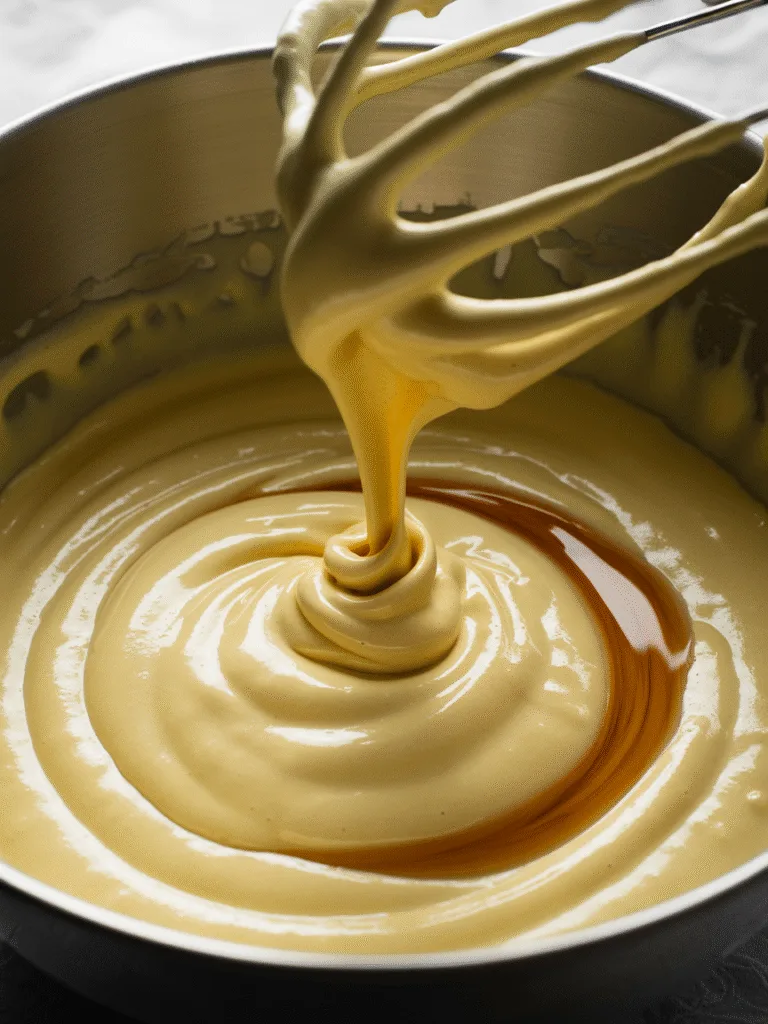
I’ve made these enough times to know what small changes do. That glossy top everyone loves it’s not luck. It comes from dissolving the sugar thoroughly in warm butter and melted chocolate before adding the eggs. When you whisk it, the mixture should turn thick and shiny, almost like wet paint. If it still feels grainy, keep going. A faint grit is okay, but mostly dissolved is the goal.
And mixing this is where things go sideways. I used to beat the batter like I was making cake, especially after adding the eggs. But that builds air, and air makes brownies rise too much. These aren’t supposed to rise. They’re meant to stay dense. Now I mix by hand, fold in the flour gently, and stop the second it disappears. Overmixing at that stage can push them toward a cakier texture, and once that happens, there’s no coming back.
Why this recipe works
Warm fat and sugar create a shiny crust
When granulated sugar dissolves into warm, melted butter and chocolate, it helps form a stable emulsion. That means more sugar reaches the surface during baking, drying into a thin, crackly top. It’s not just about looks the crust adds a slight resistance before the soft interior gives way. If your brownies come out dull on top, it’s likely the sugar didn’t dissolve enough, or the batter cooled before baking.
Low leavening and controlled mixing preserve fudginess
There’s no baking powder here. Structure comes from eggs and cocoa solids, not air. That keeps gluten development low, so the crumb stays tight and moist. I’ve tried adding a pinch of baking powder once—thought it would make them rise evenly. Instead, they turned light, almost bouncy. Not bad, but not what I wanted. This version stays dense, the way a good brownie should.
Cocoa plus real chocolate equals depth
Using both Dutch-process cocoa and 60–70% dark chocolate builds layers of flavor. Cocoa gives color and a smooth bitterness, while real chocolate melts into the batter and adds richness. I’ve tested with cocoa alone, and it tastes flat. Too much chocolate without cocoa, and it becomes one-note, overly sweet. Together, they balance each other especially when paired with toasted walnuts, which add earthiness without making it taste like a nut bar.
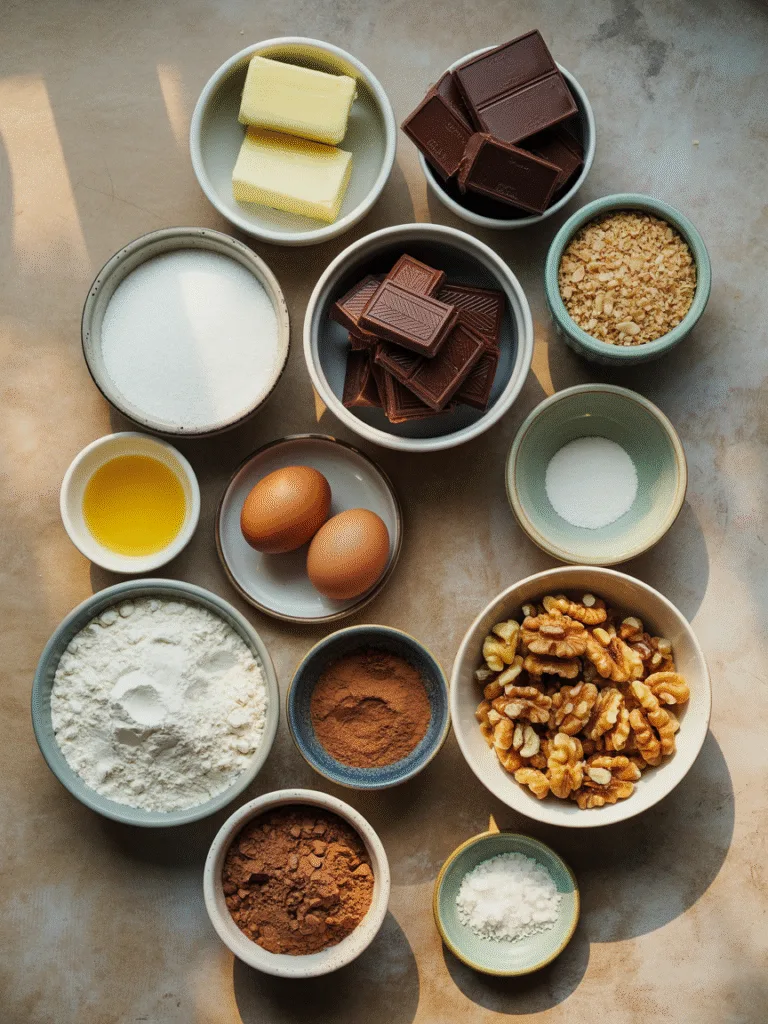
Ingredients (with weights and purpose)
Yield: 16 small squares or 9 large squares in an 8-inch (20 cm) square pan
- Unsalted butter — 170 g (12 tbsp) — adds richness and moisture; carries chocolate flavor and helps dissolve sugar evenly
- Dark chocolate 60–70% — 115 g (about 2/3 cup chopped) — gives body and sheen; melts into butter for a smooth, deep chocolate base
- Granulated sugar — 250 g (1 1/4 cups) — responsible for the shiny top and classic sweetness; dissolving it in warm fat improves emulsification
- Brown sugar (light) — 50 g (1/4 cup, packed) — adds moisture and a hint of caramel; helps keep centers fudgy
- Eggs — 2 large (100 g without shells) — provide structure and chew; emulsify fat and cocoa for a dense crumb
- Vanilla extract — 2 tsp — rounds out the bitterness of cocoa without standing out
- All-purpose flour — 95 g (3/4 cup, spooned and leveled) — minimal amount keeps texture fudgy; too much pushes it toward cake
- Dutch-process cocoa powder — 25 g (1/4 cup) — adds color and bittersweet depth; sifts easily to prevent lumps
- Fine sea salt — 1/2 tsp — balances sweetness and sharpens chocolate flavor
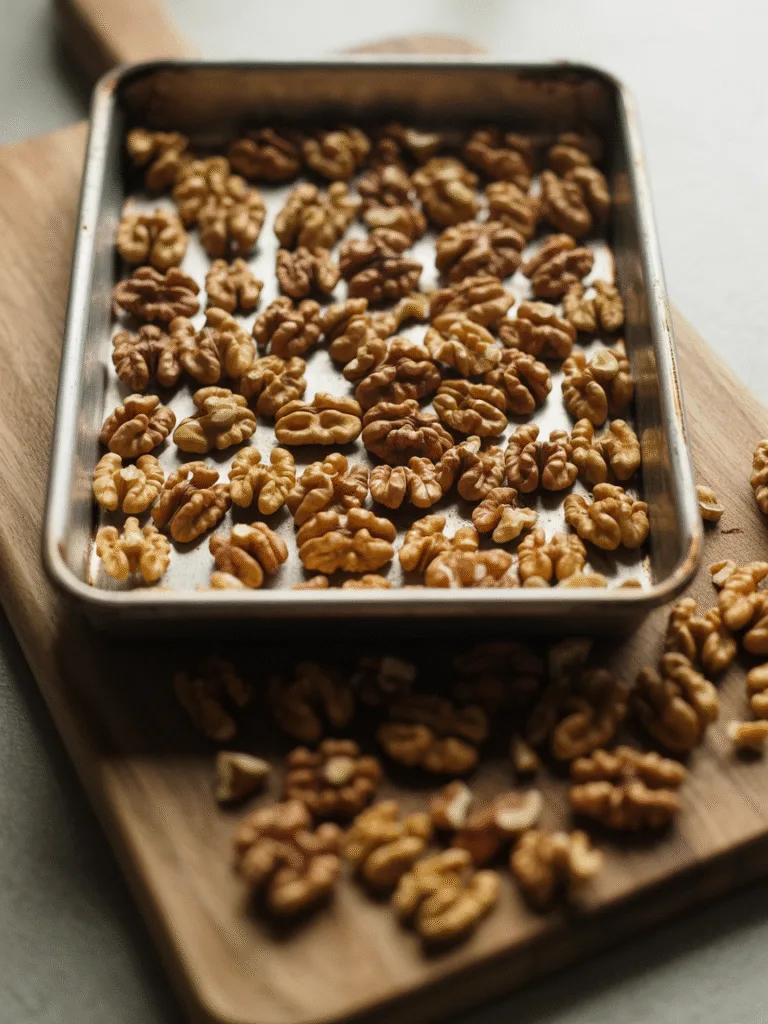
- Walnuts, toasted and roughly chopped — 120 g (1 cup) — bring crunch and nuttiness; toasting prevents sogginess
- Optional finish: A small pinch of flaky salt over the hot brownies for contrast
Ingredient notes
Dutch-process cocoa gives a darker color and smoother flavor. Natural cocoa can work, but the taste will be sharper and the color lighter—use the same weight. If your chocolate is 72% or higher, the bitterness may come through more. In that case, adding 15–20 g more granulated sugar can help balance it.
Equipment
Required:
- 8-inch (20 cm) square metal pan
- Medium heatproof bowl and saucepan (for double boiler) or microwave-safe bowl
- Whisk and rubber spatula
- Measuring scale (preferred) and cups/spoons
- Oven or OTG, oven thermometer if available
- Parchment paper
Nice-to-have:
- Offset spatula for leveling
- Fine mesh sieve for sifting dry ingredients
- Instant-read thermometer to check doneness
Step-by-step instructions with timing and visual cues
Oven/OTG setup
Preheat to 175°C (350°F) for at least 20 minutes. Place the rack in the middle. For OTG, use both rods, disable the fan if it browns too fast, and position the pan in the vertical center. Line the pan with a parchment sling (two strips) for easy removal.

Toast walnuts
Time: 6–8 minutes at 160°C (320°F), then cool.
Visual cue: walnuts darken slightly and smell nutty and warm—no scorching. Chop once cooled.
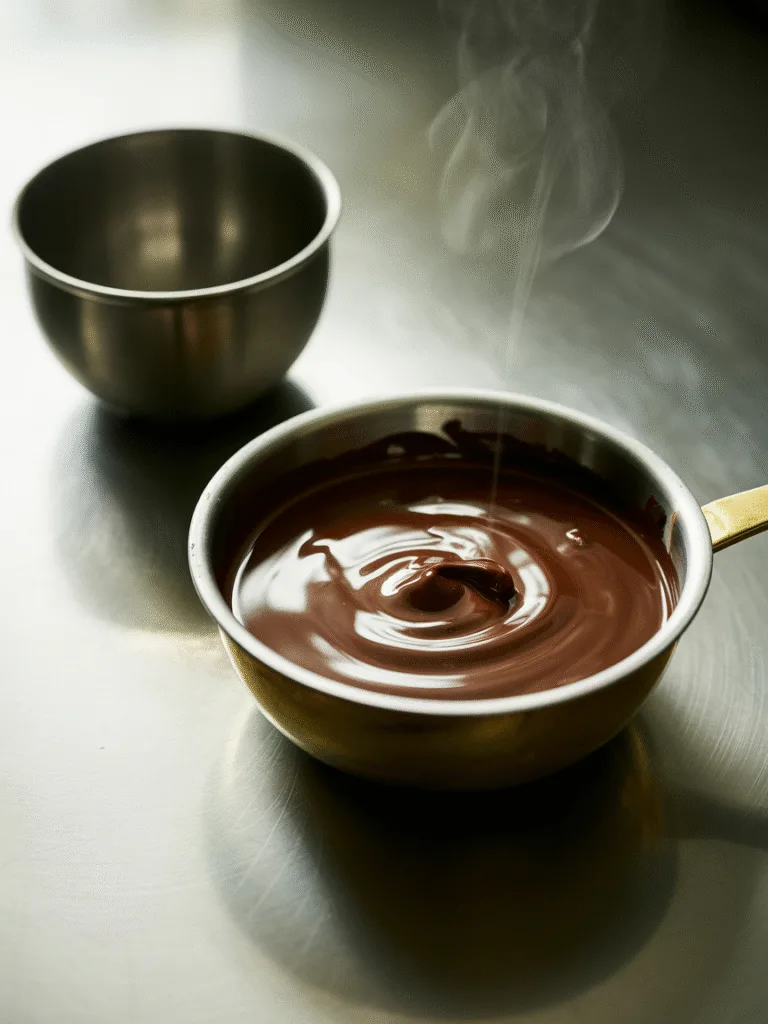
Melt chocolate and butter
Set a heatproof bowl over barely simmering water. Add butter and chopped chocolate, stir until fully melted and glossy. Or microwave in 20–30 second bursts, stirring each time.
Visual cue: smooth, shiny mixture with no specks; warm to touch but not hot.
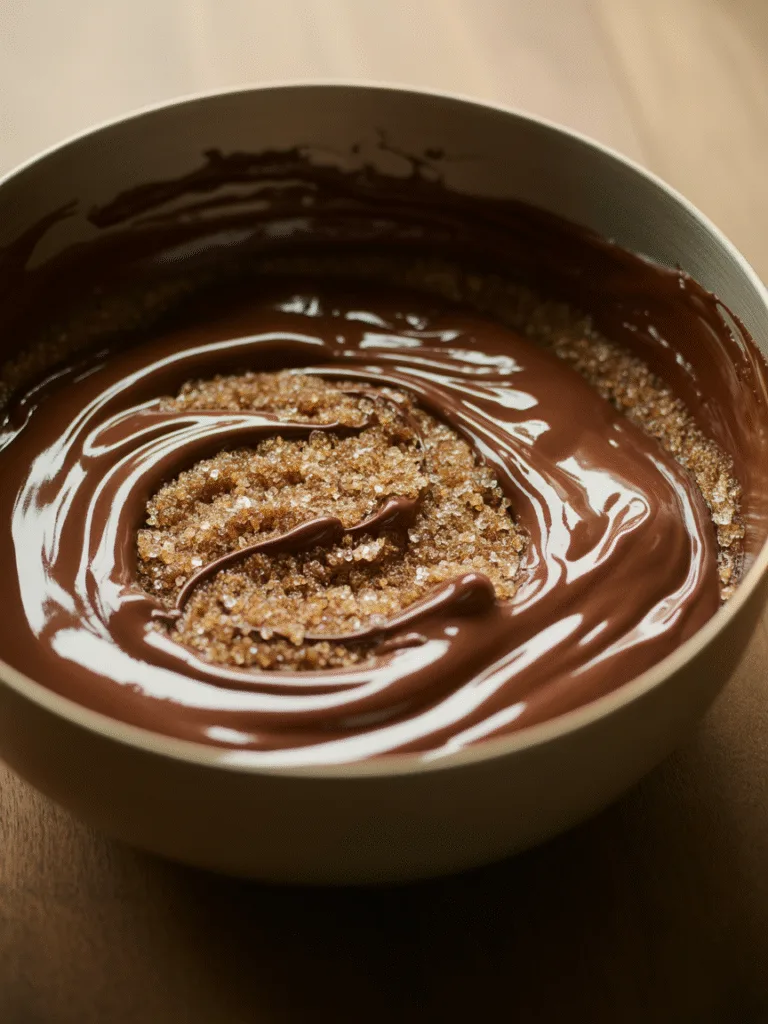
Dissolve sugars into warm chocolate-butter
Add both sugars to the warm mixture. Whisk 30–45 seconds until thickened and glossy. Let sit 2 minutes, then whisk again for 20 seconds.
Visual cue: viscous, shiny batter; grains mostly dissolved when rubbed between fingers.
Add eggs and vanilla
Whisk in eggs one at a time until fully incorporated. Add vanilla. Mix just until the batter looks cohesive and shiny—about 20–30 seconds per egg.
Checkpoint: lifting the whisk should create thick ribbons that slowly reabsorb in 5–7 seconds. If too runny, whisk 10 seconds more.
Sift and fold dry ingredients
Sift flour, cocoa, and salt directly over the batter. Switch to a spatula and fold gently.
Checkpoint: stop as soon as no dry flour is visible. Overmixing can lead to a cakier texture and tunneling.
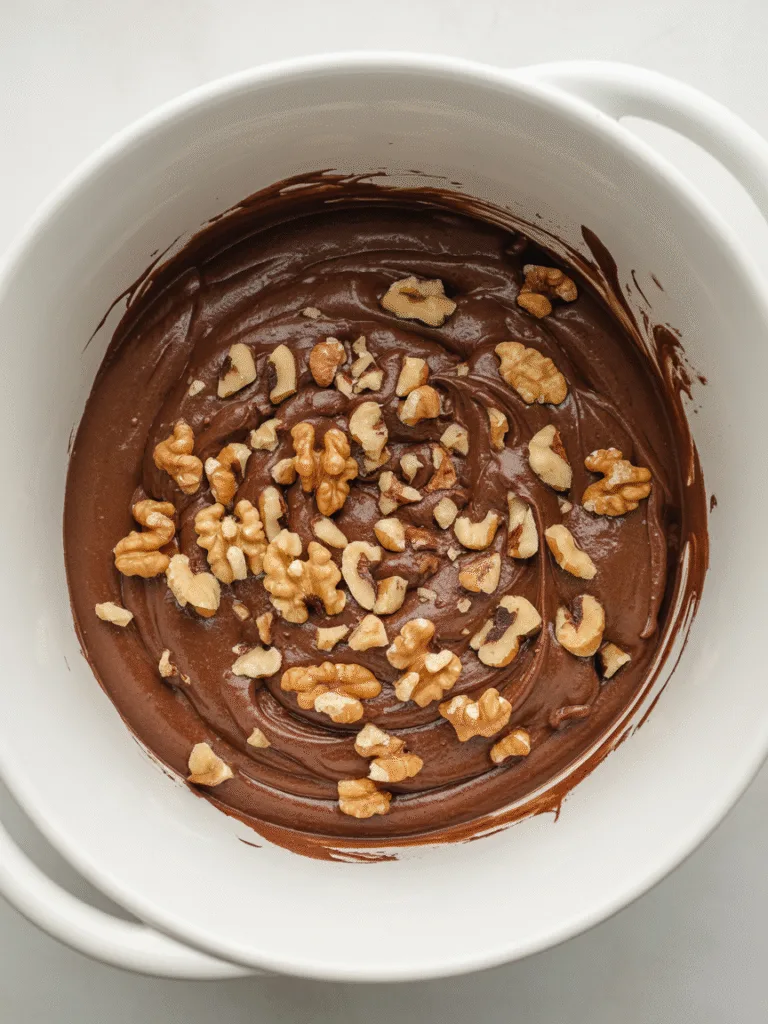
Fold in walnuts
Add toasted chopped walnuts, reserving a handful for the top if desired.
Visual cue: evenly distributed without deflating the batter’s sheen.
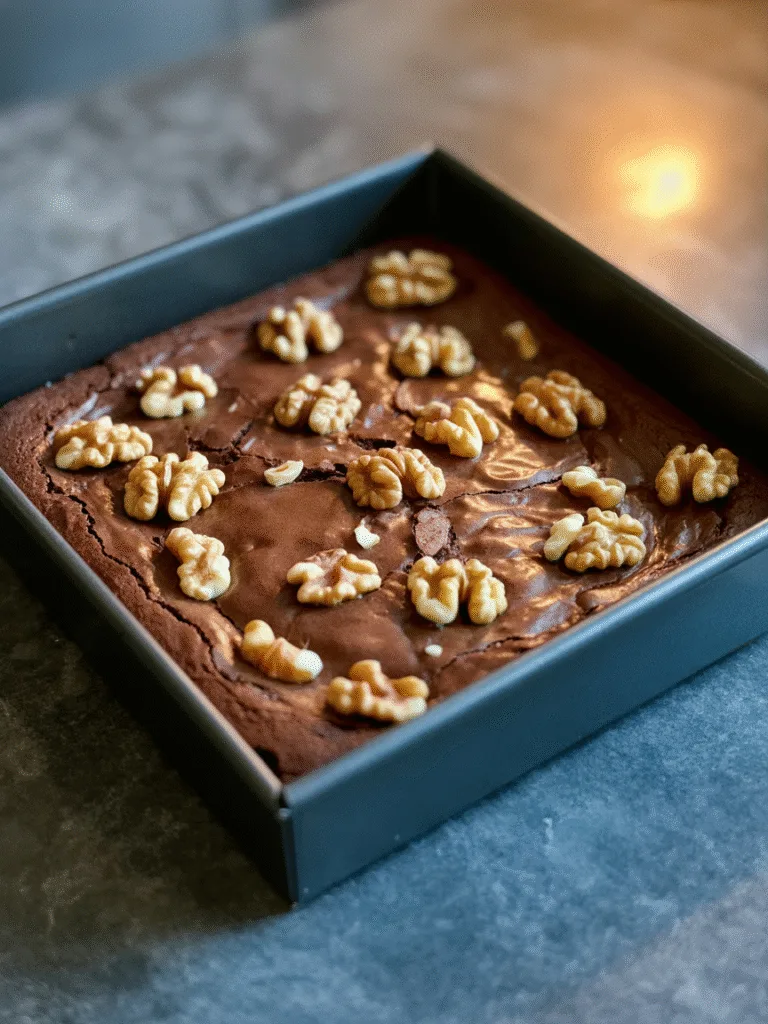
Pan and bake
Spread batter into the lined pan. Level with an offset spatula. Tap the pan firmly on the counter 2–3 times to remove large bubbles.
Bake at 175°C (350°F) for 22–28 minutes. Start checking at 22 minutes.
Doneness tests:
- Top is shiny and cracked in places
- Toothpick inserted 5 cm from the edge has a few moist crumbs; center may have a thin sticky smear, not wet batter
- Optional: internal temperature around 88–92°C (190–198°F) for fudgy texture
If using OTG with strong top heat, tent loosely with foil at minute 18.
Cool, slice, and finish
Cool in pan on a rack for 45–60 minutes until just warm. Lift out using parchment. Cut with a warm, dry knife, wiping between slices.
Optional: sprinkle flaky salt right after baking.
Troubleshooting: common failures and fixes
Dry, cakey brownies
Likely causes: overbaked by 5+ minutes, too much flour, or overmixed after adding flour.
Fix next time: weigh flour, stop folding immediately after flour disappears, pull at first sign of moist crumbs.
Gummy center that won’t set
Likely causes: underbaked by 5–8 minutes, oven running cool, or too much sugar without enough time.
Fix next time: bake to 88–92°C in the center, verify oven temp with a thermometer, extend bake in 2–3 minute increments.
No shiny crust
Likely causes: sugar not dissolved in warm fat, batter cooled before baking, or eggs overbeaten.
Fix next time: whisk sugars into warm butter-chocolate until glossy, avoid whipping eggs, get pan into oven promptly.
Tunneling or large holes
Likely causes: vigorous mixing after flour, or no degassing taps.
Fix next time: fold gently, tap pan 2–3 times before baking.
Bitter taste
Likely causes: over-toasted walnuts, cocoa weighed too heavily, or ultra-dark chocolate without sugar adjustment.
Fix next time: toast walnuts lightly, measure cocoa accurately, add 15–20 g extra sugar if using 72%+ chocolate.
Cracked, hard top but wet center
Likely causes: top heat too strong (OTG upper rod/fan), pan on upper rack.
Fix next time: use middle rack, tent with foil at minute 18, avoid fan or reduce to 165°C (330°F).
Substitutions and variations
Dietary swaps:
- Egg-free: Replace each egg with 60 g thick, unsweetened plain yogurt (120 g total), plus 1 tsp instant espresso. Bake 2–4 minutes longer. Texture will be slightly less chewy but still fudgy.
- Dairy-free: Use 170 g refined coconut oil or neutral vegetable oil; pick a dairy-free 60–70% chocolate bar. Expect a softer set—chill 30 minutes before slicing.
- Gluten-free: Substitute 95 g certified gluten-free all-purpose blend (with xanthan gum). Mix gently and bake toward the shorter end.
Ingredient swaps available in India/common markets:
- Butter: Amul or President unsalted work well. If using salted, reduce added salt to a pinch.
- Chocolate: Bournville 70% or couverture from Mason & Co. Chop finely for even melting.
- Cocoa: Dutch-process options like Hintz or Van Houten give the intended color and flavor.
Flavor variations:
- Espresso: Add 1–2 tsp instant espresso to warm butter-chocolate to deepen chocolate flavor.
- Orange-walnut: Add 1 tbsp finely grated orange zest with the eggs; finish with flaky salt.
- Double-chocolate: Fold in 90 g dark chocolate chunks with the walnuts.
- Cinnamon-walnut: Add 1 tsp ground cinnamon with the dry mix for warmth without cake-like sweetness.
Scaling:
- 9-inch (23 cm) square pan: Multiply all ingredients by 1.25; bake 25–32 minutes.
- Small batch loaf pan (8.5×4.5 in / 22×11 cm): Halve the recipe; bake 20–26 minutes.
- Cup-brownies (metal muffin tin): Fill two-thirds full; bake 14–18 minutes; expect more edge chew.
Storage, make-ahead, and freezing
- Counter: Store sliced brownies in an airtight container for 2–3 days at cool room temperature. Use parchment between layers.
- Fridge: Up to 5 days. Bring to room temp for 20–30 minutes or microwave for 10 seconds for best texture.
- Freezer: Up to 2 months. Wrap individual squares in parchment and foil, or use freezer bags. Thaw at room temp (1–2 hours) or overnight in the fridge.
- Refresh: Warm at 150°C (300°F) for 5–7 minutes for a just-baked feel.
- Do not freeze: Raw batter. The sugar-fat emulsion can break, leading to greasy results.
Serving suggestions and pairing ideas
Drizzle warm brownies with quick chocolate sauce or salted caramel for extra gloss and contrast. A scoop of vanilla ice cream works perfectly—the cold, creamy texture balances the dense fudge. Lightly sweetened whipped cream is another favorite. For a sharper cut, serve with fresh berries or orange segments.
FAQs
Can chocolate chips replace bar chocolate?
Yes—use 115 g dark chips with 1 tsp neutral oil to help melting. Some chips have stabilizers and may not melt as smoothly; whisk well and avoid overheating.
How to prevent cakey brownies?
Use the specified low flour amount, skip baking powder, and stop mixing once flour disappears. Pull the pan when a toothpick shows moist crumbs, not a clean stick.
Can the sugar be reduced?
Reduce granulated sugar by up to 10% (25 g) with minimal texture change. More reduction may mute the shiny top and make the crumb denser, slightly greasy.
How to double the recipe?
Double for a 9×13-inch pan and bake 28–35 minutes. Start checking at 26 minutes; look for shiny top and moist crumbs near the center.
Air fryer/OTG instructions?
For air fryer, use a metal pan that fits, preheat to 160°C (320°F), bake 16–22 minutes, checking early—airflow browns faster. For OTG, middle rack, both rods, tent if top darkens too quickly.
Notes from my kitchen (testing log)
- Batch 1: Used 85% chocolate without extra sugar. Result was too bitter, dull top. Adjustment: switched to 70%, added brown sugar for moisture and shine.
- Batch 2: Mixed vigorously after flour. Crumb turned cakey with tunnels. Adjustment: fold gently, stop when flour vanishes, tap pan before baking.
- Batch 3: Oven ran hot—edges overbaked, center perfect. Adjustment: calibrated temperature, moved rack to middle, used instant-read thermometer to pull at 90°C.
- Final: Warm sugar-fat emulsion, low flour, Dutch-process cocoa, baked at 175°C for 22–28 minutes delivers consistent fudginess and crackly top.
Nutrition and disclaimer
Approximate per serving (16 pieces): 240 kcal; 3 g protein; 14 g fat; 28 g carbs; 2 g fiber. Values are estimates from a standard calculator and vary by brand and portion size. Follow basic food-safety practices: cool completely before sealing, store airtight, and avoid cross-contamination on cutting boards.
Bakery‑Style Walnut Brownies: Chewy Edges, Fudgy Middle
Course: DessertCuisine: AmericanDifficulty: Easy4
servings25
minutes25
minutes275
kcal50
minutesCooling Time: 45–60 minutes
These walnut brownies are deeply fudgy, the kind that clings to the knife and has a paper-thin, crackly crust on top. The center stays moist and barely holds its shape, while the edges are chewy without veering into cakey territory. Toasted walnuts add a satisfying crunch that cuts through the richness, and the chocolate flavor is deep and balanced, not overly sweet. The secret to the shiny top? Dissolving the sugar thoroughly in warm butter and melted chocolate before adding the eggs. It’s a small step, but it makes all the difference.
Ingredients
170 g (12 tbsp) unsalted butter
115 g (about 2/3 cup chopped) dark chocolate
250 g (1 1/4 cups) granulated sugar
50 g (1/4 cup, packed) light brown sugar
2 large eggs (about 100 g without shells)
2 tsp vanilla extract
95 g (3/4 cup, spooned and leveled) all-purpose flour
25 g (1/4 cup) Dutch-process cocoa powder
1/2 tsp fine sea salt
120 g (1 cup) walnuts, toasted and roughly chopped
A pinch of flaky salt (optional, for topping)
Directions
- Oven Setup
Preheat oven to 175°C (350°F) for at least 20 minutes to stabilize heat.
For standard ovens: Place rack in the middle.
For OTG: Use both heating rods, disable fan if it browns too fast.
Line the pan with a parchment sling (two strips crossing) for easy removal. - Toast Walnuts
Bake at 160°C (320°F) for 6–8 minutes.
Cool completely before chopping.
Visual cue: Walnuts darken slightly and smell fragrant—no scorching. - Melt Chocolate and Butter
Double boiler method: Set bowl over barely simmering water. Add butter and chocolate. Stir until smooth and glossy.
Microwave method: Heat in 20–30 second bursts, stirring each time.
Visual cue: No specks, warm but not hot. - Dissolve Sugars
Add granulated and brown sugars to warm mixture.
Whisk 30–45 seconds until thickened and glossy.
Let sit 2 minutes, then whisk 20 seconds more.
Visual cue: Viscous, glossy batter; grains mostly dissolved. - Add Eggs and Vanilla
Whisk in eggs one at a time, fully incorporating each.
Add vanilla. Mix until batter is cohesive and shiny.
Checkpoint: Whisk should create thick ribbons that reabsorb in 5–7 seconds. - Sift and Fold Dry Ingredients
Sift flour, cocoa, and salt directly over batter.
Switch to spatula and fold gently.
Checkpoint: Stop as soon as no dry flour is visible. - Fold in Walnuts
Add toasted walnuts.
Reserve a small handful for topping if desired.
Visual cue: Evenly distributed without deflating sheen. - Pan and Bake
Spread into lined pan. Level with offset spatula.
Tap pan firmly on counter 2–3 times to remove air bubbles.
Bake at 175°C (350°F) for 22–28 minutes. - Cool and Slice
Cool in pan on rack for 45–60 minutes until just warm.
Lift out using parchment.
Cut with a warm, dry knife, wiping between slices.
Optional: Sprinkle flaky salt right after baking.
Notes
- Storage & Make-Ahead
Counter: Store in airtight container for 2–3 days. Use parchment between layers.
Fridge: Up to 5 days. Bring to room temp (20–30 min) or microwave 10 sec for softer texture.
Freezer: Up to 2 months. Wrap squares in parchment + foil or use freezer bags. Thaw at room temp (1–2 hours) or overnight in fridge.
Do not freeze batter—emulsion may separate. - Variations & Substitutions
Dietary Swaps:
Egg-free: Replace each egg with 60 g unsweetened plain yogurt (120 g total) + 1 tsp instant espresso. Bake 2–4 min longer.
Dairy-free: Use 170 g refined coconut oil + dairy-free 60–70% chocolate. Chill 30 min before slicing.
Gluten-free: Use 95 g certified GF all-purpose blend (with xanthan gum). Bake toward shorter end.